Android 플레이어 설정
This page details the Player Settings for the Android platform. For a description of the general Player settings, refer to Player Settings.

프로퍼티 문서는 플레이어 UI 섹션에 나열된 순서대로 그룹화되었습니다.
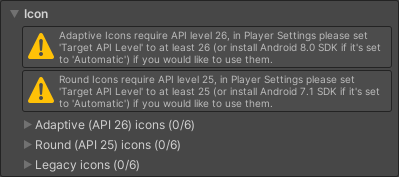
아이콘(Icon)
Icon 섹션을 사용하여 기기에서 애플리케이션을 나타내는 아이콘을 지정합니다.
| 설정 | 설명 |
|---|---|
| Adaptive | Android 8.0(API 레벨 26) 이상 버전이 탑재된 기기에서 애플리케이션을 나타내기 위해 다양한 크기의 텍스처를 지정합니다. |
| Round | Android 7.1(API 레벨 25) 이상을 실행하는 기기에서 애플리케이션을 나타내기 위해 다양한 크기의 텍스처를 지정합니다. |
| Legacy | Android 7.1(API 레벨 25) 이전 버전이 탑재된 기기에서 애플리케이션을 나타내기 위해 다양한 크기의 텍스처를 지정합니다. |
해상도(Resolution) 및 프리젠테이션(Presentation)
Resolution and Presentation 섹션에서 화면이 표시되는 모양에 대해 다음을 커스터마이즈할 수 있습니다.
| 설정 | 설명 | |
|---|---|---|
| Fullscreen Mode | 창이 기기에 표시되는 방식을 지정합니다. 시작 시 기본 창 모드를 설정합니다. | |
| Fullscreen Window | The application window fills the full-screen native resolution of the device. To fill the full-screen window, Unity scales the application contents. Resolution Scaling Mode controls how Unity scales the contents. In this mode, the navigation bar is always hidden. | |
| Windowed | 애플리케이션은 전체 화면이 아닌 이동 가능한 표준 창을 사용합니다. 창의 크기는 애플리케이션의 해상도에 따라 다릅니다. Windowed 모드에서 창의 크기는 기본적으로 변경 가능합니다. 이 옵션을 비활성화하려면 크기 조정 가능한 창을 비활성화하십시오. | |
| Resizable Window | Indicates whether the user can resize the application’s window. This setting enables multi-window capabilities in your application on Android phones and tablets. For more information, refer to Google’s developer documentation. |
|
| Default Window Width | 애플리케이션 창의 기본 너비(픽셀 단위)입니다. 이 옵션은 Fullscreen Mode가 Windowed로 설정된 경우에만 사용할 수 있습니다. | |
| Default Window Height | 애플리케이션 창의 기본 높이(픽셀 단위)입니다. 이 옵션은 Fullscreen Mode가 Windowed로 설정된 경우에만 사용할 수 있습니다. | |
| Minimum Window Width | 애플리케이션 창의 최소 너비(픽셀 단위)입니다. 이 옵션은 Fullscreen Mode가 Windowed로 설정된 경우에만 사용할 수 있습니다. | |
| Minimum Window Height | 애플리케이션 창의 최소 높이(픽셀 단위)입니다. 이 옵션은 Fullscreen Mode가 Windowed로 설정된 경우에만 사용할 수 있습니다. | |
| Hide Navigation Bar | 창 상단에 표시되는 내비게이션 바를 숨길지 여부를 나타냅니다. | |
| Render outside safe area | Indicates whether the application should use all available screen space to render, including areas of the display that are cut out (notched). For more information, refer to Android’s display cutout support documentation. | |
| Optimized Frame Pacing | Unity가 프레임 속도의 편차를 줄이기 위해 프레임을 균등하게 분배해야 하는지 여부를 나타냅니다. 이 옵션을 활성화하여 더욱 원활한 경험을 할 수 있습니다. | |
| Run In background | Enable this option to not pause the application when it loses focus. When disabled, the application pauses when it loses focus. | |
다른 Resolution and Presentation 설정은 다음 섹션에 그룹화되어 있습니다.
해상도 스케일링
Resolution Scaling 섹션을 사용하여 화면 해상도 스케일링과 관련된 설정을 커스터마이즈합니다. 기기의 네이티브 해상도보다 낮은 해상도를 사용하면 성능과 배터리 수명을 향상시킬 수 있습니다.
| 설정 | 설명 | |
|---|---|---|
| Resolution Scaling Mode | 애플리케이션이 해상도를 스케일할지 여부와 방법을 지정합니다. 스케일링을 네이티브 화면 해상도와 같거나 낮게 설정할 수 있습니다. 낮은 해상도를 사용하면 성능과 배터리 수명을 향상시킬 수 있습니다. | |
| Disabled | 해상도 스케일링을 적용하지 않고 애플리케이션이 기기의 네이티브 화면 해상도로 렌더링됩니다. | |
| FixedDPI | Applies resolution scaling using a target DPI. Use this to optimize performance and battery life or target a specific DPI setting. | |
| Letterboxed | Adds black bars to the rendered output so the content doesn’t stretch. This process is called letterboxing. | |
| Target DPI | 애플리케이션의 해상도입니다. 기기의 네이티브 화면 DPI가 이 값보다 높은 경우 Unity는 이 설정과 일치하도록 애플리케이션의 해상도를 다운스케일링합니다. Unity는 다음을 사용하여 스케일을 계산합니다.min(타겟 DPI * 인자 / 화면 DPI, 1)여기서 인자는 품질 설정의 해상도 스케일링 고정 DPI 인자입니다. 참고: 이 옵션은 Resolution Scaling Mode를 Fixed DPI로 설정한 경우에만 표시됩니다. |
|
| Reset resolution on window resize | Indicates whether to set the screen resolution to the new native window size when the native window size changes. If you set Resolution Scaling Mode to Fixed DPI, Unity recalculates the resolution based on Fixed DPI property. | |
| Blit Type | blit을 사용하여 최종 이미지를 화면에 렌더링할지 여부를 제어합니다. blit을 사용하는 것은 대부분의 기기와 호환되지만 일반적으로 blit을 사용하지 않는 것보다 느립니다. | |
| Always | Unity는 오프스크린 버퍼로 렌더링한 다음 blit을 사용하여 버퍼의 콘텐츠를 기기의 프레임 버퍼에 복사합니다. 이것은 대부분의 기기와 호환되지만 일반적으로 blit을 사용하지 않는 것보다 느립니다. | |
| Never | Unity는 기기의 운영체제에서 제공하는 프레임 버퍼로 렌더링합니다. 이 작업이 실패하면 애플리케이션은 기기 로그에 일회성 경고를 출력합니다. 이것은 일반적으로 blit을 사용하는 것보다 빠르지만 모든 장치와 호환되지는 않습니다. | |
| Auto | Unity는 가능한 경우 기기의 운영체제에서 제공하는 프레임 버퍼로 렌더링합니다. 이 작업이 실패하면 Unity는 기기 콘솔에 경고를 출력하고 blit을 사용하여 최종 이미지를 화면에 렌더링합니다. | |
지원되는 종횡비
Supported Aspect Ratio 섹션을 사용하여 지원할 기기의 종회비와 관련된 설정을 커스터마이즈합니다.
| 설정 | 설명 | |
|---|---|---|
| Aspect Ratio Mode | 애플리케이션이 지원하는 가장 큰 종횡비를 지정합니다. 기기의 종횡비가 이 종횡비보다 큰 경우 Unity는 애플리케이션에 이 종횡비를 사용하고 애플리케이션이 스트레치하지 않도록 검은색 바를 추가합니다. | |
| Legacy Wide Screen (1.86) | 애플리케이션은 Android의 레거시 와이드 스크린 종횡비까지 지원합니다. | |
| Native Aspect Ratio | 애플리케이션은 Android의 네이티브 종횡비까지 지원합니다. | |
| Custom | 애플리케이션은 Up To에서 설정한 종횡비까지 지원합니다. | |
| Minimum | The custom minimum aspect ratio. This value must be less than Maximum. This setting only appears when you set Aspect Ratio Mode to Custom. |
|
| Maximum | The custom maximum aspect ratio. This value must be greater than Minimum. This setting only appears when you set Aspect Ratio Mode to Custom. |
|
방향
Orientation 섹션을 사용하여 기기에서 애플리케이션 방향과 관련된 설정을 커스터마이즈합니다.
Default Orientation 드롭다운 메뉴에서 게임 화면의 방향을 선택할 수 있습니다.
| 설정 | 설명 | |
|---|---|---|
| Default Orientation | 애플리케이션에서 사용하는 화면 방향을 지정합니다. 참고: Unity는 사용자가 설정한 값을 Android와 iOS 간에 공유합니다. |
|
| Portrait | 애플리케이션의 창 하단과 기기의 화면 하단이 정렬되는 세로 화면 방향을 애플리케이션에서 사용합니다. | |
| Portrait Upside Down | 애플리케이션의 창 하단과 기기의 화면 상단이 정렬되는 세로 화면 방향을 애플리케이션에서 사용합니다. | |
| Landscape Right | 애플리케이션의 창 우측과 기기의 화면 하단이 정렬되는 가로 화면 방향을 애플리케이션에서 사용합니다. | |
| Landscape Left | 애플리케이션의 창 우측과 기기의 화면 상단이 정렬되는 가로 화면 방향을 애플리케이션에서 사용합니다. | |
| Auto Rotation | Allowed Orientations for Auto Rotation 섹션에서 지정한 방향으로 화면을 회전할 수 있습니다. | |
자동 회전 허용 방향
Allowed Orientations for Auto Rotation 섹션에서 Default Orientation을 Auto Rotation으로 설정하면 애플리케이션에서 지원하는 방향을 지정합니다. 예를 들어 애플리케이션은 가로 방향으로 잠겨있지만 사용자가 가로방향의 왼쪽과 오른쪽을 전환할 수 있도록 하는 데 유용합니다.
Default Orientation을 Auto Rotation으로 설정한 경우에만 이 섹션이 표시됩니다.
| 설정 | 설명 |
|---|---|
| Portrait | 애플리케이션의 창 하단과 기기의 화면 하단이 정렬되는 세로 화면 방향을 애플리케이션에서 지원하는지 여부를 나타냅니다. |
| Portrait Upside Down | 애플리케이션의 창 하단과 기기의 화면 상단이 정렬되는 세로 화면 방향을 애플리케이션에서 지원하는지 여부를 나타냅니다. |
| Landscape Right | 애플리케이션의 창 우측과 기기의 화면 하단이 정렬되는 가로 화면 방향을 애플리케이션에서 지원하는지 여부를 나타냅니다. |
| Landscape Left | 애플리케이션의 창 우측과 기기의 화면 상단이 정렬되는 가로 화면 방향을 애플리케이션에서 지원하는지 여부를 나타냅니다. |
기타
Resolution and Presentation 섹션에는 다음과 같은 일반적인 설정도 포함되어 있습니다.
| 설정 | 설명 | |
|---|---|---|
| Use 32-bit Display Buffer | 디스플레이 버퍼가 16비트 색상 값 대신 32비트 색상 값을 보유하는지 여부를 나타냅니다. 밴딩 현상이 보이거나 포스트 프로세싱 효과에서 알파 값이 필요한 경우 이 설정을 활성화합니다. 일부 포스트 프로세싱 효과는 디스플레이 버퍼와 포맷이 동일한 렌더 텍스처를 생성하기 때문에 이 옵션을 필요로 합니다. | |
| Disable Depth and Stencil | 뎁스 및 스텐실 버퍼를 비활성화할지 여부를 나타냅니다. | |
| Render Over Native UI | Android 또는 iOS에서 기본 UI 위에 렌더링할지 여부를 나타냅니다. 이 설정을 적용하려면 카메라의 Clear Flags를 알파 값이 1보다 작은 단색으로 설정합니다. | |
| Show Loading Indicator | 로딩 표시가 나타나는지 여부와 표시 방법을 지정합니다. | |
| Don’t Show | 로딩 표시를 나타내지 않습니다. | |
| Large | 로딩 표시를 크게 나타냅니다. | |
| Inversed Large | 로딩 표시를 색반전시키고 크게 나타냅니다. | |
| Small | 로딩 표시를 작게 나타냅니다. | |
| Inversed Small | 로딩 표시를 색반전시키고 작게 나타냅니다. | |
스플래시 이미지
Use the Virtual Reality Splash Image setting to select a custom splash image for Virtual Reality displays. For information on common Splash Screen settings, refer to Splash Screen.

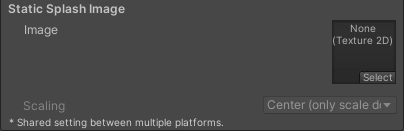
일반 스플래시 화면 설정 아래에서 Android 전용 Static Splash Image 를 설정할 수 있습니다.
| 설정 | 설명 | |
|---|---|---|
| Image | 애플리케이션에서 Android 스플래시 화면으로 사용할 텍스처를 지정합니다. 스플래시 화면 이미지의 표준 크기는 320x480입니다. | |
| Scaling | Specifies how to scale the splash image to fit the device’s screen. | |
| Center (only scale down) | 이미지가 너무 크지 않다면 네이티브 크기로 이미지를 드로우합니다. 이 경우 Unity는 이미지를 크기에 맞게 축소합니다. | |
| Scale to Fit (letter-boxed) | 이미지의 가로 또는 세로 중 비율상 더 긴 쪽을 화면 크기에 맞춰 스케일합니다. Unity는 짧은 쪽 주변의 남는 공간을 검은색으로 채웁니다. | |
| Scale to Fill (cropped) | 이미지의 가로 또는 세로 중 비율상 더 짧은 쪽을 화면 크기에 맞춰 스케일합니다. Unity는 화면에 맞지 않는 긴 쪽을 잘라냅니다. | |
기타 설정
이 섹션에서는 다음 그룹으로 분류된 다양한 옵션을 커스터마이즈할 수 있습니다.
렌더링(Rendering)
다음 설정을 사용하여 Unity가 Android 플랫폼용으로 게임을 렌더링하는 방법을 커스터마이즈합니다.
| Property | Description | |
|---|---|---|
| Color Space | Choose which color space to use for rendering. For more information, refer to Linear rendering overview. | |
| Gamma | Gamma color space is typically used for calculating lighting on older hardware restricted to 8 bits per channel for the framebuffer format. Even though monitors today are digital, they might still take a gamma-encoded signal as input. | |
| Linear | Linear color space rendering gives more precise results. When you select to work in linear color space, the Editor defaults to using sRGB sampling. If your Textures are in linear color space, you need to work in linear color space and deactivate sRGB sampling for each Texture. | |
| Auto Graphics API | Disable this option to manually pick and reorder the graphics APIs. By default, this option is enabled, and Unity tries to use Vulkan. If the device doesn’t support Vulkan, Unity falls back to GLES3.2, GLES3.1 or GLES3.0. Important: Unity adds the GLES3/GLES3.1/AEP/3.2 requirement to your Android App Manifest only if GLES2 isn’t in the list of APIs when Auto Graphics API is disabled. In this case only, your application doesn’t appear on unsupported devices in the Google Play Store. | |
| Graphics APIs | Specifies which graphics APIs the application supports. Unity tries to use the graphics API at the top of the list first and, if the device doesn’t support it, Unity falls back to the next graphics APIs in the list. This property is visible only when Auto Graphics API is set to false. |
|
| Vulkan | Adds Vulkan as an API to target. | |
| OpenGLES3 | Adds OpenGLES 3 as an API to target. | |
| Require ES3.1 | Indicates whether to require that the minimum OpenGL ES 3 minor version is 3.1. This property is visible only if you enable Auto Graphics API or if Graphics APIs includes OpenGLES3. |
|
| Require ES3.1+AEP | Indicates whether to require that the minimum OpenGL ES 3 minor version is 3.1+AEP. This property is visible only if you enable Auto Graphics API or if Graphics APIs includes OpenGLES3. |
|
| Require ES3.2 | Indicates whether to require that the minimum OpenGL ES 3 minor version is 3.2. This property is visible only if you enable Auto Graphics API or if Graphics APIs includes OpenGLES3. |
|
| Color Gamut | You can add or remove color gamuts to use for rendering. Click the plus (+) icon to see a list of available gamuts. A color gamut defines a possible range of colors available for a given device (such as a monitor or screen). The sRGB gamut is the default (and required) gamut. | |
| Multithreaded Rendering | Enable this option to use multithreaded rendering. This is only supported on Metal. | |
| Static Batching | Enable this option to use static batching. | |
| Dynamic Batching | Check this box to use Dynamic Batching on your build (enabled by default). | |
| Compute Skinning | Enable this option to use DX11/DX12/ES3 GPU compute skinning, which frees up CPU resources. | |
| Graphics Jobs (Experimental) | Enable this option to instruct Unity to offload graphics tasks (render loops) to worker threads running on other CPU cores. This is intended to reduce the time spent in Camera.Render on the main thread, which is often a bottleneck. Note: This feature is experimental. It may not deliver a performance improvement for your project, and may introduce new crashes. |
|
| Texture compression formats | Choose between ASTC, ETC2 and ETC (ETC1 for RGB, ETC2 for RGBA), DXTC and DXT + RGTC(BC4, BC5). Refer to texture compression format overview for more information on how to pick the right format. It’s possible to add multiple texture compression formats to this list for texture compression targeting support, however you can’t have both DXT and DXT + RGTC(BC4, BC5) in this list at the same time. If you enable texture compression targeting, Unity also enables, Split Application Binary. Refer to Texture compression settings for more details on how this interacts with the texture compression setting in the Build Settings. Note: If you export or build your application as an APK, Unity only uses the first texture compression format in this list. |
|
| Normal Map Encoding | Choose XYZ or DXT5nm-style to set the normal map encoding. This setting affects the encoding scheme and compression format used for normal maps. DXT5nm-style normal maps are of higher quality, but more expensive to decode in shaders. | |
| Lightmap Encoding | Defines the encoding scheme and compression format of the lightmaps. You can choose from Low Quality, Normal Quality, or High Quality |
|
| HDR Cubemap Encoding | Defines the encoding scheme and compression format of the HDR Cubemaps. You can choose from Low Quality, Normal Quality, or High Quality. For more information, refer to Lightmaps: Technical information. |
|
| Lightmap Streaming | Enable this option to use Mipmap Streaming for lightmaps. Unity applies this setting to all lightmaps when it generates them. Note: To use this setting, you must enable the Texture Streaming Quality setting. |
|
| Streaming Priority | Sets the priority for all lightmaps in the Mipmap Streaming system. Unity applies this setting to all lightmaps when it generates them. Positive numbers give higher priority. Valid values range from –128 to 127. |
|
| Frame Timing Stats | Enable this option to gather CPU/GPU frame timing statistics. | |
| Virtual Texturing | Indicates whether to enable Virtual Texturing. Note: Virtual Texturing isn’t compatible with Android. |
|
| Shader precision model | Controls the default precision of samplers used in shaders. For more information, refer to Shader data types and precision. | |
| 360 Stereo Capture | Indicates whether Unity can capture stereoscopic 360 images and videos. For more information, refer to Stereo 360 Image and Video Capture.Note: 360 stereoscopic capturing isn’t compatible with Android. | |
| Load/Store Action Debug Mode | Highlights undefined pixels that may cause rendering problems on mobile platforms. This affects the Unity Editor Game view, and your built application if you select Development Build in Build Settings. See LoadStoreActionDebugModeSettings. | |
| Editor Only | Indicates whether the Load/Store Action Debug Mode only runs in the Unity Editor. This property is visible only when Load/Store Action Debug Mode is set to true. |
|
Vulkan 설정
| Property | Description |
|---|---|
| SRGB Write Mode | 런타임 동안 Graphics.SetSRGBWrite() 렌더러가 sRGB 쓰기 모드를 토글할 수 있도록 허용하려면 이 옵션을 활성화합니다. 즉 Linear-to-sRGB 쓰기 색상 전환을 일시적으로 끄고자 할 경우 이 프로퍼티를 사용하면 됩니다. 이 프로퍼티를 활성화하면 모바일 타일 기반 GPU의 성능에 부정적인 영향을 주므로 모바일에서는 활성화하면 안 됩니다. |
| Number of swapchain buffers | 이중 버퍼링에 대해 이 옵션을 2로 설정하거나 Vulkan 렌더러를 함께 사용하려면 삼중 버퍼링에 대해 3으로 설정합니다. 이 설정은 일부 플랫폼의 지연에 도움이 될 수는 있지만 대부분의 경우 기본값인 3에서 변경해선 안 됩니다. 이중 버퍼링은 성능에 부정적인 영향을 줄 수 있습니다. Android에서는 이 설정을 사용하면 안 됩니다. |
| Acquire swapchain image late as possible | 활성화된 경우 Vulkan은 프레임을 오프스크린 이미지로 렌더링한 후가 될 때까지 백버퍼 획득을 지연합니다. Vulkan은 이를 위해 스테이징 이미지를 사용합니다. 이 설정을 활성화하면 백버퍼를 표시할 때 추가 blit이 발생합니다. 이 설정은 이중 버퍼링과 조합하여 사용하면 성능을 향상시킬 수 있습니다. 하지만 추가 blit이 대역폭을 차지하기 때문에 성능 문제를 일으킬 수도 있습니다. |
| Recycle command buffers | Unity에서 CommandBuffers를 실행한 후 재활용할지 해제할지 여부를 나타냅니다. |
| Apply display rotation during rendering | Enable this to perform all rendering in the native orientation of the display. This has a performance benefit on many devices. For more information, see documentation on Framebuffer orientation. |
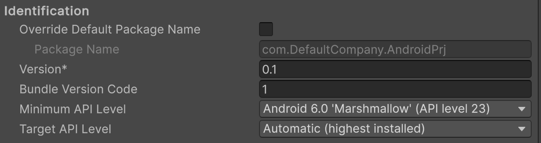
식별
| 프로퍼티 | 기능 |
|---|---|
| Override Default Package Name | Indicates whether to override the default package name for your application. Note: This setting affects macOS, iOS, tvOS, and Android. |
| Package Name | Set the application ID, which uniquely identifies your app on the device and in Google Play Store. The application ID must follow the convention com.YourCompanyName.YourProductName and must contain only alphanumeric and underscore characters. Each segment must start with an alphabetical character. For more information, refer to Set the application ID.Important: Unity automatically removes any invalid characters you type. To set this property, enable Override Default Package Name. |
| Version | Enter the build version number of the bundle, which identifies an iteration (released or unreleased) of the bundle. The version is specified in the common format of a string containing numbers separated by dots (For example, 4.3.2). (Shared between iOS and Android.) |
| Bundle Version Code | An internal version number. This number is used only to determine whether one version is more recent than another, with higher numbers indicating more recent versions. This isn’t the version number shown to users; that number is set by the versionName attribute. The value must be set as an integer, such as “100”. You can define it however you want, as long as each successive version has a higher number. For example, it could be a build number. Or you could translate a version number in “x.y” format to an integer by encoding the “x” and “y” separately in the lower and upper 16 bits. Or you could simply increase the number by one each time a new version is released. Keep this number under 100000 if Split APKs by target architecture is enabled. Each APK must have a unique version code so Unity adds 100000 to the number for ARMv7, and 200000 for ARM64. |
| Minimum API Level | 애플리케이션을 실행하는 데 필요한 최소 Android 버전(API 레벨)입니다. |
| Target API Level | 애플리케이션을 컴파일하는 데 사용할 타겟 Android 버전(API 레벨)입니다. |
설정
| Property | Description | |
|---|---|---|
| Scripting Backend | Choose the scripting backend you want to use. The scripting backend determines how Unity compiles and executes C# code in your Project. | |
| Mono | Compiles C# code into .NET Common Intermediate Language (CIL) and executes that CIL using a Common Language Runtime. For more information, refer to Mono. | |
| IL2CPP | Compiles C# code into CIL, converts the CIL to C++ and then compiles that C++ into native machine code, which executes directly at runtime. For more information, refer to IL2CPP. | |
| API Compatibility Level | Choose which .NET APIs you can use in your project. This setting can affect compatibility with third-party libraries. However, it has no effect on Editor-specific code (code in an Editor directory, or within an Editor-specific Assembly Definition). Tip: If you are having problems with a third-party assembly, you can try the suggestion in the API Compatibility Level section below. |
|
| .Net Framework | Compatible with the .NET Framework 4 (which includes everything in the .NET Standard 2.0 profile plus additional APIs). Choose this option when using libraries that access APIs not included in .NET Standard 2.0. Produces larger builds and any additional APIs available aren’t necessarily supported on all platforms. For more information, refer to Referencing additional class library assemblies. | |
| .Net Standard 2.1 | Produces smaller builds and has full cross-platform support. | |
| Editor Assemblies Compatibility Level | Select which .NET APIs to use in your Editor assemblies. | |
| .NET Framework | Compatible with the .NET Framework 4 (which includes everything in the .NET Standard 2.1 profile plus additional APIs). Choose this option when using libraries that access APIs not included in .NET Standard 2.1. Produces larger builds and any additional APIs available aren’t necessarily supported on all platforms. For more information, refer to Referencing additional class library assemblies. | |
| .NET Standard | Compatible with .NET Standard 2.1. Produces smaller builds and has full cross-platform support. | |
| IL2CPP Code Generation | Defines how Unity manages IL2CPP code generation. Note: To use this, set Scripting Backend to IL2CPP. |
|
| C++ Compiler Configuration | Choose the C++ compiler configuration used when compiling IL2CPP generated code. | |
| Debug | Debug configuration turns off all optimizations, which makes the code quicker to build but slower to run. | |
| Release | Release configuration enables optimizations, so the compiled code runs faster and the binary size is smaller but it takes longer to compile. | |
| Master | Master configuration enables all possible optimizations, squeezing every bit of performance possible. For instance, on platforms that use the MSVC++ compiler, this option enables link-time code generation. Compiling code using this configuration can take significantly longer than it does using the Release configuration. Unity recommends building the shipping version of your game using the Master configuration if the increase in build time is acceptable. | |
| Use incremental GC | Uses the incremental garbage collector, which spreads garbage collection over several frames to reduce garbage collection-related spikes in frame duration. For more information, refer to Automatic Memory Management. | |
| Allow downloads over HTTP | Indicates whether to allow downloading content over HTTP. The default option is Not allowed due to the recommended protocol being HTTPS, which is more secure. | |
| Not Allowed | Never allow downloads over HTTP. | |
| Allowed in Development Builds | Only allow downloads over HTTP in development builds. | |
| Always Allowed | Allow downloads over HTTP in development and release builds. | |
| Mute Other Audio Sources | Indicates whether your Unity application should stop audio from applications running in the background. Otherwise, Audio from background applications continues to play alongside your Unity application. | |
| Target Architectures | Specifies which architecture to target. | |
| ARMv7 | Enable support for ARMv7 architecture. | |
| ARM64 | Enable support for ARM64 architecture. | |
| x86 (ChromeOS) | Enable support for x86 architecture. | |
| x86–64 (ChromeOS and Magic Leap 2) | Enable support for x86–64 architecture. | |
| Enable Armv9 Security Features for Arm64 | Enable Pointer Authentication (PAuth, PAC) and Branch Target Identification (BTI) for Arm64 builds. This property is visible only when Arm64 is set to true. |
|
| Split APKs by target architecture | Enable this option to create a separate APK for each CPU architecture selected in Target Architectures. This makes download size smaller for Google Play Store users. This is primarily a Google Play store feature and may not work in other stores. For more details, refer to Multiple APK Support. | |
| Target Devices | Specifies the target devices on which the APK is allowed to run. | |
| All Devices | The APK is allowed to run on all Android and ChromeOS devices. | |
| Phones, Tablets, and TV Devices Only | The APK is allowed to run on Android phones, tablets, and TVs, but not on ChromeOS devices. | |
| ChromeOS Devices Only | The APK is allowed to run on ChromeOS devices, but not on Android phones or tablets. | |
| Install Location | Specifies application install location on the device (for detailed information, refer to Android Developer documentation on install locations.) | |
| Automatic | Let the operating system decide. User will be able to move the app back and forth. | |
| Prefer External | Install the application to external storage (SD card) if possible. The operating system doesn’t guarantee it; if not possible, the app will be installed to internal memory. | |
| Force Internal | Force the application to be installed to internal memory. The user will be unable to move the app to external storage. | |
| Internet Access | Choose whether to always add the networking (INTERNET) permission to the Android App Manifest, even if you aren’t using any networking APIs. Set to Require by default for development builds. |
|
| Auto | Only add the internet access permission if you are using a networking API. | |
| Require | Always add the internet access permission. | |
| Write Permission | Choose whether to enable write access to the external storage (such as the SD card) and add a corresponding permission to the Android App Manifest. Set to External(SDCard) by default for development builds. | |
| Internal | Only grant write permission to internal storage. | |
| External(SDCard) | Enable write permission to external storage. | |
| Filter Touches When Obscured | Enable this option to discard touches received when another visible window is covering the Unity application. This is to prevent tapjacking. | |
| Sustained Performance Mode | Enable this option to set a predictable and consistent level of device performance over longer periods of time, without thermal throttling. Overall performance might be lower when this setting is enabled. Based on the Android Sustained Performance API. | |
| Maximum Java Heap Size | Set the maximum Java heap size to user for building (in megabytes). Defaults to 4096. | |
| Low Accuracy Location | Enable this option to use low accuracy values with Android location APIs instead. | |
| ChromeOS Input Emulation | ChromeOS’s default behaviour is to convert mouse and touchpad input events into touchscreen input events. Un-check this setting to disable the default behavior. | |
| Android TV Compatibility | Enable this option to mark the application as Android TV compatible. | |
| Android Game | Enable this option to mark the output package (APK) as a game rather than a regular application. This property is visible only when Android TV Compatibility is set to true. |
|
| Android Gamepad Support Level | Choose the level of support your application offers for a gamepad. This property is visible only when Android TV Compatibility is set to true. |
|
| Works with D-Pad | The application is fully operational with a D-pad. No gamepad is needed. | |
| Supports Gamepad | The application works with a gamepad, but doesn’t require it. | |
| Requires Gamepad | The application requires a gamepad to use. | |
| Warn about App Bundle size | Enable this option to receive a warning when the size of the Android App Bundle exceeds a certain threshold. This option is selected by default and you can only configure it if you enable the Build App Bundle (Google Play) option in the Build settings. | |
| App Bundle size threshold | Enter a size in Mb. When your App Bundle exceeds this size, Unity will display a warning. | |
| Application Entry Point | The application entry points to generate for your application. For more information, refer to Android application entry points. | |
| Activity | Generate an Activity application entry point. | |
| GameActivity | Generate a GameActivity application entry point. | |
| Active Input Handling | Choose how to handle input from users. | |
| Input Manager (Old) | Uses the traditional Input settings. | |
| Input System Package (New) | Uses the Input system. This option requires you to install the InputSystem package. | |
| Both | Use both systems. | |
Shader Variant Loading
Use these settings to control how much memory shaders use at runtime.
| 설정 | 설명 |
|---|---|
| Default chunk size (MB) | Sets the maximum size of compressed shader variant data chunks Unity stores in your built application for all platforms. The default is 16. For more information, refer to Shader loading. |
| Default chunk count | Sets the default limit on how many decompressed chunks Unity keeps in memory on all platforms. The default is 0, which means there’s no limit. |
| Override | Enables overriding Default chunk size and Default chunk count for this build target. |
| Chunk size (MB) | Overrides the value of Default chunk size (MB) on this build target. |
| Chunk count | Overrides the value of Default chunk count on this build target. |
API 호환성 레벨
You can choose your mono API compatibility level for all targets. Sometimes a third-party .NET library uses functionality that’s outside of your .NET compatibility level. To understand what’s going on in such cases, and how to best fix it, try following these suggestions:
- Windows용 ILSpy를 설치합니다.
- 문제가 있는 API 호환성 수준의 .NET 어셈블리를 ILSpy로 드래그합니다. .NET 어셈블리는
Frameworks/Mono/lib/mono/YOURSUBSET/에 있습니다. - 서드파티 어셈블리를 드래그합니다.
- 서드파티 어셈블리를 마우스 오른쪽 버튼으로 클릭하고 Analyze를 선택합니다.
- In the analysis report, inspect the Depends on section. The report highlights anything that the third-party assembly depends on, but that’s not available in the .NET compatibility level of your choice in red.
스크립트 컴파일

| 프로퍼티 | 설명 |
|---|---|
| Scripting Define Symbols | Sets custom compilation flags. For more details, see Platform dependent compilation. |
| Additional Compiler Arguments | Adds entries to this list to pass additional arguments to the Roslyn compiler. Use one new entry for each additional argument. To create a new entry, click Add (+). To remove an entry, click Remove (-). When you have added all desired arguments, click Apply to include your additional arguments in future compilations. Click Revert to reset this list to the most recent applied state. |
| Suppress Common Warnings | Indicates whether to display the C# warnings CS0169 and CS0649. |
| Allow ‘unsafe’ Code | Enables support for compiling ‘unsafe’ C# code in a pre-defined assembly (for example, Assembly-CSharp.dll). For Assembly Definition Files ( .asmdef), click on one of your .asmdef files and enable the option in the Inspector window that appears. |
| Use Deterministic Compilation | Indicates whether to prevent compilation with the -deterministic C# flag. With this setting enabled, compiled assemblies are byte-for-byte identical each time they are compiled. For more information, see Microsoft’s deterministic compiler option. |
| Enable Roslyn Analyzers | Indicates whether to compile user-written scripts without Roslyn analyzer DLLs that might be present in your project. |
최적화(Optimization)
| Property | Description | |
|---|---|---|
| Prebake Collision Meshes | Adds collision data to Meshes at build time. | |
| Preloaded Assets | Sets an array of Assets for the player to load on startup. To add new Assets, increase the value of the Size property and then set a reference to the Asset to load in the new Element box that appears. |
|
| Strip Engine Code | Enable this option if you want the Unity Linker tool to remove code for Unity Engine features that your Project doesn’t use. This setting is only available with the IL2CPP scripting backend. Most apps do not use every available DLL. This option strips out DLLs that your app doesn’t use to reduce the size of the built Player. If your app is using one or more classes that would normally be stripped out under your current settings, Unity displays a debug message when you try to build the app. | |
| Managed Stripping Level | Chooses how aggressively Unity strips unused managed (C#) code. When Unity builds your app, the Unity Linker process can strip unused code from the managed DLLs your Project uses. Stripping code can make the resulting executable smaller, but can sometimes remove code that’s in use. For more information about these options and bytecode stripping with IL2CPP, refer to ManagedStrippingLevel. |
|
| Minimal | Use this to strip class libraries, UnityEngine, Windows Runtime assemblies, and copy all other assemblies. | |
| Low | Remove unreachable managed code to reduce build size and Mono/IL2CPP build times. | |
| Medium | Run UnityLinker to reduce code size beyond what Low can achieve. You might need to support a custom link.xml file, and some reflection code paths might not behave the same. | |
| High | UnityLinker will strip as much code as possible. This will further reduce code size beyond what Medium can achieve but managed code debugging of some methods might no longer work. You might need to support a custom link.xml file, and some reflection code paths might not behave the same. | |
| Enable Internal Profiler (Deprecated) | This feature is deprecated and will be retired in a future version of Unity. Use the Profiler window instead (menu: Window > Analytics > Profiler). The Profiler collects application performance data and prints a report to the console. The report contains the number of milliseconds each Unity subsystem takes to execute on each frame, averaged across 30 frames. |
|
| Vertex Compression | Sets vertex compression per channel. This affects all the meshes in your project. Typically, Vertex Compression is used to reduce the size of mesh data in memory, reduce file size, and improve GPU performance. For more information on how to configure vertex compression and limitations of this setting, refe to Compressing mesh data. |
|
| Optimize Mesh Data | Enable this option to strip unused vertex attributes from the mesh used in a build. This option reduces the amount of data in the mesh, which can help reduce build size, loading times, and runtime memory usage. Warning: If you have this setting enabled, don’t change material or shader settings at runtime. For more information, refer to PlayerSettings.stripUnusedMeshComponents. |
|
| Texture MipMap Stripping | Enables mipmap stripping for all platforms. It strips unused mipmaps from Textures at build time. Unity determines unused mipmaps by comparing the value of the mipmap against the quality settings for the current platform. If a mipmap value is excluded from every quality setting for the current platform, then Unity strips those mipmaps from the build at build time. If QualitySettings.masterTextureLimit is set to a mipmap value that has been stripped, Unity will set the value to the closest mipmap value that hasn’t been stripped. |
|
로깅(Logging)
특정 컨텍스트에서 허용할 로깅 유형을 선택합니다.

- Select your preferred stack trace method by enabling the option that corresponds to each Log Type (Error, Assert, Warning, Log, and Exception) based on the type of logging you require. For example:
-
ScriptOnly: Logs only when running scripts.
-
Full: Logs all the time.
-
None: No logs are ever recorded.
-
ScriptOnly: Logs only when running scripts.
자세한 내용은 스택 추적 로깅을 참조하십시오.
레거시
SkinnedMeshRenderers의 블렌드 셰이프 가중치 범위를 고정하려면 Clamp BlendShapes (Deprecated) 옵션을 활성화합니다.
퍼블리싱 설정(Publishing Settings)
Use the Publishing Settings to configure how Unity builds your Android app. To open the Publishing Settings, go to Edit > Project Settings, select Player, select the Android icon, and open the Publishing Settings panel.
이 섹션에서는 Publishing Settings 패널의 다양한 구성 요소와 해당 기능에 대해 설명합니다. 여기에는 다음이 포함됩니다.

참고: 보안상의 이유로 Unity는 키스토어 또는 프로젝트 키 비밀번호를 저장하지 않습니다.
Use the Keystore Manager window to create, configure and load your keys and keystores. You can load existing keystores and keys from either the Keystore Manager or the main Android Publishing panel. If you choose to load these from inside the Keystore Manager, Unity automatically fills the Project Keystore and Project Key fields. For further information see documentation on the Keystore Manager.
프로젝트 키스토어
A keystore is a container that holds signing keys for application security. For details, refer to Android developer documentation: Android keystore system.
Use the Project Keystore settings to choose which keystore to use for the open project. When you load a keystore, Unity loads all the keys in that keystore. To load and use an existing keystore in your open project:
- Custom Keystore를 활성화합니다.
- Select 드롭다운에서 Browse를 선택한 후 파일 시스템에서 키스토어를 선택합니다.
- 키스토어 비밀번호를 입력합니다.
기존 키스토어가 없으면 Custom Keystore를 비활성화 상태로 두십시오.
Unity uses a debug keystore to sign your application. A debug keystore is a working keystore. It allows you to sign the application and to test it locally. However, the app store will decline apps signed in this way. This is because the app store is unable to verify the validity and ownership of the application using a debug keystore.
| 프로퍼티 | 설명 |
|---|---|
| Custom Keystore | Custom Keystore를 활성화하면 기존 키스토어를 로드하여 사용할 수 있습니다. |
| Select | When Custom Keystore is enabled, use this to select the keystore you want to use. The keystores below the partition in the Select dropdown are stored in a predefined dedicated location. For more details, refer to Choose the keystore location. |
| Path | You don’t need to enter your keystore path. Unity provides this based on the keystore you choose. |
| Password | 선택한 키스토어를 로드하기 위한 키스토어 비밀번호를 입력합니다. |
프로젝트 키
When you load a keystore, Unity loads all the keys in that keystore. Use the Project Key settings to choose one key from that keystore to use as the active key for the open project.
| 프로퍼티 | 설명 |
|---|---|
| Alias | 열린 프로젝트에 사용할 키를 선택합니다. |
| Password | 키 비밀번호를 입력합니다. |
빌드
기본적으로 Unity는 Unity 설치와 함께 제공되는 매니페스트 파일, Gradle 템플릿, Proguard 파일을 사용하여 애플리케이션을 빌드합니다. Android 퍼블리싱 설정의 Build 섹션을 사용하여 변경할 수 있습니다.
커스텀 매니페스트 파일이나 Gradle 템플릿 또는 Proguard 파일을 사용하려면 다음 단계를 따르십시오.
- 해당 체크박스를 선택합니다. 그러면 Unity가 프로젝트에 기본 파일을 생성하고, 해당 파일 위치가 체크박스 아래에 나타납니다.
- 새 파일을 열고 변경 작업을 수행합니다.
- 변경 사항을 이 파일에 저장합니다. Unity는 다음 번에 애플리케이션을 빌드할 때 이 파일에 저장된 변경 사항을 자동으로 사용합니다.
Build 섹션의 설정은 현재 프로젝트의 빌드 프로세스에만 적용됩니다.
| 프로퍼티 | 설명 |
|---|---|
| Upgrade templates to C# | Opens the Android Templates Upgrader window which you can use to upgrade your custom Gradle template files to use the Android Project Configuration Manager. |
| Custom Main Manifest | Customizable version of the Android LibraryManifest.xml file. This file contains important metadata about your Android application. For more information about the responsibilities of the Main/Unity Library Manifest refer to Unity Library Manifest. |
| Custom Unity Launcher Manifest | Customizable version of the Android LauncherManifest.xml file. This file contains important metadata about your Android application’s launcher. For more information about the responsibilities of the Unity Launcher Manifest refer to Unity Launcher Manifest. |
| Custom Main Gradle Template | Customizable version of the mainTemplate.gradle file. This file contains information on how to build your Android application as a library. For more information refer to the documentation on Gradle project files. |
| Custom Launcher Gradle Template | Customizable version of the launcherTemplate.gradle file. This file contains instructions on how to build your Android application. For more information refer to the documentation on Gradle project files. |
| Custom Base Gradle Template | Customizable version of the baseProjectTemplate.gradle file. This file contains configuration that’s shared between all other templates and Gradle projects. For more information, refer to the documentation on Gradle project files. |
| Custom Gradle Properties Template | Customizable version of the gradle.properties file. This file contains configuration settings for the Gradle build environment. This includes: • The JVM (Java Virtual Machine) memory configuration. • A property to allow Gradle to build using multiple JVMs. • A property for choosing the tool to do the minification. • A property to not compress native libs when building an app bundle. |
| Custom Gradle Settings Template | Customizable version of the settingsTemplate.gradle file. This file contains declaration of artifact repositories to resolve external dependencies required for your application. |
| Custom Proguard File | Customizable version of the proguard.txt file. This file contains configuration settings for the minification process. If minification removes some Java code which should be kept, you should add a rule to keep that code in this file. For more information refer to the documentation on Minification. |
축소
축소는 애플리케이션의 코드를 축소, 난독화 및 최적화하는 프로세스입니다. 이를 통해 코드 크기를 줄이고, 코드를 분해하기 어렵게 만들 수 있습니다. Minify 설정을 사용하여 Unity가 빌드에 축소를 적용할 시기와 방법을 정의하십시오.
대개의 경우 디버그 빌드가 아니라 릴리스 빌드에만 축소를 적용하는 것이 좋습니다. 축소 프로세스는 시간이 다소 걸리고 빌드 속도가 느려질 수 있기 때문입니다. 또한 코드가 수행하는 최적화로 인해 디버깅이 더 복잡해질 수 있습니다.
Minify 섹션의 설정은 현재 프로젝트의 빌드 프로세스에만 적용됩니다.
| 프로퍼티 | 설명 |
|---|---|
| Release | Unity가 릴리스 빌드에서 애플리케이션 코드를 축소하도록 만들려면 이 체크박스를 활성화합니다. |
| Debug | Unity가 디버그 빌드에서 애플리케이션 코드를 축소하도록 만들려면 이 체크박스를 활성화합니다. |
애플리케이션 바이너리 분할
출력 패키지를 메인(APK) 및 확장(OBB) 패키지로 분할하려면 Split Application Binary 옵션을 활성화합니다. 100MB가 넘는 애플리케이션을 Google Play 스토어에 퍼블리시하는 경우 이 옵션을 활성화해야 합니다.
Report Dependencies in App Bundle
Enable this option to include information about dependencies in App Bundle if you’re planning to build your application as Android App Bundle (AAB) for Google Play. For more information, refer to Report App Dependencies section.
Note: You can only interact with this setting if you enable Build App Bundle (Google Play) option in Android Build Settings.
- Unity 5.5에서 업데이트된 기능
- Unity 2017.3에서 Sustained Performance Mode 추가됨
- 2018.1에서 .NET 4.x 런타임 추가됨
- Unity 2018.2에서 Android Multiple APK 기능 추가됨
- 2019.1에서 Android용 OpenGL ES 3.2 지원 추가됨 NewIn20191
- Unity 2019.1에 입력 시스템 프리뷰 추가됨
- Unity 2019.1에서 Render outside safe area 추가됨
- Unity 2019.2에서 앱 번들 크기 옵션에 대한 경고 추가됨
- Unity 2019.3에서 GPU 스키닝의 이름이 컴퓨트 스키닝으로 변경됨
- Unity 2019.3에서 Vuforia 제거됨
- Unity 2019.3에서 빌트인 XR SDK에 대한 지원이 중단됨NewIn20193
- 텍스처 압축 포맷 업데이트됨
PlayerSettingsAndroid
Copyright © 2023 Unity Technologies
优美缔软件(上海)有限公司 版权所有
"Unity"、Unity 徽标及其他 Unity 商标是 Unity Technologies 或其附属机构在美国及其他地区的商标或注册商标。其他名称或品牌是其各自所有者的商标。
公安部备案号:
31010902002961