UWP Player settings
To access the Universal Windows Platform (UWP) Player settings, go to Edit > Preferences > Project Settings > Player from the main menu in Unity. Use the Player settings to determine how Unity builds and displays your final application. For a description of the general Player settings, refer to Player Settings.
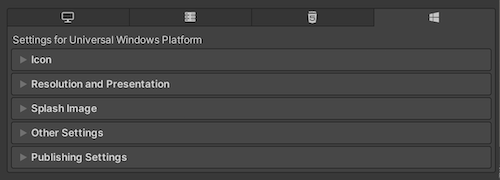
프로퍼티 문서는 플레이어 UI 섹션에 나열된 순서대로 그룹화되었습니다.
아이콘(Icon)
Use the Icon settings to customize the branding for your app on the Microsoft Store.
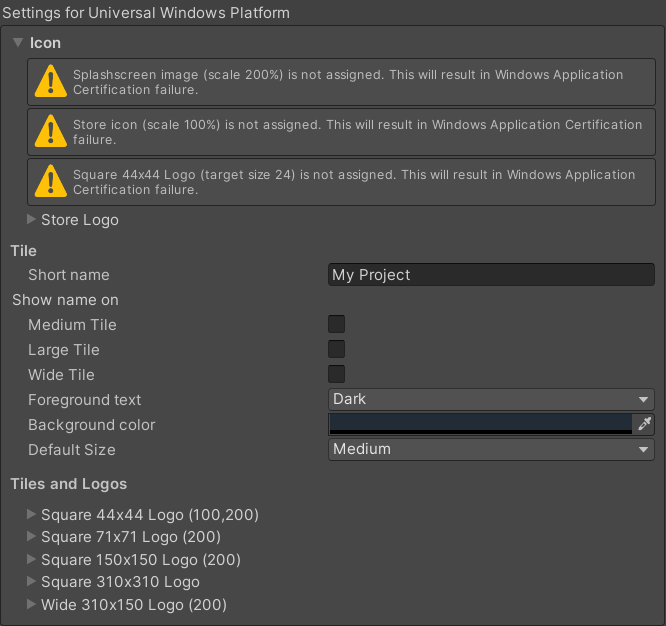
The Icon section displays warnings for any images that are required for certification but haven’t been assigned. A UWP application must specify icon and logo images as part of the package before you can submit it to the Microsoft Store.
Note: You can also choose the image types and their sizing within the API. For more information, refer to PlayerSettings.WSAImageType and PlayerSettings.WSAImageScale.
애플리케이션의 스토어 설명 페이지에 표시되는 이미지를 지정하려면 Store Logo 섹션을 펼칩니다. 최대 8가지의 해상도를 추가할 수 있습니다.
Tile
Customize the general appearance of your Microsoft Store tiles with these settings:
| 프로퍼티 | 설명 | |
|---|---|---|
| Short name | Sets an abbreviated name for the app. | |
| Show name on | Indicates each icon image you want the name to appear on: Medium Tile, Large Tile, or Wide Tile. | |
| Foreground text | Chooses whether to use Light or Dark text on the app’s Tile. | |
| Background color | Specifies what color to use for the background. | |
| Default Size | Chooses which size you want to use as the default size for the Tile. | |
| Not Set | 기본 크기를 사용하지 않습니다. | |
| Medium | 중간 크기를 사용합니다. | |
| Wide | 폭이 넓은 크기를 사용합니다. | |
Unity는 이러한 옵션을 Package.appxmanifest 파일에 바로 복사합니다.
Tiles and Logos
Specify the images your tiles display on the Microsoft Store with these settings:
| 프로퍼티 | 설명 |
|---|---|
| Square 44x44 Logo | 앱 타일에서 사용할 44x44 크기의 로고 이미지를 설정합니다. 최대 10가지의 해상도를 설정할 수 있습니다. |
| Square 71x71 Logo | 앱 타일에서 사용할 71x71 크기의 로고 이미지를 설정합니다. 최대 5가지의 해상도를 설정할 수 있습니다. |
| Square 150x150 Logo | 앱 타일에서 사용할 150x150 크기의 로고 이미지를 설정합니다. 최대 5가지의 해상도를 설정할 수 있습니다. |
| Square 310x310 Logo | 앱 타일에서 사용할 310x310 크기의 로고 이미지를 설정합니다. 최대 5가지의 해상도를 설정할 수 있습니다. |
| Wide 310x150 Logo | 앱 타일에서 사용할 310x150 크기의 로고 이미지를 설정합니다. 최대 5가지의 해상도를 설정할 수 있습니다. |
해상도(Resolution) 및 프리젠테이션(Presentation)
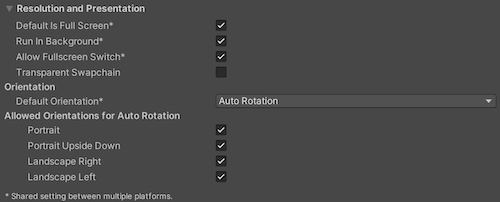
Resolution and Presentation 섹션에서 화면이 표시되는 모양에 대해 다음을 커스터마이즈할 수 있습니다.
| 프로퍼티 | 설명 |
|---|---|
| Default is Full Screen | Sets the app window to the full-screen native display resolution, covering the whole screen. This mode is also known as borderless full-screen. Unity renders the app content at the resolution set by a script, or the native display resolution if none is set and scales it to fill the window. When scaling, Unity adds black bars to the rendered output to match the display aspect ratio to prevent content stretching. This process is called letterboxing. |
| Run In Background | Indicates whether to keep the game running (rather than pausing) if the app loses focus. |
| Allow Fullscreen Switch | Indicates whether to allow default OS full-screen key presses to toggle between full-screen and windowed modes. |
| Transparent Swapchain | Indicates whether to set AlphaMode on the swap chain to DXGI_ALPHA_MODE_PREMULTIPLIED. This setting is used only for UWP projects that use the XAML build type. By enabling this setting, you can compose Unity content with other XAML content in your application. For more information, refer to PlayerSettings.WSA.transparentSwapchain. |
방향
Default Orientation 드롭다운 메뉴에서 게임 화면의 방향을 선택할 수 있습니다.
| Property | Description | |
|---|---|---|
| Default Orientation | Specifies the screen orientation the application uses. | |
| Portrait | The application uses portrait screen orientation where the bottom of the application’s window aligns with the bottom of the device’s screen. | |
| Portrait Upside Down | The application uses portrait screen orientation where the bottom of the application’s window aligns with the top of the device’s screen. | |
| Landscape Right | The application uses landscape screen orientation where the right side of the application’s window aligns with the bottom of the device’s screen. | |
| Landscape Left | The application uses landscape screen orientation where the right side of the application’s window aligns with the top of the device’s screen. | |
| Auto Rotation | The screen can rotate to any of the orientations you specify in the Allowed Orientations for Auto Rotation section. | |
자동 회전 허용 방향
Allowed Orientations for Auto Rotation 섹션에서 Default Orientation을 Auto Rotation으로 설정하면 애플리케이션에서 지원하는 방향을 지정합니다. 예를 들어 애플리케이션은 가로 방향으로 잠겨있지만 사용자가 가로방향의 왼쪽과 오른쪽을 전환할 수 있도록 하는 데 유용합니다.
This section is visible only when Default Orientation is set to Auto Rotation. Enable each orientation by checking its box in this section:
| Property | Description |
|---|---|
| Portrait | Indicates whether the application supports portrait screen orientation where the bottom of the application’s window aligns with the bottom of the device’s screen. |
| Portrait Upside Down | Indicates whether the application supports portrait screen orientation where the bottom of the application’s window aligns with the top of the device’s screen. |
| Landscape Right | Indicates whether the application supports landscape screen orientation where the right side of the application’s window aligns with the bottom of the device’s screen. |
| Landscape Left | Indicates whether the application supports landscape screen orientation where the right side of the application’s window aligns with the top of the device’s screen. |
스플래시 이미지(Splash Image)
Above the common Splash Screen settings, the Player Settings settings allow you to specify splash images for UWP.

Use the Virtual Reality Splash Image property to select a custom splash image to display in Virtual Reality displays.
일반적인 스플래시 화면 설정 아래에 다음과 같이 몇 가지 섹션이 더 있습니다.
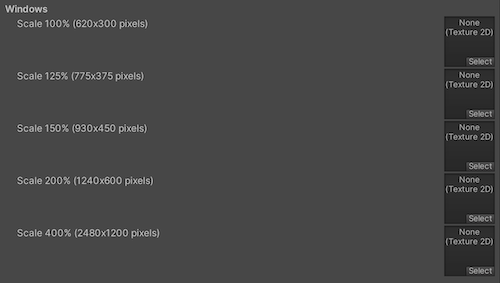
Windows
Set the foreground image to use in your app’s splash screen. You can add up to seven different resolutions.
Windows Holographic
다음 설정을 사용하여 Mixed Reality 애플리케이션의 홀로그래픽 스플래시 이미지를 커스터마이즈합니다.

시작 시 표시할 Holographic Splash Image를 설정합니다. 이 이미지는 5초 동안 또는 앱이 로딩을 완료할 때까지 표시됩니다.
추적 손실
A Mixed Reality headset needs to build world-locked coordinate systems from its environment to allow holograms to stay in position. Tracking loss occurs when the headset loses track of where it is (can’t locate itself) in the world. This leads to a breakdown in spatial systems (spatial mapping, spatial anchors, spatial stages).
이러한 현상이 발생하면 Unity에서 홀로그램 렌더링이 중단되고, 게임이 일시중지되며 알림이 표시됩니다. On Tracking Loss Pause and Show Image 프로퍼티를 활성화한 다음 Tracking Loss Image 프로퍼티로 표시될 이미지를 선택하여 알림에 나타나는 이미지를 커스터마이즈할 수 있습니다.
For more information, refer to Recommended settings for Unity.
배경색 덮어쓰기
While your application initializes, UWP shows a Splash screen that appears before the Made with Unity Splash screen. It’s best practice to match the UWP Splash screen background to the Splash screen image because it’s more visually appealing. The default color is black.
To overwrite the UWP specific Splash screen background color:
- Go to Player Settings > Splash Screen and enable Overwrite Background Color.
- Choose a color from the Background Color selector.
If you overwrite the default background color, Unity changes the color value in the application manifest. If you are using the XAML application type, Unity also sets the color value in the initial XAML page.

기타 설정
이 섹션에서는 다음 그룹으로 분류된 다양한 옵션을 커스터마이즈할 수 있습니다.
렌더링(Rendering)
Use these settings to customize how Unity renders your game for UWP.
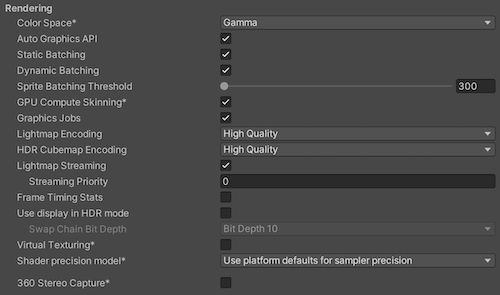
| Property | Description | |
|---|---|---|
| Color Space | Choose which color space to use for rendering. For more information, refer to Linear rendering overview. | |
| Gamma | Gamma color space is typically used for calculating lighting on older hardware restricted to 8 bits per channel for the framebuffer format. Even though monitors today are digital, they might still take a gamma-encoded signal as input. | |
| Linear | Linear color space rendering gives more precise results. When you select to work in linear color space, the Editor defaults to using sRGB sampling. If your Textures are in linear color space, you need to work in linear color space and deactivate sRGB sampling for each Texture. | |
| Auto Graphics API | Indicates whether to manually pick and reorder the graphics APIs. By default this option is enabled, and Unity uses Direct3D11. | |
| Static Batching | Enable this option to use static batching. | |
| Dynamic Batching | Enable this option to use dynamic batching (enabled by default). Note: Dynamic batching has no effect when a Scriptable Render Pipeline is active, so this setting is only visible if the Scriptable Render Pipeline Asset Graphics setting is blank. |
|
| Sprite Batching Threshold | Controls the maximum vertex threshold used when batching. | |
| GPU Compute Skinning | Indicates whether to use DX11/DX12/ES3 GPU skinning. | |
| Graphics Jobs | Offloads graphics tasks (render loops) to worker threads running on other CPU cores. This option reduces the time spent in Camera.Render on the main thread, which can be a bottleneck. |
|
| Lightmap Encoding | Defines the encoding scheme and compression format of the lightmaps. You can choose from Low Quality, Normal Quality, or High Quality |
|
| HDR Cubemap Encoding | Defines the encoding scheme and compression format of the HDR Cubemaps. You can choose from Low Quality, Normal Quality, or High Quality. For more information, refer to Lightmaps: Technical information. |
|
| Lightmap Streaming | Enable this option to use Mipmap Streaming for lightmaps. Unity applies this setting to all lightmaps when it generates them. Note: To use this setting, you must enable the Texture Streaming Quality setting. |
|
| Streaming Priority | Sets the priority for all lightmaps in the Mipmap Streaming system. Unity applies this setting to all lightmaps when it generates them. Positive numbers give higher priority. Valid values range from –128 to 127. |
|
| Enable Frame Timing Stats | Allows Unity to gather CPU/GPU frame timing statistics. Use this option with the Dynamic Resolution camera setting to determine if your application is CPU or GPU bound. | |
| Use Display In HDR Mode (Windows Only) | Allows the game to automatically switch to HDR mode output when it runs. This option works only on displays that support this feature. If the display doesn’t support HDR mode, the game runs in standard mode. | |
| Swap Chain Bit Depth | Selects the number of bits in each color channel for swap chain buffers. You can select Bit Depth 10 or Bit Depth 16. The option to choose bit depth only becomes available when you enable HDR Mode. For more information on bit depth, refer to the Scripting API page for D3DHDRDisplayBitDepth. |
|
| Virtual Texturing | Enable this option to reduce GPU memory usage and texture loading times if your Scene has many high resolution textures. For more information, refer to Virtual Texturing. Note: The Unity Editor requires a restart for this setting to take effect. |
|
| Shader precision model | Controls the default precision of samplers used in shaders. For more information, refer to Shader data types and precision. | |
| 360 Stereo Capture | Allows Unity to capture stereoscopic 360 images and videos. When enabled, Unity compiles additional shader variants to support 360 capture (only on Windows). When enabled, the enable_360_capture keyword is added during the Stereo RenderCubemap call. This keyword isn’t triggered outside the Stereo RenderCubemap function. For more information, refer to Stereo 360 Image and Video Capture. |
|
설정

| Property | Description | |
|---|---|---|
| Scripting Backend | The scripting backend determines how Unity compiles and executes C# code in your Project. This setting defaults to IL2CPP for Universal Windows Platform and can’t be changed. | |
| API Compatibility Level | Choose which .NET APIs you can use in your project. This setting can affect compatibility with third-party libraries. However, it has no effect on Editor-specific code (code in an Editor directory, or within an Editor-specific Assembly Definition). Tip: If you are having problems with a third-party assembly, you can try the suggestion in the API Compatibility Level section below. |
|
| .Net Framework | Compatible with the .NET Framework 4 (which includes everything in the .NET Standard 2.0 profile plus additional APIs). Choose this option when using libraries that access APIs not included in .NET Standard 2.0. Produces larger builds and any additional APIs available aren’t necessarily supported on all platforms. For more information, refer to Referencing additional class library assemblies. | |
| .Net Standard 2.1 | Produces smaller builds and has full cross-platform support. | |
| IL2CPP Code Generation | Defines how Unity manages IL2CPP code generation. | |
| Faster runtime | Generates code optimized for runtime performance. This setting is enabled by default. | |
| Faster (smaller) builds | Generates code optimized for build size and iteration. This setting generates less code and produces a smaller build, but may reduce runtime performance, especially for generic code. Use this option when faster build times are important, such as when iterating on changes. | |
| C++ Compiler Configuration | Chooses the C++ compiler configuration used when compiling IL2CPP generated code. Note: This property is disabled for the Universal Windows Platform because it’s chosen in the generated Visual Studio project. |
|
| Use incremental GC | Uses the incremental garbage collector, which spreads garbage collection over several frames to reduce garbage collection-related spikes in frame duration. For more information, refer to Automatic Memory Management. | |
| Assembly Version Validation | Indicates whether Mono validates types from a strongly-named assembly. | |
| Allow downloads over HTTP | Indicates whether to allow downloading content over HTTP. The default option is Not allowed due to the recommended protocol being HTTPS, which is more secure. | |
| Not Allowed | Never allow downloads over HTTP. | |
| Allowed in Development Builds | Only allow downloads over HTTP in development builds. | |
| Always Allowed | Allow downloads over HTTP in development and release builds. | |
| Accelerometer Frequency | Defines how often to sample the accelerometer. If you choose Disabled, then no samples are taken. Otherwise, you can choose from 15Hz, 30Hz, 60Hz and 100Hz frequencies. | |
| Active Input Handling | Choose how to handle input from users. | |
| Input Manager (Old) | Uses the traditional Input settings. | |
| Input System Package (New) | Uses the Input system. This option requires you to install the InputSystem package. | |
| Both | Use both systems. | |
API 호환성 레벨
You can choose your mono API compatibility level for all targets. Sometimes a third-party .NET library uses functionality that’s outside of your .NET compatibility level. To understand what’s going on in such cases, and how to best fix it, try following these suggestions:
- Windows용 ILSpy를 설치합니다.
- Drag the .NET assemblies for the API compatibility level that you are having issues with into ILSpy. You can find these under
Data/MonoBleedingEdge/lib/mono/YOURSUBSET/. - 서드파티 어셈블리를 드래그합니다.
- 서드파티 어셈블리를 마우스 오른쪽 버튼으로 클릭하고 Analyze를 선택합니다.
- In the analysis report, inspect the Depends on section. The report highlights anything that the 3rd-party assembly depends on, but that’s not available in the .NET compatibility level of your choice in red.
스크립트 컴파일
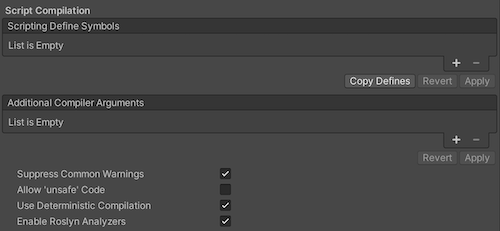
| 프로퍼티 | 설명 |
|---|---|
| Scripting Define Symbols | Sets custom compilation flags. For more details, see Platform dependent compilation. |
| Additional Compiler Arguments | Adds entries to this list to pass additional arguments to the Roslyn compiler. Use one new entry for each additional argument. To create a new entry, click Add (+). To remove an entry, click Remove (-). When you have added all desired arguments, click Apply to include your additional arguments in future compilations. Click Revert to reset this list to the most recent applied state. |
| Suppress Common Warnings | Indicates whether to display the C# warnings CS0169 and CS0649. |
| Allow ‘unsafe’ Code | Enables support for compiling ‘unsafe’ C# code in a pre-defined assembly (for example, Assembly-CSharp.dll). For Assembly Definition Files ( .asmdef), click on one of your .asmdef files and enable the option in the Inspector window that appears. |
| Use Deterministic Compilation | Indicates whether to prevent compilation with the -deterministic C# flag. With this setting enabled, compiled assemblies are byte-for-byte identical each time they are compiled. For more information, see Microsoft’s deterministic compiler option. |
| Enable Roslyn Analyzers | Indicates whether to compile user-written scripts without Roslyn analyzer DLLs that might be present in your project. |
최적화(Optimization)
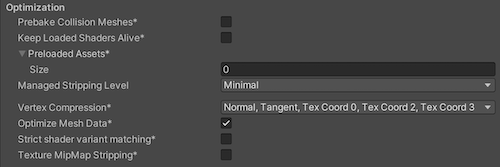
| Property | Description | |
|---|---|---|
| Prebake Collision Meshes | Adds collision data to Meshes at build time. | |
| Keep Loaded Shaders Alive | Indicates whether to prevent shaders from being unloaded. For more information, see Shader Loading. |
|
| Preloaded Assets | Sets an array of Assets for the player to load on startup. To add new Assets, increase the value of the Size property and then set a reference to the Asset to load in the new Element box that appears. |
|
| Managed Stripping Level | Chooses how aggressively Unity strips unused managed (C#) code. When Unity builds your app, the Unity Linker process can strip unused code from the managed DLLs your Project uses. Stripping code can make the resulting executable smaller, but can sometimes remove code that’s in use. For more information about these options and bytecode stripping with IL2CPP, refer to ManagedStrippingLevel. |
|
| Minimal | Use this to strip class libraries, UnityEngine, Windows Runtime assemblies, and copy all other assemblies. | |
| Low | Remove unreachable managed code to reduce build size and Mono/IL2CPP build times. | |
| Medium | Run UnityLinker to reduce code size beyond what Low can achieve. You might need to support a custom link.xml file, and some reflection code paths might not behave the same. | |
| High | UnityLinker will strip as much code as possible. This will further reduce code size beyond what Medium can achieve but managed code debugging of some methods might no longer work. You might need to support a custom link.xml file, and some reflection code paths might not behave the same. | |
| Vertex Compression | Sets vertex compression per channel. This affects all the meshes in your project. Typically, Vertex Compression is used to reduce the size of mesh data in memory, reduce file size, and improve GPU performance. For more information on how to configure vertex compression and limitations of this setting, refe to Compressing mesh data. |
|
| Optimize Mesh Data | Enable this option to strip unused vertex attributes from the mesh used in a build. This option reduces the amount of data in the mesh, which can help reduce build size, loading times, and runtime memory usage. Warning: If you have this setting enabled, don’t change material or shader settings at runtime. For more information, refer to PlayerSettings.stripUnusedMeshComponents. |
|
| Strict shader variant matching | If a shader variant is missing, the editor uses the bright pink error shader whilst displaying an error message in the Console. | |
| Texture MipMap Stripping | Enables mipmap stripping for all platforms. It strips unused mipmaps from Textures at build time. Unity determines unused mipmaps by comparing the value of the mipmap against the quality settings for the current platform. If a mipmap value is excluded from every quality setting for the current platform, then Unity strips those mipmaps from the build at build time. If QualitySettings.masterTextureLimit is set to a mipmap value that has been stripped, Unity will set the value to the closest mipmap value that hasn’t been stripped. |
|
Stack Trace
Select which type of stack trace logging to allow in specific contexts.

- Select your preferred stack trace method by enabling the option that corresponds to each Log Type (Error, Assert, Warning, Log, and Exception) based on the type of logging you require. For example:
-
ScriptOnly: Logs only when running scripts.
-
Full: Logs all the time.
-
None: No logs are ever recorded.
-
ScriptOnly: Logs only when running scripts.
자세한 내용은 스택 추적 로깅을 참조하십시오.
레거시
Enable Clamp BlendShapes (Deprecated) to clamp the range of blend shape weights in SkinnedMeshRenderers.

퍼블리싱 설정(Publishing Settings)
Use these settings to customize building your UWP app. These options are organized into the following groups:
Unity stores these settings in the Package.appxmanifest file when creating a Visual Studio solution for the first time.
Note: If you build your project on top of the existing one, Unity doesn’t overwrite the Package.appxmanifest file if it’s already present. That means if you change any of the Player settings, you need to check Package.appxmanifest. If you want to regenerate Package.appxmanifest, delete it and rebuild your project from Unity.
For more information, refer to Microsoft’s documentation on App package manifest.
Supported orientations from Player Settings are also populated to the manifest (Package.appxmanifest file in Visual Studio solution). On UWP apps, Unity resets the orientation to the one you used in the Player settings, regardless of what you specify in the manifest. This is because Windows itself ignores those settings on desktop and tablet computers.
팁: Unity 스크립팅 API를 사용하여 언제든지 지원되는 방향을 변경할 수 있습니다.
패키지

| 프로퍼티 | 설명 |
|---|---|
| 패키지 이름 | 시스템에서 패키지를 식별할 이름을 입력합니다. 이름은 고유해야 합니다. |
| Package display name | The Product Name value that you set at the top of the Player settings appears here. This is the name of the app as it will appear on the Microsoft Store. |
| Version | Major.Minor.Build.Revision 스트링을 사용하여 4채널 표기에 패키지 버전을 입력합니다. |
| Publisher display name | The Company Name value that you set at the top of the Player settings appears here. This is the user-friendly name of the publisher. |
| Streaming Install | 씬을 위한 스트리밍 가능한 에셋을 포함한 AppxContentGroupMap.xml 매니페스트 파일을 만들려면 이 옵션을 활성화합니다. 씬 에셋을 기본적으로 포함하려면 Last required scene index 설정을 사용합니다. 씬 인덱스가 Last required scene index 보다 상위에 있는 씬의 에셋은 매니페스트 파일에서 스트리밍 가능한 에셋으로 지정됩니다. |
| Last required scene index | Enter the index number from the Scenes In Build list on the Build Settings window that corresponds to the last scene in that list that must be present in the game build. For an application to start, Unity requires any scene index at or less than the specified index. To require all files in the list, use the index of the last scene in the list. Scenes with a greater scene index must include shared Assets for Scenes with a lesser index. The order of scenes in the Build Settings dialog may be important to allow the application to locate the required assets. Note: By default, the Streaming Install option is disabled, which means that this setting isn’t available. To make this property editable, enable the Streaming Install option first. |
인증서
Every UWP App needs a certificate which identifies a developer.

Click Select to choose your certificate file (.pfx) from your local computer. The name of the file you selected appears on Select.
인증서 파일이 없다면 Unity에서 다음과 같이 파일을 만들 수 있습니다.
-
Click Create. The Create Test Certificate for Microsoft Store dialog window appears.

Publisher 텍스트 상자에 패키지 퍼블리셔의 이름을 입력합니다.
You may also protect the certificate with a password but this is optional. We recommend leaving the password field blank.
-
Create를 클릭합니다.
창이 닫히고 Certificate 섹션에 Publisher 및 Issued by 값으로 입력한 이름이 표시됩니다. Expiration date는 인증서를 만든 날짜로부터 1년 후로 설정됩니다.

Application UI
Unity는 이러한 옵션을 Package.appxmanifest 파일에 바로 복사합니다.

The Display name value that you set at the top of the Player Settings settings appears in this section. This is the full name of the app.
Enter the text you want to appear on the app’s tile on the Microsoft Store in the Description text box. This defaults to the Package display name value.
파일 및 프로토콜 연결
The settings under the File Type Associations, File Types, and Protocol sections allow you to set up your Microsoft Store app as the default handler for a certain file type or URI scheme.

File Type Associations 섹션의 Name 텍스트 상자에 파일 유형 그룹의 이름을 소문자로만 입력합니다. 파일 그룹의 파일은 표시 이름, 로고, 정보 팁과 편집 플래그가 같습니다. 앱이 업데이트되어도 동일하게 유지할 수 있는 그룹 이름을 선택하십시오.
파일 연결로 설정하는 경우 다음을 수행하십시오.
- Click Add New. An empty entry appears in File Types. You can add multiple file types.
- Enter the MIME content type in the Content Type text box for a particular file type. For example, image/jpeg.
- Enter the file type to register for in the File Type text box, preceded by a period (for example, .jpeg).
URI 체계와의 연결로 설정하는 경우 Name 텍스트 상자에 프로토콜을 입력하십시오.
For more information, refer to Microsoft documentation on Auto-launching with file and URI associations (XAML).
기타
Unity는 이벤트를 구독하여 입력을 수신합니다. Input Source 설정은 어디서(어느 소스에서) 입력을 수신할지 지정합니다. 키보드 입력은 항상 CoreWindow에서 송신되므로, 현재 이 설정은 마우스와 터치 입력에만 적용됩니다.

| 프로퍼티 | 설명 | |
|---|---|---|
| Default Language (.vcxproj) | Sets the XML default language in the generated Visual Studio project. If not specified, ‘en-US’ is used. Note: Changes only apply to the initial file generation, changes don’t affect pre-existing files. |
|
| Input Source | Defines which sources to receive input from. Currently this only applies to mouse and touch input, as keyboard input always comes from CoreWindow. | |
| CoreWindow | Subscribes to CoreWindow events. This is the default. | |
| Independent Input Source | Creates Independent Input Source and receive input from it. | |
| SwapChainPanel | Subscribes to SwapChainPanel events. | |
Capabilities
Capabilities 섹션을 사용하여 앱에서 액세스할 API나 리소스를 활성화합니다. 이러한 리소스는 사진, 음악 또는 카메라나 마이크와 같은 기기일 수 있습니다.
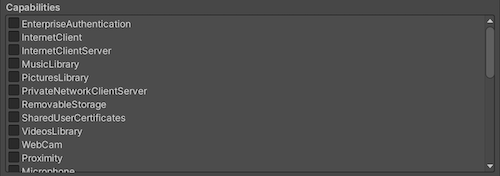
| 프로퍼티 | 설명 |
|---|---|
| EnterpriseAuthentication | Windows domain credentials enable a user to log into remote resources using their credentials, and act as if a user provided their username and password. |
| InternetClient | Allows your app to receive incoming data from the Internet. Can’t act as a server. No local network access. |
| InternetClientServer | Same as InternetClient but also enables peer-to-peer (P2P) scenarios where the app needs to listen for incoming network connections. |
| MusicLibrary | 사용자의 음악에 액세스하여 앱이 사용자의 상호작용 없이 라이브러리의 모든 파일을 열거하고 액세스할 수 있도록 합니다. 이 기능은 보통 음악 라이브러리 전체를 사용하는 주크박스 앱에서 활용됩니다. |
| PicturesLibrary | 사용자의 사진에 액세스하여 앱이 사용자의 상호작용 없이 라이브러리의 모든 파일을 열거하고 액세스할 수 있도록 합니다. 이 기능은 보통 사진 라이브러리 전체를 사용하는 사진 앱에서 활용됩니다. |
| PrivateNetworkClientServer | 방화벽을 통해 가정 및 직장 네트워크에 대한 인바운드 액세스와 아웃바운드 액세스를 제공합니다. 일반적으로 이 기능은 로컬 영역 네트워크(LAN)를 통해 통신하는 게임 및 다양한 로컬 기기에 걸쳐 데이터를 공유하는 앱에서 사용됩니다. |
| RemovableStorage | USB 키와 외장 하드 드라이브 등 제거 가능한 스토리지의 파일에 액세스합니다. |
| SharedUserCertificates | 앱이 공유 사용자 스토어의 소프트웨어 및 하드웨어 기반 인증서(예: 스마트카드에 저장된 인증서)를 추가하고 액세스할 수 있도록 합니다. 일반적으로 이 기능은 스마트 카드를 이용하여 인증해야 하는 금융 앱이나 기업 앱에서 사용됩니다. |
| VideosLibrary | 앱이 사용자의 비디오에 액세스하여 사용자의 상호작용 없이 라이브러리의 모든 파일을 열거하고 액세스할 수 있도록 합니다. 이 기능은 보통 비디오 라이브러리 전체를 사용하는 영화 재생 앱에서 활용됩니다. |
| WebCam | Accesses the video feed of a built-in camera or external webcam, which allows the app to capture photos and videos. Note: This only grants access to the video stream. In order to grant access to the audio stream as well, the Microphone capability must be added. |
| Proximity | 근접한 여러 대의 기기가 상호 통신할 수 있도록 합니다. 일반적으로 이 기능은 캐주얼 멀티플레이어 게임 및 정보를 교환하는 앱에서 사용됩니다. 기기가 Bluetooth, Wi-Fi와 인터넷 중 최상의 연결을 제공하는 커뮤니케이션 기술의 사용을 시도합니다. |
| Microphone | 마이크의 오디오 피드에 액세스하여 앱이 연결된 마이크의 오디오를 녹음할 수 있도록 합니다. |
| 위치 | PC의 GPS 센서와 같은 전용 하드웨어에서 검색해서 가져오거나 가용 네트워크 정보에서 파생된 위치 기능에 액세스합니다. |
| HumanInterfaceDevice | Enables access to Human Interface Device APIs. For more information, refer to How to specify device capabilities for HID. |
| AllJoyn | 네트워크에서 AllJoyn이 활성화된 앱과 기기의 상호 감지 및 상호작용이 가능하게 합니다. |
| BlockedChatMessages | 앱이 Spam Filter 앱에 의해 차단된 SMS 및 MMS 메시지를 읽을 수 있도록 합니다. |
| Chat | 앱이 모든 SMS 및 MMS 메시지를 읽고 쓸 수 있도록 합니다. |
| CodeGeneration | 앱이 JIT 기능을 제공하는 다음 함수에 액세스할 수 있도록 합니다. VirtualProtectFromApp CreateFileMappingFromApp OpenFileMappingFromApp MapViewOfFileFromApp |
| Objects3D | 앱이 3D 오브젝트 파일에 프로그래밍 방식으로 액세스할 수 있도록 합니다. 일반적으로 이 기능은 3D 오브젝트 라이브러리 전체에 대한 액세스가 필요한 3D 앱과 게임에서 사용됩니다. |
| PhoneCall | Allows apps to access all of the phone lines on the device and perform the following functions. Place a call on the phone line and display the system dialer without prompting the user. Access line-related metadata. Access line-related triggers. Allows the user-selected spam filter app to set and check block list and call origin information. |
| UserAccountInformation | 사용자의 이름과 사진에 액세스합니다. |
| VoipCall | 앱이 Windows.ApplicationModel.Calls 네임스페이스에서 VOIP 호출 API에 액세스할 수 있도록 합니다. |
| Bluetooth | 앱이 Generic Attribute(GATT)나 Classic Basic Rate(RFCOMM) 프로토콜을 통해 기존에 페어링된 Bluetooth 기기와 통신할 수 있도록 합니다. |
| SpatialPerception | Provides programmatic access to spatial mapping data, giving mixed reality apps information about surfaces in application-specified regions of space near the user. Declare the spatialPerception capability only when your app will explicitly use these surface meshes, as the capability isn’t required for mixed reality apps to perform holographic rendering based on the user’s head pose. |
| InputInjectionBrokered | 앱이 HID, 터치, 펜, 키보드나 마우스 등 다양한 입력 형식을 프로그래밍 방식으로 시스템에 추가할 수 있도록 합니다. 일반적으로 이 기능은 시스템을 제어할 수 있는 협업 앱에서 사용됩니다. |
| Appointments | 사용자의 일정 스토어에 액세스합니다. 이 기능은 동기화된 네트워크 계정 및 일정 스토어에 작성하는 다른 앱에 대한 읽기 액세스를 허용합니다. 앱은 이 기능을 사용하여 새로운 캘린더를 생성하고, 만든 캘린더에 일정을 작성할 수 있습니다. |
| BackgroundMediaPlayback | MediaPlayer와 같은 미디어별 API와 AudioGraph 클래스의 동작을 변경하여 앱이 백그라운드에서 작동하는 동안 미디어 재생을 허용합니다. 활성화된 모든 오디오 스트림이 더 이상 음소거되지 않되, 앱이 백그라운드에서 전환하더라도 계속해서 들리는 상태로 유지됩니다. 또한 재생 중에는 앱 수명이 자동으로 연장됩니다. |
| Contacts | 다양한 컨택트 스토어의 컨택트를 집계한 뷰에 액세스합니다. 앱은 이 기능을 통해 여러 네트워크와 로컬 컨택트 스토어로부터 동기화된 컨택트에 제한적으로 액세스(네트워크 허용 규칙이 적용됨)할 수 있습니다. |
| LowLevelDevices | 일정한 수의 추가 요건이 충족되면 앱에 커스텀 기기에 대한 액세스 권한을 허용합니다. |
| OfflineMapsManagement | 앱에 오프라인 맵에 대한 액세스 권한을 허용합니다. |
| PhoneCallHistoryPublic | 앱이 기기의 셀룰러 및 일부 VOIP 호출 이력 정보를 읽을 수 있도록 합니다. 또한 앱이 VOIP 호출 이력 엔트리를 작성할 수 있도록 합니다. |
| PointOfService | Windows.Devices.PointOfService 네임스페이스에서 API에 대한 액세스 권한을 허용합니다. 이 네임스페이스는 앱이 POS 바코드 스캐너와 마그네틱 선 리더에 액세스할 수 있게 하며, UWP 앱에서 다양한 제조사의 POS 기기에 액세스할 수 있는 공급업체에 구애 받지 않는 인터페이스를 제공합니다. |
| RecordedCallsFolder | 앱에 기록된 호출 폴더에 대한 액세스 권한을 허용합니다. |
| RemoteSystem | 앱에 사용자의 Microsoft 계정과 연결된 기기 목록에 대한 액세스 권한을 허용합니다. 여러 기기에 걸쳐 작동을 수행하려면 기기 목록에 대한 액세스 권한이 필요합니다. |
| SystemManagement | 앱에 종료나 재부팅, 로케일과 시간대 등의 기본적인 시스템 관리 권한을 허용합니다. |
| UserDataTasks | 앱에 현재의 작업 설정 상태에 대한 액세스 권한을 허용합니다. |
| UserNotificationListener | 앱에 현재의 알림 설정 상태에 대한 액세스 권한을 허용합니다. |
| GazeInput | Allows apps to detect where the user is looking when a compatible eye-tracking device is connected. |
For more information, refer to App capability declarations.
Unity는 이러한 옵션을 Package.appxmanifest 파일에 바로 복사합니다.
Note: If you build your game on top of a previous package, Package.appxmanifest won’t be overwritten.
지원되는 기기 패밀리
A device family identifies the APIs, system characteristics, and behaviors across a class of devices. It also determines the set of devices on which your app can be installed from the Store. For more information, refer to Microsoft’s Device families overview.
If no options are enabled, Windows.Universal is used as default, which enables your app to be available on all device families. You can also set this within the API in PlayerSettings.WSATargetFamily instead of in the Editor.
Note: These settings are used only when generating a new UWP Visual Studio solution. Changing these settings has no effect if you rebuild UWP to an existing folder.

| 프로퍼티 | 설명 |
|---|---|
| 데스크톱 | Indicates whether your application supports the Desktop device family. |
| Mobile | Indicates whether your application supports the Mobile device family. |
| Holographic | Indicates whether your application supports the HoloLens (self-contained, holographic computer) device family. This is used for Mixed Reality apps. |
| Team | Indicates whether your application supports the Team device family. This is commonly used for Microsoft Surface Hub devices. |
| IoT | Indicates whether your application supports the IoT device family. Note: Currently, apps targeting IoT aren’t valid in the app store and should be used only for development purposes. |
| IoTHeadless | Indicates whether your application supports the IoTHeadless device family. Note: Currently, apps targeting IoTHeadless aren’t valid in the app store and should be used only for development purposes. |
For more information, refer to Device family availability.
PlayerSettingsWSA