Standalone Player settings
This page details the Player settings specific to standalone platforms (Mac OSX, Windows and Linux). For a description of the general Player settings, see Player Settings.
You can find documentation for the properties in the following sections:
Icon
Enable the Override for Standalone setting to assign a custom icon for your standalone game. You can upload different sizes of the icon to fit each of the squares provided.

Resolution and Presentation
Use the Resolution and Presentation section to customize aspects of the screen’s appearance in the Resolution and Standalone Player Options sections.
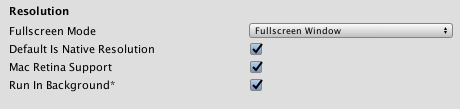
Resolution section
This section allows you to customize the screen mode and default size.
| Свойство: | Функция: | |
|---|---|---|
| Fullscreen Mode | Choose the full-screen mode. This defines the default window mode at startup. | |
| Fullscreen Window | Set your app window to the full-screen native resolution of the display. Unity renders app content at the resolution set by script (or by user selection when the built application launches), but scales it to fill the window. When scaling, Unity adds black bars to the rendered output to match the aspect ratio chosen in the Player settings, so that the content isn’t stretched. This process is called letterboxing. | |
| Exclusive Fullscreen (Windows only) | Set your app to maintain sole full-screen use of a display. Unlike Fullscreen Window, this mode changes the OS resolution of the display to match the app’s chosen resolution. This option is only supported on Windows; on other platforms, the setting falls back to Fullscreen Window. | |
| Maximized Window (Mac only) | Set the app window to the operating system’s definition of “maximized”. On macOS, this means a full-screen window with an auto-hidden menu bar and dock. This option is only supported on macOS; on other platforms, the setting falls back to Fullscreen Window. | |
| Windowed | Set your app to a standard, non-full-screen, movable window, the size of which is dependent on the app resolution. In this mode, the window is resizable by default. To disable this, disable the Resizable Window setting. | |
| Default Is Native Resolution | Enable this option to make the game use the default resolution used on the target machine. This option is not available if the Fullscreen Mode is set to Windowed. | |
| Default Screen Width | Set the default width of the game screen in pixels. This option is only available if the Fullscreen Mode is set to Windowed. | |
| Default Screen Height | Set the default height of the game screen in pixels. This option is only available if the Fullscreen Mode is set to Windowed. | |
| Mac Retina Support | Enable this option to enable support for high DPI (Retina) screens on a Mac. Unity enables this by default. This enhances Projects on a Retina display, but it is somewhat resource-intensive when active. | |
| Run In background | Enable this option to make the game keep running (rather than pausing) if the app loses focus. | |
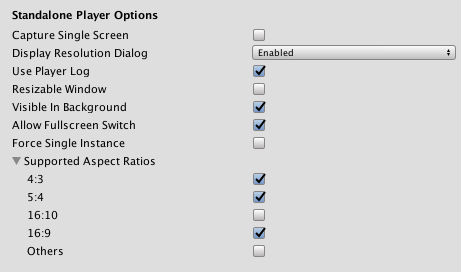
Standalone Player Options section
This section allows you to customize how the user can customize the screen. For example, here you can set up a startup dialog to allow the user to set their screen resolution from a list of aspect ratios that you provide. You can also determine whether the user can resize the screen and how many instances can run concurrently.
| Свойство: | Функция: |
|---|---|
| Capture Single Screen | Enable this option to ensure standalone games in Fullscreen Mode do not darken the secondary monitor in multi-monitor setups. This is not supported on Mac OS X. |
| ###Настройка вашего диалогового окна для выбора разрешения (Resolution Dialog) | See Customizing your Resolution Dialog for details. |
| Use Player Log | Enable this option to write a log file with debugging information. Defaults to enabled. Warning: If you plan to submit your application to the Mac App Store, leave this option disabled. For more information, see Publishing to the Mac App Store. |
| Resizable Window | Enable this option to allow the user to resize the standalone player window. Note: If you disable this option, your application can’t use the Windowed Fullscreen Mode. |
| Visible in Background | Enable this option to show the application in the background if Windowed Fullscreen Mode is used (in Windows). |
| Allow Fullscreen Switch | Enable this option to allow default OS full-screen key presses to toggle between full-screen and windowed modes. |
| Force Single Instance | Enable this option to restrict standalone players to a single concurrent running instance. |
| Supported Aspect Ratios | Enable each aspect ratio that you want to appear in the Resolution Dialog at startup (as long as they are supported by the user’s monitor). |
Creating a Resolution Dialog on Startup
If you want to let the user choose the screen resolution to run the game in, you can create a dialog window that appears when your game launches.
Choose one of these values from the Display Resolution Dialog dropdown menu:
| Value | Description |
|---|---|
| Disabled | Don’t show the dialog at startup. |
| Enabled | Display a dialog asking the user to choose the screen resolution at startup. |
| Hidden by Default | Display a dialog asking the user to choose the screen resolution only if the user holds down the Alt key at startup. |
In addition, you can add a custom banner image to display on the dialog window. Expand the Splash Image section and set a reference to the image you want to use in the Application Config Dialog Banner property. The maximum image size is 432 x 163 pixels. The image does not scale up to fit the screen selector: Unity centers and crops it automatically.
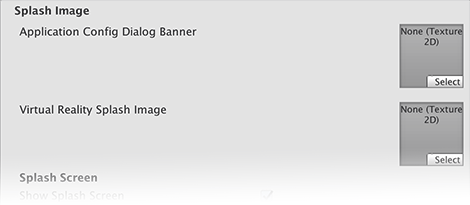
Splash Image
Above the common Splash Screen settings, the Player Settings settings allow you to specify splash images for standalone platforms.
| Свойство: | Функция: |
|---|---|
| Application Config Dialog Banner | Select a custom splash image to appear on the resolution startup dialog window. For more information, see Creating a Resolution Dialog on Startup. |
| Virtual Reality Splash Image | Select a custom splash image to be displayed in Virtual Reality displays. |
Other Settings
This section allows you to customize a range of options organized into the following groups:
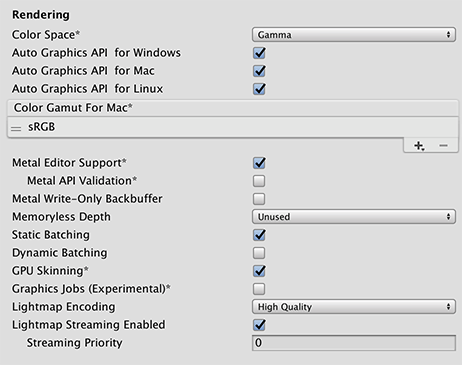
Rendering
Use these settings to customize how Unity renders your game for Standalone platforms.
| Свойство: | Функция: | |
|---|---|---|
| Color Space | Choose which color space should be used for rendering: Gamma or Linear. See the Linear rendering overview for an explanation of the difference between the two. |
|
| Auto Graphics API for Windows | Enable this option to use the best Graphics API on the Windows machine the game is running on. Disable it to add and remove supported Graphics APIs. | |
| Auto Graphics API for Mac | Enable this option to use the best Graphics API on the Mac the game is running on. Disable it to add and remove supported Graphics APIs. | |
| Auto Graphics API for Linux | Enable this option to use the best Graphics API on the Linux machine it runs on. Disable it to add and remove supported Graphics APIs. | |
| Color Gamut for Mac | You can add or remove color gamuts for the Standalone Mac platforms to use for rendering. Click the plus (+) icon to see a list of available gamuts. A color gamut defines a possible range of colors available for a given device (such as a monitor or screen). The sRGB gamut is the default (and required) gamut. | |
| Metal Editor Support | Enable this option to use the Metal API in the Unity Editor and unlock faster Shader iteration for targeting the Metal API. | |
| Metal API Validation | Enable this option when you need to debug Shader issues. Note: Validation increases CPU usage, so use it only for debugging. |
|
| Metal Write-Only Backbuffer | Allow improved performance in non-default device orientation. This sets the frameBufferOnly flag on the back buffer, which prevents readback from the back buffer but enables some driver optimization. | |
| Memoryless Depth | Choose when to use memoryless render textures. Memoryless render textures are temporarily stored in the on-tile memory when rendered, not in CPU or GPU memory. This reduces memory usage of your app but you cannot read or write to these render textures. Note: Memoryless render textures are only supported on iOS, tvOS 10.0+ Metal and Vulkan. Render textures are read/write protected and stored in CPU or GPU memory on other platforms. |
|
| Unused | Never use memoryless framebuffer depth. | |
| Forced | Always use memoryless framebuffer depth. | |
| Automatic | Let Unity decide when to use memoryless framebuffer depth. | |
| Строка состояния | Enable this option to use Static batching. | |
| Dynamic Batching | Enable this option to use Dynamic Batching on your build (enabled by default). Note: Dynamic batching has no effect when a Scriptable Render Pipeline is active, so this setting is only visible when nothing is set in the Scriptable Render Pipeline Asset Graphics setting. |
|
| GPU Skinning | Enable this option to enable DX11/ES3 GPU skinning. | |
| Graphics Jobs (Experimental) | Enable this option to instruct Unity to offload graphics tasks (render loops) to worker threads running on other CPU cores. This is intended to reduce the time spent in Camera.Render on the main thread, which is often a bottleneck. Note: This feature is experimental. It may not deliver a performance improvement for your project, and may introduce new crashes. |
|
| Lightmap Encoding | Choose Normal Quality or High Quality to set the lightmap encoding. This setting affects the encoding scheme and compression format of the lightmaps. | |
| Lightmap Streaming Enabled | Enable this option to load only the lightmap mip maps as needed to render the current game Cameras. This value applies to the lightmap textures as they are generated. Note: To use this setting, you must enable the Texture Streaming Quality setting. |
|
| Streaming Priority | Set the lightmap mip map streaming priority to resolve resource conflicts. These values are applied to the light map textures as they are generated. Positive numbers give higher priority. Valid values range from –128 to 127. |
|
Vulkan Settings
Enable the SRGB Write Mode option to allow Graphics.SetSRGBWrite() on Vulkan renderer to toggle the sRGB write mode during the frame.

Note: Enabling this feature may reduce performance, especially for tiled GPUs.
Mac App Store Options
For details on setting these options, see Delivering your application to the Mac App Store.
Publishing to the Mac App Store
The Use Player Log property enables writing a log file with debugging information. This is useful for investigating problems with your game. However you need to disable this when publishing games for Apple’s Mac App Store, as Apple may reject your submission if it is enabled. See the Unity Manual Log Files page for further information about log files.
The Use Mac App Store Validation property enables receipt validation for the Mac App Store. If enabled, your game only runs when it contains a valid receipt from the Mac App Store. Use this when submitting games to Apple for publishing on the App Store. This prevents people from running the game on a different computer to the one it was purchased on.
Note that this feature does not implement any strong copy protection. In particular, any potential crack against one Unity game would work against any other Unity content. For this reason, it is recommended that you implement your own receipt validation code on top of this, using Unity’s plugin feature. However, since Apple requires plugin validation to initially happen before showing the screen setup dialog, you should still enable this property to avoid Apple rejecting your submission.
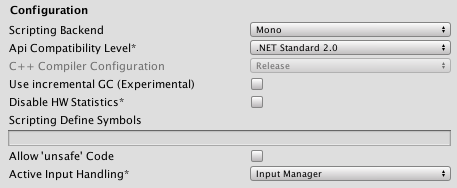
Configuration
| Setting | Функция: | |
|---|---|---|
| Scripting Backend | Choose the scripting backend you want to use. The scripting backend determines how Unity compiles and executes C# code in your Project. | |
| Mono | Compiles C# code into .NET Common Intermediate Language (CIL) and executes that CIL using a Common Language Runtime. See the Mono Project website for more information. | |
| IL2CPP | Compiles C# code into CIL, converts the CIL to C++ and then compiles that C++ into native machine code, which executes directly at run time. See IL2CPP for more information. | |
| API Compatibility Level | Choose which .NET APIs you can use in your project. This setting can affect compatibility with 3rd-party libraries. Tip: If you are having problems with a third-party assembly, you can try the suggestion in the API Compatibility Level section below. |
|
| .Net 2.0 | .Net 2.0 libraries. Maximum .net compatibility, biggest file sizes. Part of the deprecated .NET 3.5 runtime. | |
| .Net 2.0 Subset | Subset of full .net compatibility, smaller file sizes. Part of the deprecated .NET 3.5 runtime. | |
| .Net Standard 2.0 | Compatible with .NET Standard 2.0. Produces smaller builds and has full cross-platform support. | |
| .Net 4.x | Compatible with the .NET Framework 4 (which includes everything in the .NET Standard 2.0 profile as well as additional APIs). Choose this option when usng libraries that access APIs not included in .NET Standard 2.0. Produces larger builds and any additional APIs available are not necessarily supported on all platforms. See Referencing additional class library assemblies for more information. | |
| C++ Compiler Configuration | Choose the C++ compiler configuration used when compiling IL2CPP generated code. Note: This property is disabled unless Scripting Backend is set to IL2CPP. |
|
| Use incremental GC | Use the incremental garbage collector, which spreads garbage collection over several frames to reduce gc-related spikes in frame duration. | |
| Disable HW Statistics | Enable this option to instruct the application not to send information about the hardware to Unity. By default, Unity Android applications send anonymous HW statistics to Unity. This provides you with aggregated information to help you make decisions as a developer. See Unity Hardware Statistics for more details | |
| Scripting Define Symbols | Set custom compilation flags. For more details, see Platform dependent compilation. | |
| Allow ‘unsafe’ Code | Enable support for compiling ‘unsafe’ C# code in a pre-defined assembly (for example, Assembly-CSharp.dll). For Assembly Definition Files ( .asmdef), click on one of your .asmdef files and enable the option in the Inspector window that appears. |
|
| Active Input Handling | Choose how you want to handle input from users. | |
| Input Manager | Use the traditional Input settings. | |
| Input System (Preview) | Use the newer Input system. The Input System is provided as a preview package for this release. To try a preview of the Input System, install the InputSystem package. | |
| Both | Use both systems side by side. | |
API Compatibility Level
You can choose your mono API compatibility level for all targets. Sometimes a 3rd-party .NET library uses functionality that is outside of your .NET compatibility level. In order to understand what is going on in such cases, and how to best fix it, try following these suggestions:
- Install Reflector for Windows.
- Drag the .NET assemblies for the API compatilibity level you are having issues with into Reflector. You can find these under
Frameworks/Mono/lib/mono/YOURSUBSET/. - Drag in your 3rd-party assembly.
- Right-click your 3rd-party assembly and select Analyze.
- In the analysis report, inspect the Depends on section. The report highlights anything that the 3rd-party assembly depends on, but that is not available in the .NET compatibility level of your choice in red.
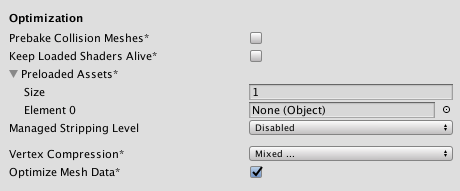
Optimization
| Свойство: | Функция: | |
|---|---|---|
| Prebake Collision Meshes | Enable this option to add collision data to Meshes at build time. | |
| Keep Loaded Shaders Alive | Enable this option to prevent shaders from being unloaded. | |
| Preloaded Assets | Set an array of Assets for the player to load on startup. To add new Assets, increase the value of the Size property and then set a reference to the Asset to load in the new Element box that appears. |
|
| Strip Engine Code (IL2CPP only) | Specify whether the Unity Linker tool removes code for Unity Engine features that your Project does not use. | |
| Managed Stripping Level | Defines how aggressively Unity strips unused managed (C#) code. When Unity builds your game or application, the Unity Linker process can strip unused code from the managed dynamically linked libraries used in the project. Stripping code can make the resulting executable significantly smaller, but can sometimes mistakenly remove code that is actually used. This setting allows you to choose how aggressively Unity should remove unused code. |
|
| Disabled (Mono only) | Do not strip any code. (Managed code stripping is always enabled when using IL2CPP.) | |
| Normal | Remove unreachable managed code to reduce build size and Mono/IL2CPP build times. | |
| Aggressive (Experimental) | Remove code more aggressively than under the Normal option. Code size is further reduced, but this additional reduction may have side effects. For example, some methods may no longer be visible in the debugger and code accessed through reflection can be stripped. You can create a custom link.xml file to preserve specific classes and methods. See Managed bytecode stripping with IL2CPP for more information. | |
| Enable Internal profiler (Deprecated) | Enable this option to get the profiler data from your device in the Android SDK’s adblogcat output while testing your projects. This is only available in development builds. | |
| Script Call Optimization | Choose how to optionally disable exception handling for a speed boost at runtime. See iOS Optimization for details. | |
| Slow and Safe | Use full exception handling (with some performance impact on the device when using the Mono scripting backend). | |
| Fast but no Exceptions | No data provided for exceptions on the device (the game runs faster when using the Mono scripting backend). Note: Using this option with the IL2CPP Scripting Backend does not impact performance; however, using it can avoid undefined behavior on release builds. |
|
| Vertex Compression | Set vertex compression per channel. For example, you can enable compression for everything except positions and lightmap UVs. Whole Mesh compression set per imported object overrides where vertex compression is set on objects. Everything else obeys these vertex compression settings. | |
| Optimize Mesh Data | Enable this option to remove any data from Meshes that is not required by the Material applied to them (such as tangents, normals, colors, and UVs). | |
Logging
Select what type of logging to allow in specific contexts.
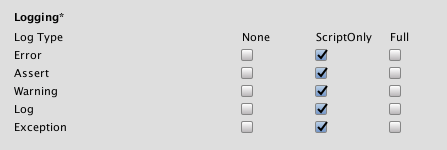
Check one box that corresponds to each Log Type (Error, Assert, Warning, Log, and Exception) when running scripts (ScriptOnly) , all the time (Full), or never (None).
Legacy
Enable the Clamp BlendShapes (Deprecated) option to clamp the range of blend shape weights in SkinnedMeshRenderers.

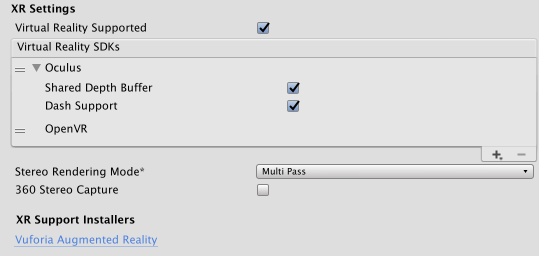
XR Settings
| Свойство: | Функция: | |
|---|---|---|
| Virtual Reality Supported | Enable native VR support for the Unity Editor and your game builds. | |
| Virtual Reality SDKs | Add and remove Virtual Reality SDKs from the list. This list is only available available when the Virtual Reality Supported is enabled. To add an SDK to the list, click the plus (+) button. To remove an SDK from the list, select it and then click the minus (-) button. Some of the SDKs provide extra settings that appear here. For details, see XR SDKs. |
|
| Stereo Rendering Mode | Choose how you want to render for a virtual reality device. | |
| Multi Pass | This is the normal rendering mode. Unity renders the Scene twice: first to render the left-eye image; and then again for the right-eye image. | |
| Single Pass | Render both eye images at the same time into one packed Render Texture. This means that the whole Scene is only rendered once, which significantly reduces CPU processing time. | |
| Single Pass Instanced (Preview) | The GPU performs a single render pass, replacing each draw call with an instanced draw call. This heavily decreases CPU use, and slightly decreases GPU use, due to the cache coherency between the two draw calls. Using this mode significantly reduces the power consumption of your application. | |
| 360 Stereo Capture | Enable this option to use 360 capture-enabled shader variants. By default, this option is disabled and Unity does not generate these shader variants. | |
| Vuforia Augmented Reality | Click this link to download the Vuforia Software Development Kit. You must have a Vuforia software license before you can use the Vuforia SDK. | |
2017–09–04 > Added MacOS Retina Support checkbox Added in 2017.2 NewIn20171
Allow ‘unsafe’ Code checkbox added in Unity 2018.1 NewIn20181
.NET 4.x runtime added in 2018.1
Updated for United Settings, .Net 3.5 scripting runtime deprecated in Unity 2018.3 NewIn20183
Input System preview added in Unity 2019.1
Copyright © 2023 Unity Technologies
优美缔软件(上海)有限公司 版权所有
"Unity"、Unity 徽标及其他 Unity 商标是 Unity Technologies 或其附属机构在美国及其他地区的商标或注册商标。其他名称或品牌是其各自所有者的商标。
公安部备案号:
31010902002961