Grid snapping
Unity provides a visual grid in the Editor’s Scene view, which can help precisely align GameObjects by snapping (moving) them to the nearest grid location.

You can snap a GameObject to a grid projected along the X, Y, or Z axes in several ways:
- Align selected GameObjects to the nearest grid point.
- Turn on grid snapping while you move, rotate, or scale a GameObject.
You can also transform a GameObject in increments without aligning it with the gridlines. If you need to change how much you are moving, rotating, or scaling, you can change the increment snap values.
By default, the grid is hidden, but you can make it visible and switch which axis it appears along. You can customize the grid in appearance and behavior by changing the following:
- The size of the grid (adjust the distance between the lines).
- The color of the grid lines themselves.
- How transparent or opaque the grid lines appear.
- The position of the grid in the Scene view (move it closer or farther).
Many of these actions support keyboard shortcuts. You can see which key combinations are assigned to these actions and use the Shortcuts Manager to customize them.
Aligning, snapping, and incremental movements
This section provides information on how to perform these actions:
Aligning (pushing) to the grid
You can align a GameObject to either the closest grid point on a single axis, or on all axes at once.
To align a GameObject to the closest point on a grid for a specific axis:
- Open the Grid and Snap window by either method:
- From the main Unity menu, choose Edit > Grid and Snap Settings.
- From the grid visibility drop-down menu (
 ), open the overflow menu and choose Edit > Grid and Snap Settings.
-
From the Align Selection to Grid section, click the X, Y, or Z button that matches the axis you want to push to.

Align Selection to Grid section of the Grid and Snap window
To align a GameObject on all axes at once:
Select the GameObject(s) you want to align to the grid.
-
Use the Ctrl+\ (Windows) or Command+\ (macOS) shortcut to push the GameObject(s) onto the grids on all axes.
Alternatively, you can open the Grid and Snap window and click the All Axes button from the Align Selection to Grid section.
Activating auto-snapping
To turn on automatic snapping to the grid:
- Activate the Move tool and make sure the handle orientation is set to Global (
 ).
). - Click the grid snapping icon (
 ) beside the Pivot/Center and Global/Local gizmos in the toolbar.
When you enable automatic grid snapping, the Move, Rotate, and Scale transform tools snap the selected GameObject(s) to the grid along the active gizmo axis. If you need the GameObject to move in smaller increments, you can also transform it incrementally.
Moving, rotating, and scaling in increments
To move, rotate, or scale by increment snap values:
- Hold down the Control key (Windows) or Command key (macOS) while using one of the transform gizmos.
To change the default increment snap values:
Open the Grid and Snap window.
-
The Grid Visuals section contains several properties that let you set the same value for all axes or different values:

Increment Snap section of the Grid and Snap window (A) Use the Move property to enter a increment snap value for all axes. This field is only enabled if the uniform checkbox (B) is enabled.
(B) The uniform checkbox toggles between enabling the Move property or the Axis properties.
(C) You can set different increment snap values in the X, Y, and Z properties for the Axis. These properties are only enabled if the uniform checkbox (B) is disabled.
Customizing the grid
This section provides information on customizing the following:
- Showing and hiding the grid lines
- Changing the axis where the grid appears
- Resizing the grid
- Changing the default color of the grid lines
- Changing the opacity of the grid
- Adjusting the grid’s location
- Resetting values and settings to default
Showing and hiding the grid lines
You can toggle the grid visibility button (![]() ) on the Scene view Toolbar to display or hide the grid on any axis (X, Y, Z). If you are in orthographic mode, Unity chooses the correct view.
) on the Scene view Toolbar to display or hide the grid on any axis (X, Y, Z). If you are in orthographic mode, Unity chooses the correct view.
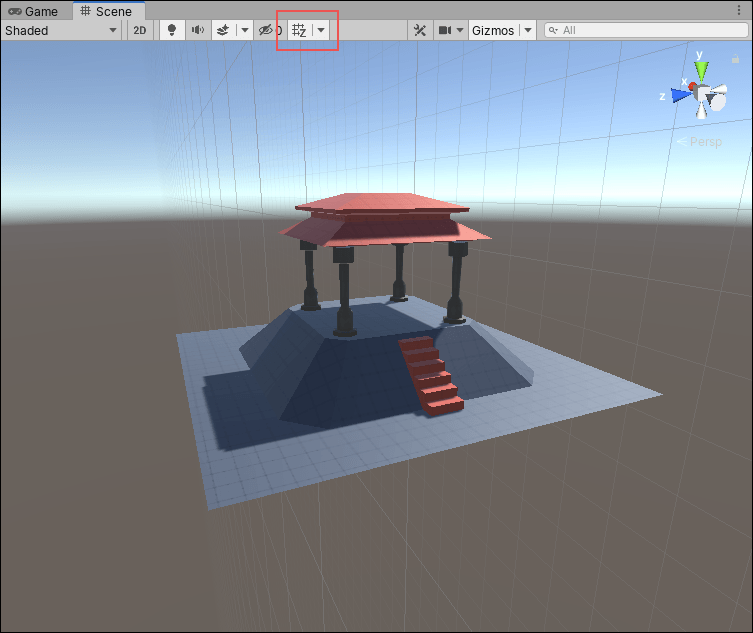
Changing the axis where the grid appears
To change which axis the grid appears on:
Open the grid visibility drop-down menu (
 ) from the toolbar.
-
From the Grid Axis section, select the axis where you want the grid to appear.
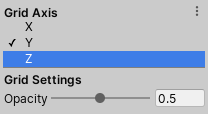
The Grid Axis section under the grid visibility drop-down menu
Resizing the grid
You can use the Grid and Snap window to set the size of the gridlines as they appear in the Scene view. This affects the appearance of the grid and how your GameObjects automatically snap to the grid, but doesn’t affect how much your GameObject(s) move, rotate, or scale in increments.
If you set a size for all axes at once, a uniform (square-based) grid appears. However, you can also use different values on any of the three axes to see a non-uniform (rectangular-based) grid. By default, the grid is set to a uniform distance (1 on all axes).
To resize the grid:
Open the Grid and Snap window.
-
The Grid Visuals section contains several properties that let you set the same value for all axes or different values:

Grid Visuals section of the Grid and Snap window (A) Use the Grid Size property to enter a uniform value for the visual grid. This field is only enabled if the uniform checkbox (B) is enabled.
(B) The uniform checkbox toggles between enabling the Grid Size property or the Axis properties.
(C) You can specify a non-uniform grid in the X, Y, and Z properties for the Axis. These properties are only enabled if the uniform checkbox (B) is disabled.
-
If you want to set a non-uniform distance between the grid lines, follow these steps:
- Disable the uniform checkbox (B).
- Ensure the Grid Size property is disabled and the Axis properties are enabled.
- Set a new value for the X, Y, or Z properties. For example, to create a rectangular grid on the x and y axes, you can set X and Y to 1, and set Z to 2.
-
If you want to switch back to a uniform value between the grid lines:
- Enable the uniform checkbox (B).
- The Grid Size property now displays the value from X, but the grid distance is still non-uniform. You must explicitly set the Grid Size property to complete the change.
- Set a value for the grid size in the Grid Size property.
Note: You can also use the keyboard shortcuts to increase and decrease the size of the grid:
- To increase the grid size, use Ctrl+] (Windows) or Command+] (macOS).
- To decrease the grid size, use Ctrl+[ (Windows) or Command+[ (macOS).
Changing the default color of the grid lines
To change the color of the visible grid lines in the Scene view:
Open the Unity Preferences page (go to Edit > Preferences on Windows or Unity > Preferences on macOS).
-
Click on the Colors category from the list to see the Colors page.
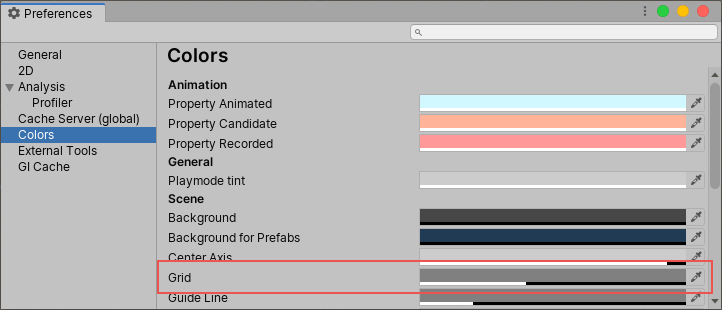
The grid preference properties on the Preferences page Select a new color using the Grid property’s color picker.
Changing the opacity of the grid
If the grid lines are too light or too dark, you can adjust them:
Open the grid visibility drop-down menu (
 ) from the toolbar.
-
From under the Grid Settings section, adjust the value of the Opacity property.
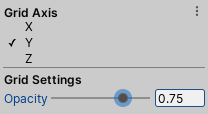
The Grid Settings section under the grid visibility drop-down menu
Adjusting the grid’s location
You can also use the following shortcuts to move the grid backward and forward along its axis:
- To nudge the grid backward, use Shift+[.
- To nudge the grid forward, use Shift+].
Nudging the grid brings it closer (for example, if it is difficult to see your GameObject against a distant grid) or sends it farther away.
Resetting values and settings to default
To reset the grid axis and opacity settings to their defaults:
Open the grid visibility drop-down menu (
 ) from the toolbar.
-
Click the overflow menu icon and then click Reset.
The grid appears on the y-axis again and the opacity is 0.5, but the visibility of the grid lines remains unchanged.
To reset the size of the grid to the default:
-
Open the Grid and Snap window by either method:
- From the main Unity menu, choose Edit > Grid and Snap Settings.
- From the grid visibility drop-down menu (
 ), open the overflow menu and choose Edit > Grid and Snap Settings.
Next to the Grid Visuals heading, click the gear icon (
 ).
).-
Click Reset.
Only the values under the Grid Visuals section return to 1.
To reset the increment snap values to the default:
-
Open the Grid and Snap window by either method:
- From the main Unity menu, choose Edit > Grid and Snap Settings.
- From the grid visibility drop-down menu (
 ), open the overflow menu and choose Edit > Grid and Snap Settings.
Next to the Increment Snap heading, click the gear icon (
 ).
).-
Click Reset.
Only the values under the Increment Snap section return to their original default values.
Grid and Snap window
You can open the Grid and Snap window from the menu (Edit > Grid and Snap Settings) or by using the grid visibility drop-down menu:
-
From the grid visibility drop-down menu (A), click the overflow menu icon (B).
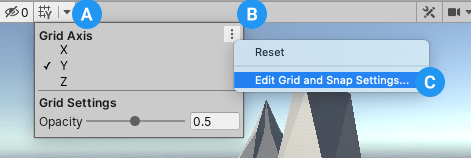
The overflow menu icon is in the top right corner of the menu -
Select Edit Grid and Snap Settings (C).
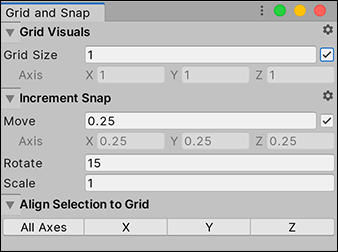
Grid and Snap settings
The Grid and Snap window let you perform the following actions:
- Resize the grid using the properties under the Grid Visuals section.
- Change the default values for moving, rotating, and scaling in increments under the Increment Snap section.
- Push the selected GameObject(s) to a specific axis, or to the closest point on all three axes under the Align Selection to Grid section.
Note: The settings on the Grid and Snap window are global to all Scene views.
Shortcut defaults
You can perform the following actions with these default Unity shortcuts:
| Action | Default shortcut |
|---|---|
| Increase Grid Size |
Ctrl+] (Windows) or Command+] (macOS) |
| Decrease Grid Size |
Ctrl+[ (Windows) or Command+[ (macOS) |
| Nudge Grid Backward | Shift+[ |
| Nudge Grid Forward | Shift+] |
| Push to Grid (Align Selection to Grid) |
Ctrl+\ (Windows) or Command+\ (macOS) |
| Reset Grid | (no shortcut by default) |
To change these default keyboard shortcuts, use the Shortcuts Manager.
- Native grid improvements updated in 2019.3 NewIn20193