Редактирование кривых
There are several different features and windows in the Unity Editor which use Curves to display and edit data. The methods you can use to view and manipulate curves is largely the same across all these areas, although there are some exceptions.
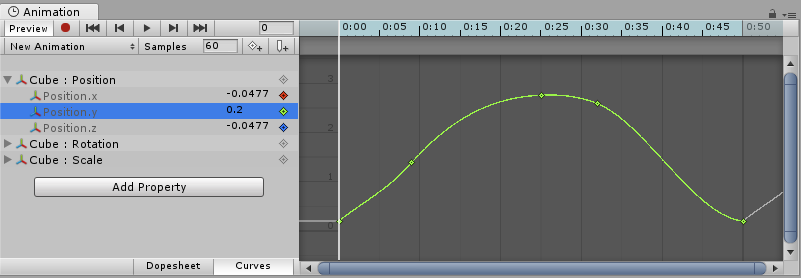
- The Animation Window uses curves to display and edit the values of animated properties over time in an Animation Clip.
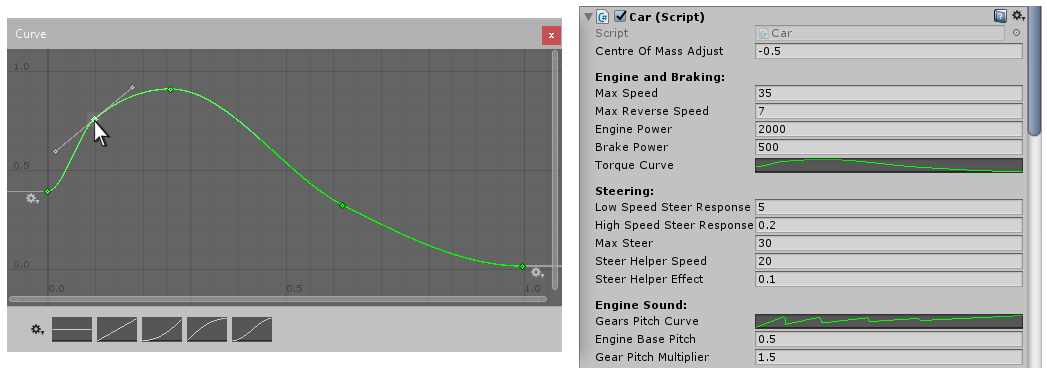
- Script components can have member variables of type Animation Curve that can be used for all kinds of things. Clicking on those in the Inspector will open up the Curve Editor.
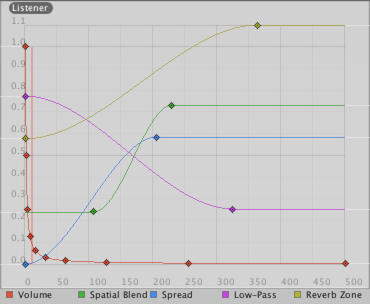
- The Audio Source component uses curves to control roll-off and other properties as a function of distance to the Audio Source.
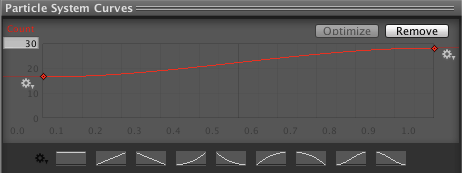
- The Particle System uses curves to vary particle properties over time.
While these controls have subtle differences, the curves can be edited in exactly the same way in all of them. This page explains how to navigate and edit curves in those controls.
Добавление и перемещение ключей на кривой
A key can be added to a curve by double-clicking on the curve at the point where the key should be placed. It is also possible to add a key by right-clicking on a curve and select Add Key from the context menu.
После размещения, ключей (keys) их можно перетаскивать с помощью мыши:
Чтобы выбрать ключ (key), кликните на него. Перетащите выбранный ключ при помощи мыши. * Чтобы привязать ключ к сетке, зажмите Command на Mac / Control на Windows, в то время, как двигаете ключ.
Также можно выбрать несколько ключей (keys) сразу:
- Чтобы выбрать несколько ключей за раз, зажмите Shift, во время нажатий на ключи.
- To deselect a selected key, click on it again while holding down Ctrl.
- Чтобы выбрать все ключи (keys) внутри прямоугольной области, нажмите на пустом месте и перетащите курсор мыши, чтобы сформировать прямоугольное выделение.
- Прямоугольное выделение также можно использовать для добавления дополнительных ключе в выделение, при помощи зажатия down Shift.
Ключи (Keys) можно удалить, выделив их и нажав Delete или нажав на них правой кнопкой мыши и выбрав из контекстного меню Delete Key.
Редактирование кривых
Direct editing of key values in curve editors is a new feature in Unity 5.1. Use Enter/Return or context menu to start editing selected keys, Tab to switch between fields, Enter/Return to commit, and Escape to cancel editing.
Навигация в окне Curve View
При работе с окном Animation (Animation View) вы можете легко увеличить масштаб кривых для более детальной работы с ними или уменьшить масштаб, чтобы получить полную картину.
Вы всегда можете нажать F, для выделения всех отображённых кривых или ключей на кривых в этом кадре.
Масштаб окна Curve View
You can zoom the Curve View using the scroll-wheel of your mouse, the zoom functionality of your trackpad, or by holding Alt while right-dragging with your mouse.
Вы можете масштабировать только по горизонтальной или вертикальной оси:
- Масштабирование при зажатом Command на Mac / Control на Windows будет масштабировать по горизонтали.
- Масштабирование, при зажатом Shift будет масштабировать по вертикали.
Кроме того, вы можете уменьшить или расширить видимую зону в Curve View при помощи перетягивания концов полос прокрутки.
Прокрутка
Вы можете прокручивать (pan) окно Curve View, при помощи движения мыши с зажатым колёсиком, или зажав Alt, пока двигать мышью с зажатой левой кнопкой.
Редактирование касательных
A key has two tangents - one on the left for the incoming slope and one on the right for the outgoing slope. The tangents control the shape of the curve between the keys. You can select from a number of different tangent types to control how your curve leaves one key and arrives at the next key. Right-click a key to select the tangent type for that key.

For animated values to change smoothly when passing a key, the left and right tangent must be co-linear. The following tangent types ensure smoothness:
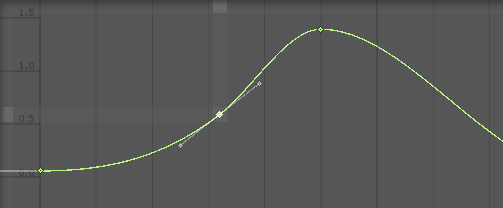
- Clamped Auto: This is the default tangent mode. The tangents are automatically set to make the curve pass smoothly through the key. When editing the key’s position or time, the tangent adjusts to prevent the curve from “overshooting” the target value. If you manually adjust the tangents of a key in Clamped Auto mode, it is switched to Free Smooth mode. In the example below, the tangent automatically goes into a slope and levels out while the key is being moved:
-
Auto: This is a Legacy tangent mode, and remains an option to be backward compatible with older projects. Unless you have a specific reason to use this mode, use the default Clamped Auto. When a key is set to this mode, the tangents are automatically set to make the curve pass smoothly through the key. However, there are two differences compared with Clamped Auto mode:
- The tangents do not adjust automatically when the key’s position or time is edited; they only adjust when initially setting the key to this mode.
- When Unity calculates the tangent, it does not take into account avoiding “overshoot” of the target value of the key.
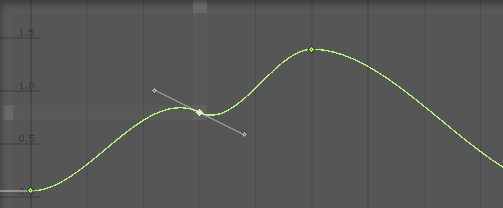
- Free Smooth: Drag the tangent handles to freely set the tangents. They are locked to be co-linear to ensure smoothness.
- Flat: The tangents are set to be horizontal (this is a special case of Free Smooth).

Sometimes you might not want the curve to be smooth when passing through a key. To create sharp changes in the curve, choose one of the Broken tangent modes.

When using broken tangents, the left and right tangent can be set individually. Each of the left and right tangents can be set to one of the following types:
- Broken - Free: Drag the tangent handle to freely set the tangents.

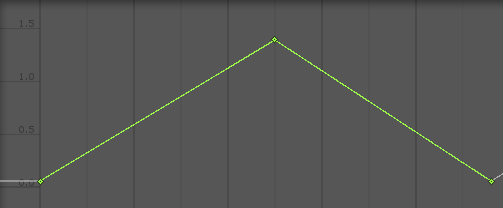
- Broken - Linear: The tangent points towards the neighboring key. To make a linear curve segment, set the tangents at both ends to be Linear. In the example below, all three keys have been set to Broken - Linear, to achieve straight lines from key to key.
- Broken - Constant: The curve retains a constant value between two keys. The value of the left key determines the value of the curve segment.

Copyright © 2023 Unity Technologies
优美缔软件(上海)有限公司 版权所有
"Unity"、Unity 徽标及其他 Unity 商标是 Unity Technologies 或其附属机构在美国及其他地区的商标或注册商标。其他名称或品牌是其各自所有者的商标。
公安部备案号:
31010902002961