Preferences
Unity provides a number of preferences that let you customize the behavior of the Unity Editor.
To access the Preferences window, go to Edit > Preferences (Windows) or Unity > Preferences (macOS) from the main menu in Unity. The following preference categories are available:
- General
- 2D
- Analysis
- Cache Server (global)
- Colors
- External Tools
- GI Cache
- Scene View
- UI Scaling
- Custom package preferences
Navigating the Preferences window
Use the search box to filter the list of settings categories, and highlight keywords in the details pane on the right.
General
General preferences let you customize the overall behavior for working in Unity.

| Свойство: | Функция: | |
|---|---|---|
| Auto Refresh | Enable this setting to update Assets automatically as they change. | |
| Load Previous Project on Startup | Enable this setting to always load the previous Project at startup. | |
| Compress Assets on Import | Enable this setting to automatically compress Assets during import. | |
| Disable Editor Analytics (Pro only) | Enable this setting to stop the Editor automatically sending information back to Unity. | |
| Show Asset Store search hits | Enable this setting to show the number of free/paid Assets from the Asset Store in the Project Browser. | |
| Verify Saving Assets | Enable this setting if you wish to verify which Assets to save individually on quitting Unity. | |
| Script Changes While Playing | Choose Unity’s behavior when scripts change while your game is running in the Editor. | |
| Recompile And Continue Playing | Recompile your scripts and keep running the Scene. This is the default behavior, but you might want to change it if your scripts rely on any non-serializable data. | |
| Recompile After Finished Playing | Defer recompilation until you manually stop your Scene, avoiding any interruption. | |
| Stop Playing And Recompile | Immediately stop your Scene for recompilation, allowing you to quickly restart testing. | |
| Code Optimization On Startup | Choose whether to set code optimization mode to Debug or Release when the Unity Editor starts. Debug mode allows you to attach external debugger software, but gives slower C# performance when you run your Project in Play Mode in the Editor. Release mode gives faster C# performance when you run your Project in Play Mode in the Editor, but you cannot attach any external debuggers. For more information, see Code Optimization Mode. | |
| Editor Theme | Choose which skin to use in the Unity Editor. This is only available for Plus and Pro Unity subscriptions. | |
| Personal | Use the light grey background with black text. | |
| Professional | Use the dark grey background with white text. | |
| Editor Font | Select which font to display in the Unity Editor. The default font is Inter. | |
| Enable Alpha Numeric Sorting | Enable this setting to display a button in the top-right corner of the Hierarchy window, which toggles between Transform sort (the default) and Alphanumeric sort. | |
| Enable Code Coverage | Enable this setting to access the interface for the code coverage data that Mono exposes. Code coverage lets you see how much of your code is executed when it is run. It’s normally associated with automated unit tests, but coverage data in Unity can be gathered at any time when the Editor is running. For more information, see documentation on Coverage API. | |
| Create Objects at Origin | Enable this setting to instantiate new 3D objects at World coordinates 0,0,0. Otherwise, Unity uses the Scene pivot (in front of the Scene view Camera). | |
| Interaction Mode | Specifies how long the Editor can idle before it updates. After one frame finishes, the Editor waits up to the specified amount of time before the next frame begins. This allows you to throttle Editor performance, and reduce consumption of CPU resources and power. For example, if you want to test the Editor’s performance, set this property to No Throttling. If you want to conserve power (for example, to prolong battery life on a laptop computer), set this property to one of the throttled modes. In throttled modes, the Editor stops idling if you interact with it (for example, by panning in the Scene view). Note: In Play mode, Unity ignores any throttling that you apply using this preference. The editor updates as fast as possible unless you enable the VSync option in the Game view, or set Application.targetFrameRate to a value other than –1. |
|
| Default | The Editor idles up to 4 ms each tick. If a frame takes 5 ms or more, the Editor doesn’t idle at all, and the next frame starts automatically. | |
| No Throttling | Each time a frame finishes, the next frame begins immediately. The Editor never waits, and updates as fast as possible. This mode consumes a lot of CPU resources. If you are using a laptop computer, it can cause the battery to drain quickly. |
|
| Monitor Refresh Rate | The Editor idles up to the monitor’s update rate in milliseconds. For most monitors, this is 16 ms. | |
| Custom | You specify the maximum amount of time application can be idle. When you select this option the Frame Throttling (milliseconds) property appears. |
|
| Frame Throttling (milliseconds) | When Interaction Mode is set to Custom, this property specifies how long the Editor can idle between frames. The value can be between 0 and 33 ms. 0 is equivalent to setting Interaction Mode to No Throttling. | |
2D
Use the Max Sprite Atlas Cache Size (GB) preference to set the maximum size of the Sprite Atlas cache folder. Whenever possible, Unity keeps the size of this folder below this level.

Analysis
The Analysis preferences let you define settings for the Profiler.

| Свойство: | Функция: |
|---|---|
| Frame count | Set the maximum number of frames for the Profiler to capture. You can set this number between 300 and 2,000. |
| Show stats for ‘current frame’ | By default, when you select the Current Frame button and enter Current Frame mode, the frame indicator line does not have annotations with the stats for the current frame. This is because the stats annotations might make it difficult to view data in real-time. To display the annotations, enable this setting. |
| Default recording state | Select which recording state the Profiler should open in. Choose from Enabled, Disabled, or Remember. Enabled keeps the Record button enabled between sessions, while Disbled disables it, regardless of whether you turn it on or off during your profiling session. The Remember state remembers whether you have enabled or disabled the Record button during your session and keeps it at its last state next time you open the Profiler window. |
| Default editor target mode | Select what mode the Attach to Player dropdown should target by default. Choose from either Playmode or Editor. |
Cache Server
Any time an Asset changes, Unity automatically re-imports it. Setting up a Cache Server drastically reduces the time it takes to import Assets. You can set up a Cache Server using remote hosting or stored on your local computer.

| Свойство: | Функция: |
|---|---|
| New Projects default asset pipeline | Select the default asset pipeline for new Projects. |
| Active version | Displays the current asset pipeline version. |
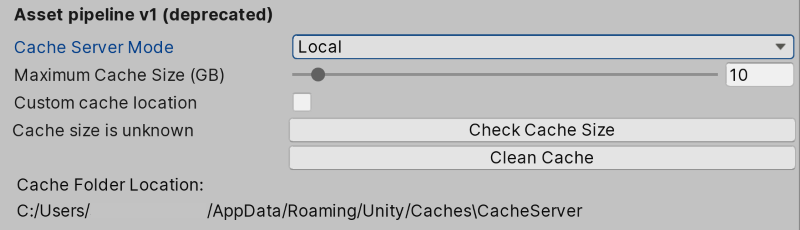
| Asset pipeline v1 (deprecated) | |
| Cache Server Mode | Define the Cache Server mode. Local: Use a local Cache Server on this computer. The preferences for Local storage appear. Remote: Use a Cache Server hosted on a remote computer. The preferences for Remote hosting appear. By default the Cache Server is disabled. |
| Asset pipeline v2 | |
| Cache Server Default Mode | Define whether the Cache Server is enabled or disabled by default. You can override this per Project in the Unity Editor settings. For more information on using Asset pipeline v2, see Unity Accelerator. |
| Default IP address | Set the default IP address for the Cache Server to use. You can override this per Project in the Unity Editor settings. |
| Check Connection | Click this button to attempt to connect to the remote Cache Server. |
Remote hosting
These preferences are only available when Use Cache Server is set to Remote.

| Свойство: | Функция: |
|---|---|
| IP Address | Enter the IP address of the dedicated cache server that an administrator set up. |
| Check Connection | Click this button to attempt to connect to the remote Cache Server. |
Local storage
These preferences are only available when the Use Cache Server is set to Local.
| Свойство: | Функция: |
|---|---|
| Maximum Cache Size (GB) | Specify the maximum size in gigabytes for the Cache Server on this computer’s storage. The minimum size is 1GB. The maximum size is 200GB. The default cache size is 10GB. |
| Custom cache location | Enable this option to specify a location where you want to store the cache. |
| Cache Folder Location | Click the Browse button to specify a location for the cache. |
| Cache size is … | Message displaying the current size of the cache. Before clicking the Check Cache Size button, this appears as Cache size is unknown. After clicking the button, the calculated cache size appears in the message. |
| Check Cache Size | Click this to find out how much storage the Local Cache Server is using. This operation can take some time to complete if you have a large project. |
| Clean Cache | Delete the contents of the cache. |
| Cache Folder Location | Displays the current cache folder location. |
Colors
The Colors preferences let you choose the colors that Unity uses when displaying various user interface elements.

External Tools
Use the External Tools preferences to set up external applications for scripting, working with images, and source control.

| Свойство: | Функция: |
|---|---|
| External Script Editor | Choose which application Unity should use to open script files. Unity automatically passes the correct arguments to script editors it has built-in support for. Unity has built-in support for Visual Studio Community, Visual Studio Code (VSCode) and JetBrains Rider. The Open by file extension option uses your device’s default application for the relevant file type when you open a file. If no default application is available, your device opens a window that prompts you to choose an application to use to open the file. |
| Примеры аргументов для редакторов скриптов: | This field controls parameters that Unity can send to your code editor when you open a file. The $(File), $(Line) and $(Column) arguments pass the filename, line number and column number to your external code editor. Your code editor uses these arguments to open the correct file with the cursor at the correct position. For example, if you double click an error message in the Unity Console, Unity passes these arguments from that error message to the external editor, which then opens the right file at the position where that error occurred.You can manually edit this field to customize the arguments Unity sends to your external code editor. Click the Reset argument button to reset this field to its default setting, which is shown in the above screenshot. |
| Generate all .csproj files. | Enable this setting to generate all .csproj files. Code editors use .sln and .csproj files to access data about your Project. .csproj files store descriptive data or metadata in an XML format. This data might include versioning information, platform requirements, build files, or database settings. When these files are present, code editors can use the data they contain to provide useful features like highlighting potential compilation errors. Enable this setting to instruct Unity to create .csproj files wherever possible in your Project. |
|
Extensions handled (Only available if you select either Rider or Visual Studio Code as your External Script Editor) |
This field determines which file types the External Script Editor opens. The field is pre-populated with a list of files that the script editor opens by default. To add other file types to this list, type in the file extension and separate each extension with a semicolon. |
|
Add .unityproj’s to .sln (Deprecated) |
This setting is permanently inactive because Unityscript, the scripting language that produced .unityproj files, is deprecated. |
| Editor Attaching | Enable this setting to allow your external code editor to debug scripts running in the Unity Editor. If you disable this option, you can’t attach a script debugger to Unity to debug your scripts. For more information on debugging, see the Debugging C# in Unity documentation. Note: When you change this setting, you need to restart Unity for the change to take effect. |
| Image application | Какое приложение будет использоваться для открытия изображений? |
| Revision Control Diff/Merge | Choose which application you want Unity to use to resolve file differences in your source control repository. Unity detects these tools in their default installation locations. On Windows, Unity checks registry keys for TortoiseMerge, WinMerge, PlasticSCM Merge, and Beyond Compare 4. For more information, see the Revision Control Diff/Merge section below. |
Revision Control Diff/Merge
Unity currently supports these tools:
- SourceGear DiffMerge
- TkDiff
- P4Merge
- TortoiseMerge
- WinMerge
- PlasticSCM Merge
- Beyond Compare 4
Note: These are third-party tools that Unity doesn’t include by default. You must download and install them separately.
To set up a custom revision tool, follow these steps:
- From the Revision Control Diff/Merge drop-down list, select Custom Tool.
- Enter the path to the custom tool’s installation folder. On Mac, this should point to the Contents / MacOS folder in the tool’s installation folder.
- Enter the arguments for two-way diffs, three-way diffs, and merges.
To specify file layout in the revision tool, use these arguments:
| Property | Function |
|---|---|
#LTITLE |
Left title |
#RTITLE |
Right title |
#ATITLE |
Ancestor title |
#LEFT |
Left file |
#RIGHT |
Right file |
#ANCESTOR |
Ancestor file |
#OUTPUT |
Output file |
#ABSLEFT |
Absolute path to the left file |
#ABSRIGHT |
Absolute path to the right file |
#ABSANCESTOR |
Absolute path to the ancestor file |
#ABSOUTPUT |
Absolute path to the output file |
Examples:


GI Cache
The Global Illumination (GI) system uses a cache on each computer to store intermediate files used to pre-compute real-time Global Illumination. All projects on the computer share the cache.

| Свойство: | Функция: |
|---|---|
| Maximum Cache Size (GB) | Use the slider to set the maximum GI cache folder size. Unity keeps the GI cache folder size below this number whenever possible. Unity periodically deletes unused files to create more space (deleting the oldest files first). This is an automatic process, and doesn’t require you to do anything. Note: If the current Scene is using all the files in the GI cache, increase your cache size. Otherwise, resource-intensive recomputation occurs when baking. This can happen when the Scene is very large or the cache size is too small. |
| Custom cache location | Enable this option to allow a custom location for the GI cache folder. By default, the GI cache is stored in the Caches folder. All Projects share the cache folder. Tip: Storing the GI Cache on an SSD drive can speed up baking in cases where the baking process is I/O bound. |
| Cache Folder Location | Click the Browse button to specify a location for the cache. |
| Cache compression | Enable this option to allow Unity to compress files in the GI cache and reduce the size of the generated data. The files are LZ4-compressed by default, and the naming scheme is a hash and a file extension. The hashes are computed based on the inputs to the lighting system, so changing any of the following can lead to recomputation of lighting: - Materials (Textures, Albedo, Emission) - Lights - Geometry - Static flags - Light Probe groups - Reflection probes - Lightmap Parameters Tip: If you need to access the raw Enlighten data, disable Cache Compression and clean the cache. |
| Clean Cache | Use this button to clear the cache directory. It is not safe to delete the GI Cache directory manually while the Editor is running. This is because the Editor creates the GiCache folder when it starts and maintains a set of references to those files. The Clean Cache button ensures that the Editor releases all references to the files on disk before they are deleted. |
| Cache size is | Displays the current size of the cache. |
| Cache Folder Location | Displays the current cache folder location. |
Scene View
Use the Scene View preferences to customize object placement and visibility while editing.

| Свойство: | Функция: |
|---|---|
| Create Objects at Origin | Enable to create new objects at origin (as opposed to the Scene pivot). Disabled by default. |
| Line Thickness | Set the line thickness of your transform tools. |
| Enable filtering while searching | Enable to gray out any non-matching items in the Scene view. Enabled by default. |
| Enable filtering while editing LOD groups | Enable to gray out other objects in the scene while editing LOD groups. Enabled by default. |
UI Scaling
The UI Scaling preferences let you define how to scale UI text and icons in the Unity Editor.

| Свойство: | Функция: |
|---|---|
| Use default desktop setting | Enable this setting to use your computer’s default settings for scaling UI text and icons. |
| Current scaling | Displays the current scaling value. |
| Use custom scaling value | Override the scaling value. |
Custom package preferences
Some Asset Store or Unity packages add their own custom preferences to the Preferences window. Generally these use the package name as the preferences category. In this example, you can see the Cinemachine package preferences:

For information about a specific package’s preferences, see the documentation for that package. This section contains documentation for standard Unity preferences only.
2020–05–04 Page amended
Interaction Mode Preferences added in 2019.3
Added Analysis and UI Scaling tabs, and removed Grid Brush and Tile Palette tabs in 2019.3
Added Gradle for Android options to the External Tools section in 2019.1.
Removed keys and added further options to the Tile Palette Preferences in 2019.1. NewIn20191
Selection outline color preference for child GameObjects added in 2018.3
New unified settings and other updates for Unity 2018.3
Script Changes While Playing and Device To Use drop-down menus added in Unity 2018.2
Updated list of external script editors in 2018.1
Copyright © 2023 Unity Technologies
优美缔软件(上海)有限公司 版权所有
"Unity"、Unity 徽标及其他 Unity 商标是 Unity Technologies 或其附属机构在美国及其他地区的商标或注册商标。其他名称或品牌是其各自所有者的商标。
公安部备案号:
31010902002961