Build your WebGL application
To create a build for WebGL, go to File > Build Settings from Unity’s main menu. In the Platform list, select WebGL and then click Switch Platform.
When you have configured the Build Settings, choose one the following options:
- Build: Builds your application into a Player.
- Build and Run: Builds your application in a Player, and opens that Player on your target platform.
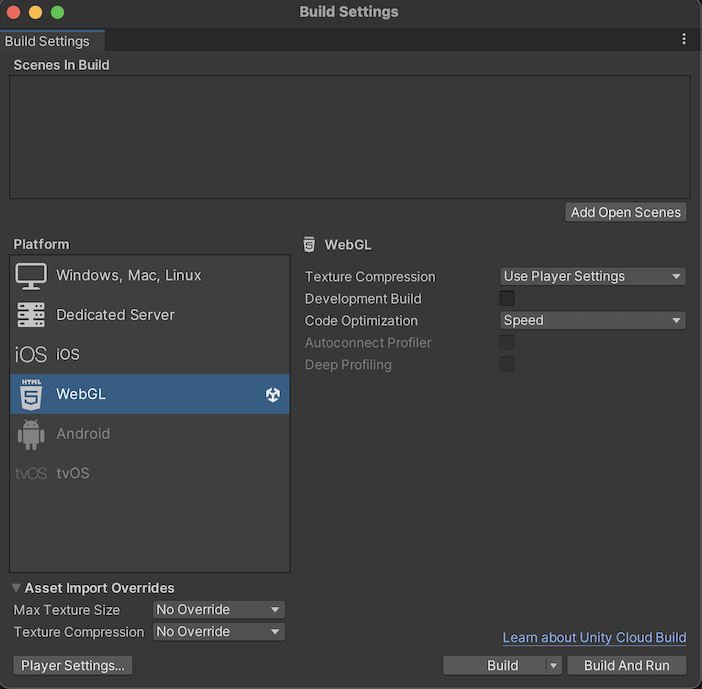
The Unity build system for WebGL supports the following settings:
| 设置 | 功能 | |
|---|---|---|
| Texture Compression | The texture compression format to use for the build. The options are: | |
| Use Player Settings | This is the default selection. It uses the texture compression format you set in the Player settings window. | |
| ETC2 | Uses ETC2 format, which is widely supported on mobile devices. | |
| ASTC | Uses ASTC format, which is widely supported on mobile devices. | |
| DXT | Uses DXT format, which is widely supported on desktop devices. | |
| Development Build | Enable this setting to include scripting debug symbols and the Profiler in your build. When you enable this, Unity sets the DEVELOPMENT_BUILD scripting define. You should use this setting only when you want to test your application. The development builds don’t minify content, which means the development builds are large to distribute. |
|
| Code Optimization | Select the optimization mode to use for compiling the WebGL code. | |
| Speed | This is the default setting. Select this to generate WebGL code that’s optimized for runtime performance. | |
| Size | Select this to generate WebGL code that’s optimized for build size. This is useful for reducing WebGL games to the smallest downloadable size, and for large projects if a mobile browser (Android or iOS) refuses to load the default optimize-for-speed WebAssembly builds as too large for mobile devices to consume. | |
| Autoconnect Profiler | Typically, when enabled, this setting allows you to automatically connect the Unity Profiler to your build. However for WebGL, as you can’t connect the Profiler to a running build, use this option to connect the content to the Editor instead. This is because the Profiler connection is handled using WebSockets on WebGL, but a web browser only allows outgoing connections from the content. For this setting to be available, you should enable the Development Build option. | |
| Deep Profiling | Enable this setting to activate Deep Profiling in the Profiler. This makes the Profiler instrument every function call in your application and returns more detailed profiling data. When you enable Deep Profiling Support, it might slow down script execution. This option is only available if you enable the Development Build option. | |
| Build | Use it to build your application. | |
| Build And Run | Use it to view the WebGL Player locally. Unity uses a local web server to host your build, and opens it from a localhost URL. Alternatively, you can use a custom local web server with properly configured response headers. For more information, see Compressed builds and server configuration. | |
For changing the settings for Asset Import Overrides, see Build Settings.
Build Folder
The Build folder contains the following files ([ExampleBuild] represents the name of the target build folder).
| 文件名 | 包含 |
|---|---|
[ExampleBuild].loader.js |
The JavaScript code that the web page needs to load the Unity content. |
[ExampleBuild].framework.js |
JavaScript 运行时和插件。 |
[ExampleBuild].wasm |
WebAssembly 二进制文件。 |
[ExampleBuild].mem |
A binary image to initialize the heap memory for your Player. Unity generates this file for multi-threaded WebAssembly builds only. |
[ExampleBuild].data |
资源数据和场景。 |
[ExampleBuild].symbols.json |
调试错误堆栈跟踪所需的调试符号名称。仅当启用 Debug Symbols 选项时 (File > Build Settings > Player Settings),才会为 Release 构建生成此文件。 |
[ExampleBuild].jpg |
A background image, which displays while the build is loading. This file is only generated when a Background Image is available in the Player Settings (File > Build Settings > Player Settings > Splash Image). For more information, see Splash Screen. |
如果对构建启用某种压缩方法,Unity 会识别与压缩方法对应的扩展名,并将此扩展名添加到 Build 子文件夹中的文件的名称中。如果启用 Decompression Fallback,Unity 将扩展名 .unityweb 附加到构建文件名。否则,Unity 为 Gzip 压缩方法附加扩展名 .gz,或者为 Brotli 压缩方法附加扩展名 .br。
有关更多信息,请参阅 WebGL:压缩构建和服务器配置。
If you enable Name Files As Hashes in the Player Settings, Unity uses the hash of the file content instead of the default filename. This applies to each file in the build folder. This option allows you to upload updated versions of the game builds into the same folder on the server, and only upload the files which have changed between build iterations.
注意:在某些浏览器中可能无法直接从文件系统打开播放器。这是由于本地文件 URL 应用了安全限制。
Deep Profiling Support
启用 Deep Profiling Support 设置可使 Unity Profiler 对应用程序中的每次函数调用都进行性能分析。如需了解更多信息,请参阅有关深度性能分析的文档。
Enable Exceptions
Open Publishing Settings to access Enable Exceptions. Enable Exceptions allows you to specify how unexpected code behavior (also known as errors) is handled at run time. It has these options:
- None:如果不需要任何异常支持,请选择此选项。此选项可提供最佳性能和最小构建。使用此选项,抛出的任何异常都会导致内容因该设置中的错误而停止。
-
Explicitly Thrown Exceptions Only(默认设置):选择此选项可捕获从脚本中的
throw语句显式指定的异常,并可确保调用finally代码块。请注意,选择此选项会使脚本中生成的 JavaScript 代码变得更长且更慢;仅当脚本是项目的主要瓶颈时,这才会成为问题。 -
Full Without Stacktrace: Select this option to capture:
* Exceptions which are explicitly specified from
throwstatements in your scripts (the same as in the Explicitly Thrown Exceptions Only option)- Null 引用
- 越界数组访问
- Full With Stacktrace:此选项与上面的选项类似,但也捕获堆栈跟踪。Unity 通过在代码中嵌入对异常检查来生成这些异常,因此该选项会降低性能并增加浏览器内存使用量。仅用于调试,并始终在 64 位浏览器中进行测试。
数据缓存
To access Data Caching, go to Publishing Setings via File > Build Settings > Player Settings > WebGL. This enables the browser to cache the main data files into the IndexedDB database.
使用默认浏览器 HTTP 缓存并不能保证浏览器缓存特定响应。这是因为浏览器 HTTP 缓存空间有限,浏览器可能无法缓存过大的文件。
为了提高加载速度,IndexedDB 允许您缓存超过浏览器限制的文件。缓存更多文件时,下一次构建运行期间下载内容在用户计算机上可用的机会就增加了。
数据缓存仅为 HTTP 响应缓存 IndexedDB 缓存中的 .data 文件。要缓存资源包,需要启用数据缓存并覆盖 unityInstance.Module.cacheControl()。
为此,请确保 Module.cacheControl(url) 为请求的资源包 URL 返回 must-revalidate。例如,您可以在 createUnityInstance() 返回的 Promise 的执行回调中重写 unityInstance.Module.cacheControl() 函数。
有关 createUnityInstance() 的更多信息,请参阅 WebGL:压缩构建和服务器配置。
Texture Compression
The texture compression setting in WebGL lets you create builds that target platforms based on the texture compression formats they support. The texture compression format value you set here has priority over the Player settings texture compression format value. To run your game on both desktop and mobile browsers with compressed textures, you might want to create two builds: * Targeting desktop browsers with DXT set as the texture compression format * Targeting mobile browsers with ASTC set as the texture compression format
Create builds for desktop and mobile browsers from a script
You can run a build for both desktop browsers and mobile browsers with the corresponding texture compression formats simultaneously using a script. For example:
using System.Collections;
using System.Collections.Generic;
using UnityEngine;
using UnityEditor;
using System.Diagnostics;
using System.IO;
using UnityEditor.Build.Reporting;

public class comboBuild
{
    //This creates a menu item to trigger the dual builds https://docs.unity.cn/ScriptReference/MenuItem.html

    [MenuItem("Game Build Menu/Dual Build")]
    public static void BuildGame()
    {
      //This builds the player twice: a build with desktop-specific texture settings (WebGL_Build) as well as mobile-specific texture settings (WebGL_Mobile), and combines the necessary files into one directory (WebGL_Build)

      string dualBuildPath    = "WebGLBuilds";
      string desktopBuildName = "WebGL_Build";
      string mobileBuildName  = "WebGL_Mobile";

      string desktopPath = Path.Combine(dualBuildPath, desktopBuildName);
      string mobilePath  = Path.Combine(dualBuildPath, mobileBuildName);
      string[] scenes = new string[] {"Assets/scene.unity"};

      EditorUserBuildSettings.webGLBuildSubtarget = WebGLTextureSubtarget.DXT;
      BuildPipeline.BuildPlayer(scenes, desktopPath, BuildTarget.WebGL, BuildOptions.Development);

      EditorUserBuildSettings.webGLBuildSubtarget = WebGLTextureSubtarget.ASTC;
      BuildPipeline.BuildPlayer(scenes,  mobilePath, BuildTarget.WebGL, BuildOptions.Development);

      // Copy the mobile.data file to the desktop build directory to consolidate them both
      FileUtil.CopyFileOrDirectory(Path.Combine(mobilePath, "Build", mobileBuildName + ".data"), Path.Combine(desktopPath, "Build", mobileBuildName + ".data"));
    }
}
You can modify the WebGL template’s index.html file to select the appropriate data file if there’s support for the texture compression format extension:
// choose the data file based on whether there's support for the ASTC texture compression format
      var dataFile = "/{{{ DATA_FILENAME }}}";
      var c = document.createElement("canvas");
      var gl = c.getContext("webgl");
      var gl2 = c.getContext("webgl2");
      if ((gl && gl.getExtension('WEBGL_compressed_texture_astc')) || (gl2 &&
              gl2.getExtension('WEBGL_compressed_texutre_astc'))) {
        dataFile =  "/WebGL_Mobile.data";
      }

      var buildUrl = "Build";
      var loaderUrl = buildUrl + "/{{{ LOADER_FILENAME }}}";
      var config = {
        dataUrl: buildUrl + dataFile,
        frameworkUrl: buildUrl + "/{{{ FRAMEWORK_FILENAME }}}",
#if USE_WASM
        codeUrl: buildUrl + "/{{{ CODE_FILENAME }}}",
#endif
#if MEMORY_FILENAME
        memoryUrl: buildUrl + "/{{{ MEMORY_FILENAME }}}",
#endif
#if SYMBOLS_FILENAME
        symbolsUrl: buildUrl + "/{{{ SYMBOLS_FILENAME }}}",
#endif
        streamingAssetsUrl: "StreamingAssets",
        companyName: {{{ JSON.stringify(COMPANY_NAME) }}},
        productName: {{{ JSON.stringify(PRODUCT_NAME) }}},
      productVersion: {{{ JSON.stringify(PRODUCT_VERSION) }}},
        showBanner: unityShowBanner,
     };
- 在 Unity 2019.1 中删除了 asm.js 链接器目标
- Unity 2020.1 中添加了构建文件更新和数据缓存
Copyright © 2023 Unity Technologies
优美缔软件(上海)有限公司 版权所有
"Unity"、Unity 徽标及其他 Unity 商标是 Unity Technologies 或其附属机构在美国及其他地区的商标或注册商标。其他名称或品牌是其各自所有者的商标。
公安部备案号:
31010902002961