Build your WebGL application
To create a build for WebGL, go to File > Build Settings from Unity’s main menu. In the Platform list, select WebGL and then click Switch Platform.
When you have configured the Build Settings, choose one the following options:
- Build: Builds your application into a Player.
- Build and Run: Builds your application in a Player, and opens that Player on your target platform.
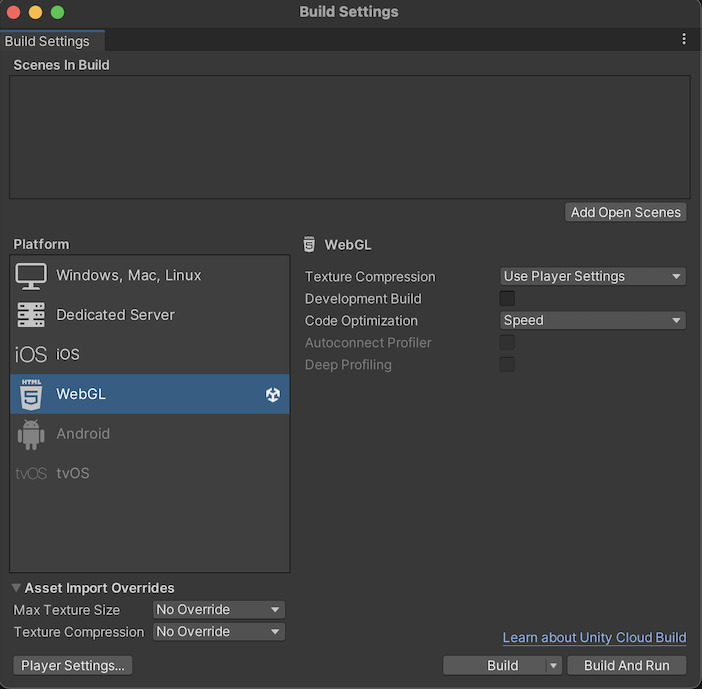
The Unity build system for WebGL supports the following settings:
| 設定 | 機能 | |
|---|---|---|
| Texture Compression | The texture compression format to use for the build. The options are: | |
| Use Player Settings | This is the default selection. It uses the texture compression format you set in the Player settings window. | |
| ETC2 | Uses ETC2 format, which is widely supported on mobile devices. | |
| ASTC | Uses ASTC format, which is widely supported on mobile devices. | |
| DXT | Uses DXT format, which is widely supported on desktop devices. | |
| Development Build | Enable this setting to include scripting debug symbols and the Profiler in your build. When you enable this, Unity sets the DEVELOPMENT_BUILD scripting define. You should use this setting only when you want to test your application. The development builds don’t minify content, which means the development builds are large to distribute. |
|
| Code Optimization | Select the optimization mode to use for compiling the WebGL code. | |
| Speed | This is the default setting. Select this to generate WebGL code that’s optimized for runtime performance. | |
| Size | Select this to generate WebGL code that’s optimized for build size. This is useful for reducing WebGL games to the smallest downloadable size, and for large projects if a mobile browser (Android or iOS) refuses to load the default optimize-for-speed WebAssembly builds as too large for mobile devices to consume. | |
| Autoconnect Profiler | Typically, when enabled, this setting allows you to automatically connect the Unity Profiler to your build. However for WebGL, as you can’t connect the Profiler to a running build, use this option to connect the content to the Editor instead. This is because the Profiler connection is handled using WebSockets on WebGL, but a web browser only allows outgoing connections from the content. For this setting to be available, you should enable the Development Build option. | |
| Deep Profiling | Enable this setting to activate Deep Profiling in the Profiler. This makes the Profiler instrument every function call in your application and returns more detailed profiling data. When you enable Deep Profiling Support, it might slow down script execution. This option is only available if you enable the Development Build option. | |
| Build | Use it to build your application. | |
| Build And Run | Use it to view the WebGL Player locally. Unity uses a local web server to host your build, and opens it from a localhost URL. Alternatively, you can use a custom local web server with properly configured response headers. For more information, see Compressed builds and server configuration. | |
For changing the settings for Asset Import Overrides, see Build Settings.
Build Folder
The Build folder contains the following files ([ExampleBuild] represents the name of the target build folder).
| ファイル名 | 含まれるもの |
|---|---|
[ExampleBuild].loader.js |
The JavaScript code that the web page needs to load the Unity content. |
[ExampleBuild].framework.js |
JavaScript のランタイムとプラグイン。 |
[ExampleBuild].wasm |
WebAssembly バイナリ。 |
[ExampleBuild].mem |
A binary image to initialize the heap memory for your Player. Unity generates this file for multi-threaded WebAssembly builds only. |
[ExampleBuild].data |
アセットデータとシーン。 |
[ExampleBuild].symbols.json |
エラーのスタックトレースを解除するのに必要なデバッグシンボル名。このファイルは、Debug Symbols オプション (File > Build Settings > Player Settings) を有効にする場合、リリースビルドに対してのみ生成されます。 |
[ExampleBuild].jpg |
A background image, which displays while the build is loading. This file is only generated when a Background Image is available in the Player Settings (File > Build Settings > Player Settings > Splash Image). For more information, see Splash Screen. |
ビルドに対して Compression Method を有効にする場合、Unity は圧縮方法に対応する拡張子を識別し、Build サブフォルダー内のファイル名にこの拡張子を追加します。Decompression Fallback を有効にする場合、Unity はビルドのファイル名に .unityweb という拡張子を追加します。それ以外の場合、Unity は、Gzip 圧縮方式の場合は .gz、Brotli圧縮方式の場合は .br という拡張子を加えます。
詳細については、WebGL: 圧縮ビルドとサーバー設定 を参照してください。
If you enable Name Files As Hashes in the Player Settings, Unity uses the hash of the file content instead of the default filename. This applies to each file in the build folder. This option allows you to upload updated versions of the game builds into the same folder on the server, and only upload the files which have changed between build iterations.
ノート: ファイルシステムから直接プレイヤーを開くと、ブラウザーによっては動作しないことがあります。これは、ローカルファイルの URL に適用されるセキュリティ制限によるものです。
Deep Profiling Support
Deep Profiling Support を有効にすると、Unity のプロファイラーがアプリケーション内のすべての関数呼び出しをプロファイルします。詳細については、詳細なプロファイリング のドキュメントを参照してください。
Enable Exceptions
Open Publishing Settings to access Enable Exceptions. Enable Exceptions allows you to specify how unexpected code behavior (also known as errors) is handled at run time. It has these options:
- None: 例外に関するサポートを必要としない場合はこれを選択します。これにより、最高のパフォーマンスと最小のビルドが得られます。このオプションでは、例外がスローされるとコンテンツはその設定のままエラーで停止します。
-
Explicitly Thrown Exceptions Only (default): これを選択すると、スクリプトの
throwステートメントから明示的に指定された例外をキャッチし、finallyブロックを確実に呼び出します。このオプションを選択すると、スクリプトから生成された JavaScript コードが長く遅くなります。これは、スクリプトがプロジェクトの主なボトルネックになっている場合にのみ問題になります。 -
Full Without Stacktrace: Select this option to capture:
* Exceptions which are explicitly specified from
throwstatements in your scripts (the same as in the Explicitly Thrown Exceptions Only option)- Null 参照
- 範囲外の配列アクセス
- Full With Stacktrace: このオプションは上記のオプションと似ていますが、スタックトレースもキャプチャします。 Unity はそれらの確認をコードに埋め込むことでこれらの例外を生成します。そのため、このオプションはパフォーマンスを低下させ、ブラウザーのメモリ使用量を増やします。このオプションはデバッグにのみ使用し、常に64ビットブラウザーでテストしてください。
データキャッシング
To access Data Caching, go to Publishing Setings via File > Build Settings > Player Settings > WebGL. This enables the browser to cache the main data files into the IndexedDB database.
ブラウザーのデフォルトの HTTP キャッシュを使用しても、ブラウザーが特定のレスポンスをキャッシュすることを保証するものではありません。これは、ブラウザーの HTTP キャッシュの容量が限られており、大きすぎるファイルをキャッシュできない可能性があるためです。
ロードの速度を向上させるために、IndexedDB ではブラウザーの制限を超えるファイルをキャッシュすることができます。より多くのファイルをキャッシュすると、ダウンロードしたコンテンツが次回のビルド実行時にユーザーのマシンで利用可能になる可能性が高まります。
データキャッシングは、HTTP 応答用に IndexedDB キャッシュの .data ファイルのみをキャッシュします。AssetBundle をキャッシュするには、データキャッシュを有効にして、 unityInstance.Module.cacheControl() をオーバーライドする必要があります。\ nこれを行うには、Module.cacheControl(url) が要求された AssetBundleURL に対して must-revalidate を返すことを確認してください。例えば、createUnityInstance() が返す Promise のフルフィルメントコールバックで unityInstance.Module.cacheControl() 関数をオーバーライドできます。
createUnityInstance() の詳細については、WebGL: 圧縮ビルドとサーバー設定 を参照してください。
Texture Compression
The texture compression setting in WebGL lets you create builds that target platforms based on the texture compression formats they support. The texture compression format value you set here has priority over the Player settings texture compression format value. To run your game on both desktop and mobile browsers with compressed textures, you might want to create two builds: * Targeting desktop browsers with DXT set as the texture compression format * Targeting mobile browsers with ASTC set as the texture compression format
Create builds for desktop and mobile browsers from a script
You can run a build for both desktop browsers and mobile browsers with the corresponding texture compression formats simultaneously using a script. For example:
using System.Collections;
using System.Collections.Generic;
using UnityEngine;
using UnityEditor;
using System.Diagnostics;
using System.IO;
using UnityEditor.Build.Reporting;

public class comboBuild
{
    //This creates a menu item to trigger the dual builds https://docs.unity.cn/ScriptReference/MenuItem.html

    [MenuItem("Game Build Menu/Dual Build")]
    public static void BuildGame()
    {
      //This builds the player twice: a build with desktop-specific texture settings (WebGL_Build) as well as mobile-specific texture settings (WebGL_Mobile), and combines the necessary files into one directory (WebGL_Build)

      string dualBuildPath    = "WebGLBuilds";
      string desktopBuildName = "WebGL_Build";
      string mobileBuildName  = "WebGL_Mobile";

      string desktopPath = Path.Combine(dualBuildPath, desktopBuildName);
      string mobilePath  = Path.Combine(dualBuildPath, mobileBuildName);
      string[] scenes = new string[] {"Assets/scene.unity"};

      EditorUserBuildSettings.webGLBuildSubtarget = WebGLTextureSubtarget.DXT;
      BuildPipeline.BuildPlayer(scenes, desktopPath, BuildTarget.WebGL, BuildOptions.Development);

      EditorUserBuildSettings.webGLBuildSubtarget = WebGLTextureSubtarget.ASTC;
      BuildPipeline.BuildPlayer(scenes,  mobilePath, BuildTarget.WebGL, BuildOptions.Development);

      // Copy the mobile.data file to the desktop build directory to consolidate them both
      FileUtil.CopyFileOrDirectory(Path.Combine(mobilePath, "Build", mobileBuildName + ".data"), Path.Combine(desktopPath, "Build", mobileBuildName + ".data"));
    }
}
You can modify the WebGL template’s index.html file to select the appropriate data file if there’s support for the texture compression format extension:
// choose the data file based on whether there's support for the ASTC texture compression format
      var dataFile = "/{{{ DATA_FILENAME }}}";
      var c = document.createElement("canvas");
      var gl = c.getContext("webgl");
      var gl2 = c.getContext("webgl2");
      if ((gl && gl.getExtension('WEBGL_compressed_texture_astc')) || (gl2 &&
              gl2.getExtension('WEBGL_compressed_texutre_astc'))) {
        dataFile =  "/WebGL_Mobile.data";
      }

      var buildUrl = "Build";
      var loaderUrl = buildUrl + "/{{{ LOADER_FILENAME }}}";
      var config = {
        dataUrl: buildUrl + dataFile,
        frameworkUrl: buildUrl + "/{{{ FRAMEWORK_FILENAME }}}",
#if USE_WASM
        codeUrl: buildUrl + "/{{{ CODE_FILENAME }}}",
#endif
#if MEMORY_FILENAME
        memoryUrl: buildUrl + "/{{{ MEMORY_FILENAME }}}",
#endif
#if SYMBOLS_FILENAME
        symbolsUrl: buildUrl + "/{{{ SYMBOLS_FILENAME }}}",
#endif
        streamingAssetsUrl: "StreamingAssets",
        companyName: {{{ JSON.stringify(COMPANY_NAME) }}},
        productName: {{{ JSON.stringify(PRODUCT_NAME) }}},
      productVersion: {{{ JSON.stringify(PRODUCT_VERSION) }}},
        showBanner: unityShowBanner,
     };
- asm.js のリンカーターゲットを Unity 2019.1で 削除
- ビルドファイルの更新とデータキャッシングは Unity 2020.1 で追加
Copyright © 2023 Unity Technologies
优美缔软件(上海)有限公司 版权所有
"Unity"、Unity 徽标及其他 Unity 商标是 Unity Technologies 或其附属机构在美国及其他地区的商标或注册商标。其他名称或品牌是其各自所有者的商标。
公安部备案号:
31010902002961