Removing an installed package from a project
When you “remove” a package from your project, the Package Manager is actually removing the project’s direct dependency from your project manifest. The result of removing the direct dependency varies, based on the dependencies for the package you are removing:
- If there are no other packages or feature sets that have a dependency on this package, any Editor or run-time functionality that it implemented is no longer available in your project. For more information about direct and indirect dependencies, see Dependency and resolution.
- If another installed package or an installed feature set depends on the package you are trying to remove, this procedure removes only the dependency from your project manifest. The package itself and all its functionality is still installed in your project, even though it might not appear in the In Project list context. For example, the Show Dependencies setting is disabled by default, so packages that are installed as indirect dependencies don’t appear until you enable this setting. For more information, including an illustrated comparison, see Show Dependencies.
Before you begin
Make sure you understand these important notes before you begin:
- Use this procedure to remove a package only if you added it to the current project by installing it, such as (but not limited to) Installing a feature set, Installing from a registry, and installing custom packages. Don’t use this procedure to attempt to remove packages that you imported to your project, such as an Asset Store package that you downloaded and imported. For information about removing Asset Store packages that you downloaded and imported, see Remove imported assets from a project.
- If you use this procedure to remove a package that you installed from a registry, the operation removes the package from the current project. It doesn’t remove the same package that might exist in other projects. It also doesn’t remove the package from the global cache; this action isn’t supported by the Package Manager, and manually manipulating the global cache is discouraged.
- If you use this procedure to remove a package that you embedded in your project, the Package Manager deletes the entire package folder from your computer. However, removing packages installed from any other source (including local packages) removes only the reference to the package in the manifest but leaves the package itself and its contents intact.
Procedure
インストールしたパッケージを削除するには、以下の手順を行います。
-
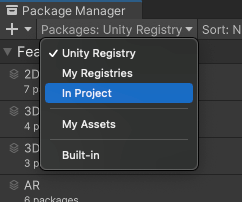
Package Manager ウィンドウを開き、Packages ドロップダウンから In Project を選択します。
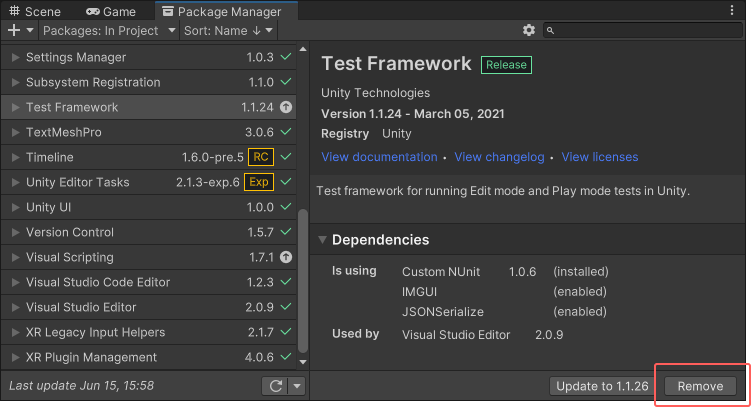
コンテキストを In Project に切り替えます Select the package you want to remove from the list of packages. The details view now displays that package’s information.
-
Click the Remove button. If this button is:
- Not displayed, you might be viewing the My Assets list. See Before you begin.
- Disabled, you can’t remove this package. For more information, see Locked and non-removable packages.
プログレスバーが終了すると、 パッケージはリストから消えます。
削除したパッケージを復元したい場合は、パッケージのインストール の手順に従ってください。
Note: You can remove multiple packages with one click by using the multiple select feature. For more information, see Perform an action on multiple packages or feature sets.
ロックされ削除できないパッケージ
別のパッケージや機能セットで必要とされないパッケージのみを取り除くことができます。Package Manager は、すべての必須パッケージの Remove ボタンを使えなくすることで、これを行います。
| 機能セット/パッケージ | 説明 |
|---|---|
| 機能セット | 機能セットがパッケージを必要とする場合、リストビューと詳細ビューの両方に、ロックアイコン ( ) が表示されます。また、詳細ビューのパッケージ名の下には、そのパッケージを必要とする機能セットの名前が表示されます。 ) が表示されます。また、詳細ビューのパッケージ名の下には、そのパッケージを必要とする機能セットの名前が表示されます。ただし、Unlock ボタンをクリックしても、そのパッケージを必要とする機能セットをすべて削除しない限り、プロジェクトからパッケージを削除することはできません。パッケージのロックを解除すると、プロジェクトに対し 別のバージョン をリクエストできますが、それでも削除はできません。 |
| 別のパッケージ | 1 つまたは複数のパッケージが選択したパッケージを必要とする場合、Remove (削除) ボタンは使用できなくなります。依存関係があるパッケージの名前は、詳細ビューの Dependencies セクションで確認できます。他のパッケージが不要な場合、それらを削除すれば、Package Manager はこのパッケージも自動的に削除します。 |
ヒント: Dependencies セクションが表示されない場合は、以下の手順で Show Dependencies (依存関係表示) の設定を有効にしてください。
-
詳細設定
 アイコン下の Advanced Project Settings を選択します。
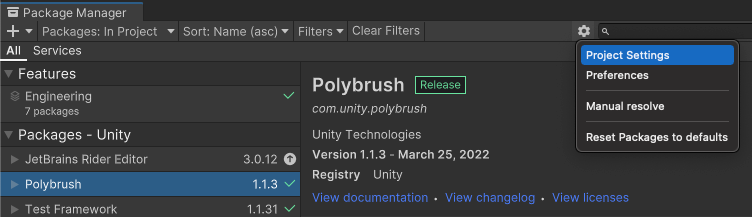
Advanced Project Settings を選択すると、Package Manager プロジェクト設定ウィンドウが開きます Package Manager プロジェクト設定ウィンドウが表示されます。
Advanced Settings グループで、Show Dependencies** オプションを有効にします。
Project Settings ウィンドウを閉じます。プロジェクトに依存関係としてのみインストールされたパッケージがパッケージリストに表示され、詳細ビューに Dependencies セクションが表示されるようになります。
Note: You can unlock multiple packages with one click by using the multiple select feature. For more information, see Perform an action on multiple packages or feature sets.
Copyright © 2023 Unity Technologies
优美缔软件(上海)有限公司 版权所有
"Unity"、Unity 徽标及其他 Unity 商标是 Unity Technologies 或其附属机构在美国及其他地区的商标或注册商标。其他名称或品牌是其各自所有者的商标。
公安部备案号:
31010902002961