Build your WebGL application
WebGL용 빌드를 생성하려면 Unity의 메인 메뉴에서 File > Build Settings로 이동합니다. 플랫폼 리스트에서 WebGL을 선택한 후 Switch Platform을 클릭합니다.
When you have configured the Build Settings, choose one the following options:
- Build: Builds your application into a Player.
- Build and Run: Builds your application in a Player, and opens that Player on your target platform.
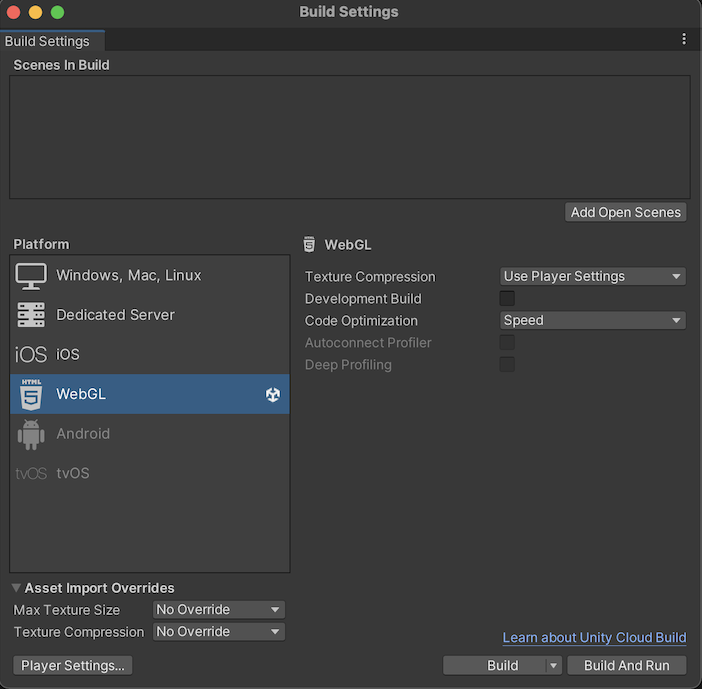
WebGL용 Unity 빌드 시스템은 다음 설정을 지원합니다.
| 설정 | 기능 | |
|---|---|---|
| Texture Compression | The texture compression format to use for the build. The options are: | |
| Use Player Settings | This is the default selection. It uses the texture compression format you set in the Player settings window. | |
| ETC2 | Uses ETC2 format, which is widely supported on mobile devices. | |
| ASTC | Uses ASTC format, which is widely supported on mobile devices. | |
| DXT | Uses DXT format, which is widely supported on desktop devices. | |
| Development Build | Enable this setting to include scripting debug symbols and the Profiler in your build. When you enable this, Unity sets the DEVELOPMENT_BUILD scripting define. You should use this setting only when you want to test your application. The development builds don’t minify content, which means the development builds are large to distribute. |
|
| Code Optimization | WebGL 코드를 컴파일하는 데 사용할 최적화 모드를 선택합니다. | |
| Speed | This is the default setting. Select this to generate WebGL code that’s optimized for runtime performance. | |
| Size | Select this to generate WebGL code that’s optimized for build size. This is useful for reducing WebGL games to the smallest downloadable size, and for large projects if a mobile browser (Android or iOS) refuses to load the default optimize-for-speed WebAssembly builds as too large for mobile devices to consume. | |
| Autoconnect Profiler | Typically, when enabled, this setting allows you to automatically connect the Unity Profiler to your build. However for WebGL, as you can’t connect the Profiler to a running build, use this option to connect the content to the Editor instead. This is because the Profiler connection is handled using WebSockets on WebGL, but a web browser only allows outgoing connections from the content. For this setting to be available, you should enable the Development Build option. | |
| Deep Profiling | Enable this setting to activate Deep Profiling in the Profiler. This makes the Profiler instrument every function call in your application and returns more detailed profiling data. When you enable Deep Profiling Support, it might slow down script execution. This option is only available if you enable the Development Build option. | |
| Build | Use it to build your application. | |
| Build And Run | Use it to view the WebGL Player locally. Unity uses a local web server to host your build, and opens it from a localhost URL. Alternatively, you can use a custom local web server with properly configured response headers. For more information, see Compressed builds and server configuration. | |
For changing the settings for Asset Import Overrides, see Build Settings.
빌드 폴더
Build 폴더에는 다음의 파일이 포함되어 있습니다([ExampleBuild]는 타겟 빌드 폴더 이름 표시).
| 파일 이름 | 내용물 |
|---|---|
[ExampleBuild].loader.js |
The JavaScript code that the web page needs to load the Unity content. |
[ExampleBuild].framework.js |
JavaScript 런타임 및 플러그인. |
[ExampleBuild].wasm |
WebAssembly 바이너리. |
[ExampleBuild].mem |
A binary image to initialize the heap memory for your Player. Unity generates this file for multi-threaded WebAssembly builds only. |
[ExampleBuild].data |
에셋 데이터 및 씬. |
[ExampleBuild].symbols.json |
오류 스택 추적을 디맹글하는 데 필요한 디버그 심볼 이름. 이 파일은 Debug Symbols 옵션(File > Build Settings > Player Settings)을 활성화한 경우에만 릴리스 빌드에 대해 생성됩니다. |
[ExampleBuild].jpg |
A background image, which displays while the build is loading. This file is only generated when a Background Image is available in the Player Settings (File > Build Settings > Player Settings > Splash Image). For more information, see Splash Screen. |
빌드에 대해 Compression Method를 활성화하면 Unity는 압축 방식에 해당하는 확장자를 식별하고 해당 확장자를 Build 하위 폴더 내의 파일 이름에 추가합니다. Decompression Fallback을 활성화하면 Unity는 빌드 파일 이름에 .unityweb 확장자를 추가합니다. 그렇지 않으면 Unity는 Gzip 압축 방식의 경우 .gz, Brotli 압축 방식의 경우 .br 확장자를 추가합니다.
자세한 내용은 WebGL: 압축 빌드 및 서버 설정을 참조하십시오.
플레이어 설정에서 Name Files As Hashes를 활성화하는 경우 Unity는 기본 파일 이름이 아닌 파일 콘텐츠의 해시를 사용합니다. 이는 빌드 폴더의 각 파일마다 적용됩니다. 이 옵션을 사용하여 게임 빌드의 업데이트된 버전을 서버의 동일한 폴더로 업로드할 수 있으며 빌드 반복 간 변경된 파일만 업로드할 수도 있습니다.
참고: 일부 브라우저에서는 파일 시스템에서 플레이어를 직접 열 수 없습니다. 이는 로컬 파일 URL에 적용된 보안 제한 사항 때문입니다.
세부 프로파일링 지원
Deep Profiling Support 설정을 활성화하면 Unity 프로파일러가 애플리케이션의 모든 함수 호출을 프로파일링합니다. 자세한 내용은 세부 프로파일링 문서를 참조하십시오.
Enable Exceptions
Open Publishing Settings to access Enable Exceptions. Enable Exceptions allows you to specify how unexpected code behavior (also known as errors) is handled at run time. It has these options:
- None: 예외 지원이 필요하지 않은 경우에 선택합니다. 성능이 극대화되고 빌드가 최소화됩니다. 이 옵션을 선택하면 폐기된 예외로 인해 해당 설정에 오류가 있는 경우 콘텐츠가 중지됩니다.
-
Explicitly Thrown Exceptions Only (기본): 스크립트의
throw문에서 명시적으로 지정된 예외를 캡처하고finally블록이 호출되도록 하려면 이 옵션을 선택합니다. 이 옵션을 선택하면 스크립트에서 생성된 JavaScript 코드가 더 길어지고 더 느려지지만, 스크립트가 프로젝트의 중요한 병목 지점인 경우를 제외하고는 문제가 되지 않을 것입니다. -
Full Without Stacktrace: Select this option to capture:
* Exceptions which are explicitly specified from
throwstatements in your scripts (the same as in the Explicitly Thrown Exceptions Only option)- Null 레퍼런스
- 범위 이탈 배열 액세스
- Full With Stacktrace: 이 옵션의 상기 옵션과 유사하지만 스택 추적도 캡처합니다. Unity는 이런 예외에 대한 확인을 코드에 포함시켜서 예외를 생성하므로, 이 옵션을 선택하면 성능이 둔화되고 브라우저 메모리 사용이 증가합니다. 디버깅에만 이 옵션을 사용하고 항상 64비트 브라우저에서 테스트해야 합니다.
데이터 캐싱
Data Caching에 액세스하려면 File > Build Settings > Player Settings > WebGL을 거쳐 Publishing Setings로 이동합니다. 이렇게 하면 브라우저가 메인 데이터 파일을 IndexedDB 데이터베이스로 캐싱할 수 있습니다.
기본 브라우저 HTTP 캐시를 사용한다고 해서 브라우저가 특정 리스폰스를 캐싱한다고 보장하지는 않습니다. 이는 브라우저 HTTP 캐시의 공간이 제한되고, 브라우저가 너무 큰 파일은 캐싱하지 못할 수 있기 때문입니다.
로드 시간을 향상하기 위해 IndexedDB를 사용하면 브라우저 제한을 초과하여 파일을 캐싱할 수 있습니다. 더 많은 파일을 캐싱하면 다음 빌드 실행 동안 사용자 컴퓨터에서 다운로드한 콘텐츠를 사용할 수 있는 가능성이 높아집니다.
데이터 캐싱은 HTTP 리스폰스를 위해 .data 파일만 IndexedDB 캐시에 캐싱합니다. 에셋 번들을 캐싱하려면 Data Caching을 활성화하고 unityInstance.Module.cacheControl()을 오버라이드해야 합니다. 이렇게 하려면 Module.cacheControl(url)이 요청된 에셋 번들 URL에 대해 must-revalidate를 반환하는지 확인하십시오. 예를 들어 createUnityInstance()가 반환하는 Promise의 이행 콜백에서 unityInstance.Module.cacheControl() 함수를 오버라이드할 수 있습니다. createUnityInstance()에 대한 자세한 내용은 WebGL: 압축 빌드 및 서버 설정을 참조하십시오.
Texture Compression
The texture compression setting in WebGL lets you create builds that target platforms based on the texture compression formats they support. The texture compression format value you set here has priority over the Player settings texture compression format value. To run your game on both desktop and mobile browsers with compressed textures, you might want to create two builds: * Targeting desktop browsers with DXT set as the texture compression format * Targeting mobile browsers with ASTC set as the texture compression format
Create builds for desktop and mobile browsers from a script
You can run a build for both desktop browsers and mobile browsers with the corresponding texture compression formats simultaneously using a script. For example:
using System.Collections;
using System.Collections.Generic;
using UnityEngine;
using UnityEditor;
using System.Diagnostics;
using System.IO;
using UnityEditor.Build.Reporting;

public class comboBuild
{
    //This creates a menu item to trigger the dual builds https://docs.unity.cn/ScriptReference/MenuItem.html

    [MenuItem("Game Build Menu/Dual Build")]
    public static void BuildGame()
    {
      //This builds the player twice: a build with desktop-specific texture settings (WebGL_Build) as well as mobile-specific texture settings (WebGL_Mobile), and combines the necessary files into one directory (WebGL_Build)

      string dualBuildPath    = "WebGLBuilds";
      string desktopBuildName = "WebGL_Build";
      string mobileBuildName  = "WebGL_Mobile";

      string desktopPath = Path.Combine(dualBuildPath, desktopBuildName);
      string mobilePath  = Path.Combine(dualBuildPath, mobileBuildName);
      string[] scenes = new string[] {"Assets/scene.unity"};

      EditorUserBuildSettings.webGLBuildSubtarget = WebGLTextureSubtarget.DXT;
      BuildPipeline.BuildPlayer(scenes, desktopPath, BuildTarget.WebGL, BuildOptions.Development);

      EditorUserBuildSettings.webGLBuildSubtarget = WebGLTextureSubtarget.ASTC;
      BuildPipeline.BuildPlayer(scenes,  mobilePath, BuildTarget.WebGL, BuildOptions.Development);

      // Copy the mobile.data file to the desktop build directory to consolidate them both
      FileUtil.CopyFileOrDirectory(Path.Combine(mobilePath, "Build", mobileBuildName + ".data"), Path.Combine(desktopPath, "Build", mobileBuildName + ".data"));
    }
}
You can modify the WebGL template’s index.html file to select the appropriate data file if there’s support for the texture compression format extension:
// choose the data file based on whether there's support for the ASTC texture compression format
      var dataFile = "/{{{ DATA_FILENAME }}}";
      var c = document.createElement("canvas");
      var gl = c.getContext("webgl");
      var gl2 = c.getContext("webgl2");
      if ((gl && gl.getExtension('WEBGL_compressed_texture_astc')) || (gl2 &&
              gl2.getExtension('WEBGL_compressed_texutre_astc'))) {
        dataFile =  "/WebGL_Mobile.data";
      }

      var buildUrl = "Build";
      var loaderUrl = buildUrl + "/{{{ LOADER_FILENAME }}}";
      var config = {
        dataUrl: buildUrl + dataFile,
        frameworkUrl: buildUrl + "/{{{ FRAMEWORK_FILENAME }}}",
#if USE_WASM
        codeUrl: buildUrl + "/{{{ CODE_FILENAME }}}",
#endif
#if MEMORY_FILENAME
        memoryUrl: buildUrl + "/{{{ MEMORY_FILENAME }}}",
#endif
#if SYMBOLS_FILENAME
        symbolsUrl: buildUrl + "/{{{ SYMBOLS_FILENAME }}}",
#endif
        streamingAssetsUrl: "StreamingAssets",
        companyName: {{{ JSON.stringify(COMPANY_NAME) }}},
        productName: {{{ JSON.stringify(PRODUCT_NAME) }}},
      productVersion: {{{ JSON.stringify(PRODUCT_VERSION) }}},
        showBanner: unityShowBanner,
     };
- Unity 2019.1에서 asm.js 링커 타겟 삭제됨
- Unity 2020.1에서 빌드 파일 업데이트 및 데이터 캐싱 추가됨
Copyright © 2023 Unity Technologies
优美缔软件(上海)有限公司 版权所有
"Unity"、Unity 徽标及其他 Unity 商标是 Unity Technologies 或其附属机构在美国及其他地区的商标或注册商标。其他名称或品牌是其各自所有者的商标。
公安部备案号:
31010902002961