Build your WebGL application
WebGL용 빌드를 생성하려면 Unity의 메인 메뉴에서 File > Build Settings로 이동합니다. 플랫폼 리스트에서 WebGL을 선택한 후 Switch Platform을 클릭합니다.
When you have configured the Build Settings, choose from one the following options:
- Build: Builds your application into a Player.
- Build and Run: Builds your application in a Player, and opens that Player on your target platform.
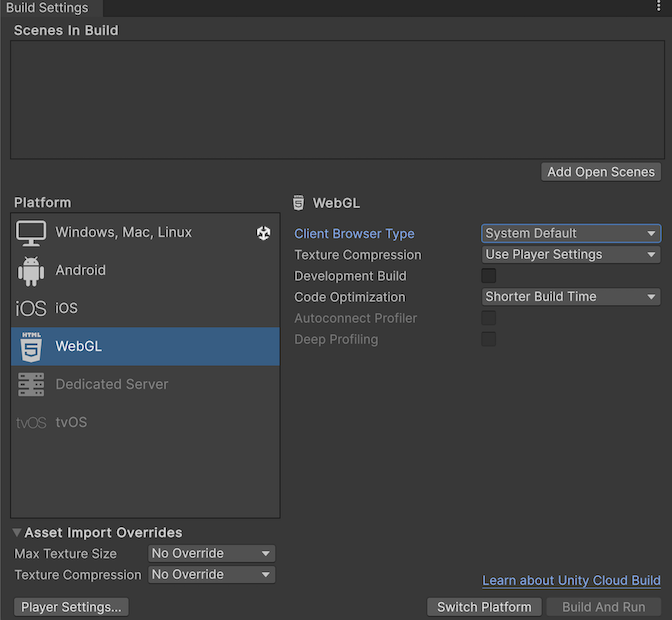
WebGL용 Unity 빌드 시스템은 다음 설정을 지원합니다.
| 설정 | 기능 | |
|---|---|---|
| Client Browser Type | Select the browser client that you want your application to launch at runtime. For example, if you choose System Default, then your application launches the default browser, and removes the Path to Client Browser setting. The available options are: | |
| System Default | This is the default setting. Select this option to launch the application in the default browser. | |
| Microsoft Edge | Select this option to launch the application in Edge browser. | |
| Mozilla Firefox | Select this option to launch the application in Firefox. | |
| Google Chrome | Select this option to launch the application in Chrome. | |
| Safari | Select this option to launch the application in Safari. | |
| Path to Client Browse§r | Specify the path to the browser client that you want your application to launch at runtime. Note: This option is only visible if the Client Browser Type isn’t set to the default browser. | |
| Texture Compression | The texture compression format to use for the build. For more information, refer to WebGL texture compression. The available options are: | |
| Use Player Settings | This is the default selection. It uses the texture compression format you set in the Player settings window. | |
| ETC2 | Uses ETC2 format, which is widely supported on mobile devices. | |
| ASTC | Uses ASTC format, which is widely supported on mobile devices. | |
| DXT | Uses DXT format, which is widely supported on desktop devices. | |
| Development Build | Enable this setting to include scripting debug symbols and the Profiler in your build. When you enable this, Unity sets the DEVELOPMENT_BUILD scripting define. Use this setting only when you want to test your application because development builds don’t minify content, they’re large to distribute. |
|
| Code Optimization | WebGL 코드를 컴파일하는 데 사용할 최적화 모드를 선택합니다. | |
| Shorter Build Time | This is the default setting. Select this option to generate WebGL code that takes the least amount of time to build. | |
| Runtime Speed | Select this option to generate WebGL code that’s optimized for runtime performance. | |
| Disk Size | Select this option to generate WebGL code that minimizes build size. For example, reducing WebGL games to the smallest downloadable size is recommended when a mobile browser (Android or iOS) refuses to load the default WebAssembly builds that are big for mobile devices. | |
| Autoconnect Profiler | Typically, when enabled, this setting allows you to automatically connect the Unity Profiler to your build. However for WebGL, as you can’t connect the Profiler to a running build, use this option to connect the content to the Unity Editor instead. This is because the Profiler connection is handled using WebSockets on WebGL, but a web browser only allows outgoing connections from the content. For this setting to be available, you must enable the Development Build option. | |
| Deep Profiling | Enable this setting to activate Deep Profiling in the Profiler. This makes the Profiler instrument every function call in your application and returns more detailed profiling data. When you enable Deep Profiling Support, it might slow down script execution. This option is only available if you enable the Development Build option. | |
| Build | Use it to build your application. | |
| Build And Run | Use it to view the WebGL Player locally. Unity uses a local web server to host your build, and opens it from a localhost URL. Alternatively, you can use a custom local web server with properly configured response headers. For more information, refer to Compressed builds and server configuration. | |
For changing the settings for Asset Import Overrides, refer to Build Settings.
Build folder structure
When you build your WebGL application, Unity creates a Build folder with the name you specify in the Build Settings window. The Build folder has the following files, where [ExampleBuild] represents the name of the target build folder.
| 파일 이름 | 설명 |
|---|---|
[ExampleBuild].loader.js |
The JavaScript code that the web page needs to load the Unity content. |
[ExampleBuild].framework.js |
JavaScript runtime and plug-ins. |
[ExampleBuild].wasm |
WebAssembly 바이너리. |
[ExampleBuild].mem |
A binary image to initialize the heap memory for your Player. Unity generates this file for multi-threaded WebAssembly builds only. |
[ExampleBuild].data |
에셋 데이터 및 씬. |
[ExampleBuild].symbols.json |
오류 스택 추적을 디맹글하는 데 필요한 디버그 심볼 이름. 이 파일은 Debug Symbols 옵션(File > Build Settings > Player Settings)을 활성화한 경우에만 릴리스 빌드에 대해 생성됩니다. |
[ExampleBuild].jpg |
A background image, which displays while the build is loading. This file is only generated when a Background Image is available in the Player Settings (File > Build Settings > Player Settings > Splash Image). For more information, refer to Splash Screen. |
If you enable a Compression Method for your build, Unity identifies the extension that corresponds with the compression method and adds this extension to the names of the files inside the Build sub folder. If you enable Decompression Fallback, Unity appends the extension .unityweb to the build file names. Otherwise, Unity appends the extension .gz for the Gzip compression method, or .br for the Brotli compression method.
For more information, refer to Compressed builds and server configuration.
If you enable Name Files As Hashes in the Player Settings, Unity uses the hash of the file content instead of the default file name. This applies to each file in the build folder. This option allows you to upload updated versions of the game builds into the same folder on the server, and only upload the files which have changed between build iterations.
참고: 일부 브라우저에서는 파일 시스템에서 플레이어를 직접 열 수 없습니다. 이는 로컬 파일 URL에 적용된 보안 제한 사항 때문입니다.
Enable exceptions
Use Enable Exceptions to specify how to handle unexpected code behavior (also known as errors) at runtime.
To access Enable Exceptions, go to the WebGL Player Settings > Publishing Settings section.
-
In the Enable Exceptions option, choose from the following options:
None: Select this if you don’t need any exception support. This gives the best performance and smallest builds. With this option, any exception thrown causes your content to stop with an error.
Explicitly Thrown Exceptions Only (default): Select this to capture exceptions which are explicitly specified from a
throwstatement in your scripts and to also to make surefinallyblocks are called. Note that selecting this option makes the generated JavaScript code from your scripts longer and slower; This might only be an issue if scripts are the main bottleneck in your project.-
Full Without Stacktrace: Select this option to capture:
- Exceptions which are explicitly specified from
throwstatements in your scripts (the same as in the Explicitly Thrown Exceptions Only option) - Null 레퍼런스
- 범위 이탈 배열 액세스
- Exceptions which are explicitly specified from
Full With Stacktrace: This option is similar to the earlier option, but it also captures Stack traces. Unity generates these exceptions by embedding checks for them in the code, so this option decreases performance and increases browser memory usage. Only use this for debugging, and always test in a 64-bit browser.
Copyright © 2023 Unity Technologies
优美缔软件(上海)有限公司 版权所有
"Unity"、Unity 徽标及其他 Unity 商标是 Unity Technologies 或其附属机构在美国及其他地区的商标或注册商标。其他名称或品牌是其各自所有者的商标。
公安部备案号:
31010902002961