Create a custom control with two attributes
Version: 2023.2+
This example demonstrates how to create a simple custom control with two attributes.
개요 예시
This example creates a custom control called MyElement with two attributes and exposes it to UXML and UI Builder. This example also shows how to add a custom control to a UI in the UI Builder.
You can find the completed files that this example creates in this GitHub repository.
선행 조건
This guide is for developers who are familiar with Unity, UI Toolkit, and C# scripting. Before you start, get familiar with the following:
Create the example
To create a new custom control class in C#, inherit it from the VisualElement class. This allows you to create and use this element in C#, but won’t automatically expose it in UXML and UI Builder. To expose it, add the UxmlElement attribute. To expose the attributes, add the UxmlAttribute attribute to each property that you want to be visible in UXML and the UI Builder.
- Create a Unity project with any template.
- In the
Assetsfolder, create a C# script namedMyElement.cswith the following content:
Create a UXML to see the attribute
- Create a UXML file with any name you want.
- Double-click the UXML file to open it in the UI Builder.
- In the Library section of the UI Builder, select Project > Custom Controls (C#) > MyElement.
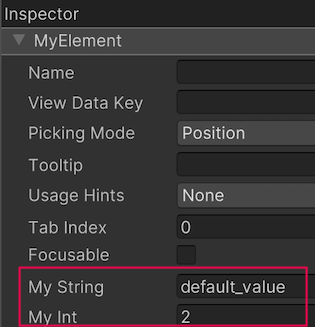
- Drag MyElement to the Hierarchy window.
- To see the custom attributes for MyElement, go to the Inspector tab of MyElement:
추가 리소스
Copyright © 2023 Unity Technologies
优美缔软件(上海)有限公司 版权所有
"Unity"、Unity 徽标及其他 Unity 商标是 Unity Technologies 或其附属机构在美国及其他地区的商标或注册商标。其他名称或品牌是其各自所有者的商标。
公安部备案号:
31010902002961