- Unity User Manual 2023.2 (beta)
- 오디오(Audio)
- 오디오 믹서
- Specifics on the Audio Mixer window
Specifics on the Audio Mixer window
Mixers panel
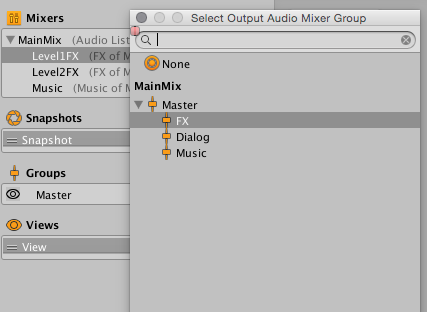
The Mixers panel displays a complete list of all Audio Mixers in the project. Select the Audio Mixers in the Mixers panel to quickly switch between them. You can also route one Audio Mixer into the AudioGroup of another Audio Mixer from this panel.
Select + in the top right of the panel to create a new Audio Mixer in the project.

Route Audio Mixers into other Audio Mixers
Unity supports the use of multiple Audio Mixers within a scene at once. By default, each Audio Mixer outputs the audio signal directly to the AudioListener.
You can choose to route the audio output of an Audio Mixer into an AudioGroup of another Audio Mixer. This allows for flexible and dynamic routing hierarchies at game runtime.
You can route an Audio Mixer into another AudioGroup through either of the following methods:
- From the Mixers panel in the Editor.
- Dynamically at runtime through the AudioMixer API.
To change the output of an Audio Mixer within the Editor:
- Select an Audio Mixer within the Mixers panel.
- Drag the Audio Mixer over the top of another Audio Mixer.
- In the dialog that appears, select the AudioGroup of the Audio Mixer you want to route into.
- The panel displays the parenting relationship of the Audio Mixers. It also displays the target AudioGroup next to the Audio Mixer’s name.

Hierarchy panel
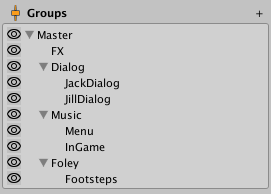
The Hierarchy view is where you define the sound categories of an Audio Mixer and the mixing structure. You can define your own custom categories that AudioSources can connect to and play through.

Add and configure AudioGroups within the Hierarchy
You can add and modify the topology of an Audio Mixer within the AudioGroup Hierarchy panel.
To add a new AudioGroup to the hierarchy, do either of the following:
- Right-click on an existing AudioGroup (there must be at least one in an Audio Mixer), and select Add child group or Add sibling group.
- Select an AudioGroup to add a child to, and select + in the top right of the panel. This adds a new group to the Audio Mixer under the selected one.
To change the topology of an Audio Mixer:
- Select an AudioGroup in the panel.
- Drag it over the top of another AudioGroup.
This parents the target AudioGroup above the one selected.
To delete an AudioGroup (including its children), do either of the following:
- Select the group you want to delete, and press the Delete key.
- Right-click the group you want to delete, and select Remove Group (and children).
To duplicate an AudioGroup and make it a sibling:
- Right-click the AudioGroup you want to duplicate.
- Select Duplicate Group (and children).
This duplicates the group and child groups exactly, including effects contained within the groups.
To rename an AudioGroup:
- Right-click the group.
- Select Rename.
AudioGroup view

The AudioGroup view displays a flat arrangement of the AudioGroups in the Audio Mixer. This arrangement is organized horizontally within the view. The current view selection dictates the groups shown in the AudioGroup view.
Each AudioGroup within the view is represented as a vertical “strip”. The layout and look and feel of the strip is common to Digital Audio Workstations and other audio editing packages. This layout facilitates the transition of audio engineers from a music and video background, and is a parallel for audio hardware integration.
The strip is made up of a title bar, followed by a vertical VU meter, which represents the current audio levels through that AudioGroup. Beside the VU meter is a volume selector that allows you to input the AudioGroups attenuation along the same scale as the VU meter, which is represented in dB levels.
Below the VU meter are three buttons with the following functionality:
- Solo - This toggle switches between hearing the entire mix or only the AudioSources that play into children of the AudioGroup being Soloed.
- Mute - This toggle includes the current AudioGroup in the audible mix or excludes it from being heard in the global mix.
- Bypass - This toggle bypasses or enables all the effects in the AudioGroup.
The AudioGroup also contains a list of DSP Effect Units and the Attenuation Units in the AudioGroup. The attenuation can be applied anywhere in the Effect Unit chain in an AudioGroup and allows you to decide exactly where you apply the volume adjustment. This is useful for non-linear effects and Send and Receive Units.
Each Effect Unit slot displays the name of the Effect unit that is being applied. The circle on the left side of the effect is a toggle to enable or bypass that individual effect. If you right-click the effect and select Allow Wet Mixing, the colored bar on the bottom of the screen becomes active. This colored bar denotes the amount of wet signal that passes through the effect.
To refine the order of effects, drag an effect up and down the audiogroup. You can also drag effects across AudioGroups to move the effect to another AudioGroup.
To add new Effect Units, right-click on an existing effect to add it before or after it, or select Add.. at the bottom of the strip.
Snapshot panel
In the Snapshot panel, you can create, switch between, and tweak different Snapshots in the Audio Mixer. There is always at least one snapshot active. Selection of a snapshot within the Snapshot panel indicates that further edits of the Audio Mixer are edits to that snapshot.
Snapshots defined in the Snapshot panel also display as sub-assets of the Audio Mixer. This allows you to access the snapshots elsewhere in the editor and within scripts.


You can also define a Start Snapshot. A Start Snapshot has a star icon to its right on the snapshot list. The Start Snapshot is the snapshot that the Audio Mixer initializes to when it loads. For example, when the scene starts.
To create a new Snapshot:
- Select the + at the top right of the panel.
- Enter a name for the new snapshot.
To define a different Start Snapshot:
- Right-click a Snapshot.
- Select Set as Start Snapshot.
Views panel
Views allow you to create groups of visible AudioGroups in the Audio Mixer. With views, you can create perspectives of interest into the Audio Mixer, instead of always being presented with the full hierarchy. Views are only for workflow optimization and don’t affect runtime setup or performance.
Like the Snapshot panel, there is always one view selected and shown in the AudioGroup View. By default, all AudioGroups are visible in the default view. The eye icons in the Hierarchy panel control what is contained in a view.
To add a new view to the list of views;
- Select the + at the top right of the Views panel.
- Enter a name for the new view.
To change the current view, select one from the list of views in the Views panel.
To remove a view:
- Right-click on the view you want to remove.
- Select Delete.
To duplicate a view with all of the current view settings:
- Right-click on the view you want to duplicate.
- Select Duplicate.
The eye icon of an AudioGroup
Each AudioGroup in the Hierarchy panel has a small eye icon to the left of the group. This icon serves two purposes:
- Select the eye icon to toggle this AudioGroup’s visibility in the currently selected View.
- Right-click on the eye icon to select from a range of colors to tag this AudioGroup with. Select a color other than No Colour to create a small color tag to the left of the eye icon and a color tag under the AudioGroup’s name in the AudioGroup view. These color indicators visually group different concepts and collections of AudioGroups in the Audio Mixer.