Simple UI Toolkit workflow
If you perform a specific task often, you can use UI Toolkit to create a dedicated UI for it. For example you can create a custom Editor window.
This guide describes the basic UI Toolkit workflow using a custom Editor window as an example. The example demonstrates how to create a custom Editor window and add UI controls into your custom Editor window using UI Builder, UXML, and C# script.
You can find the completed files that this example creates in this GitHub repository.
先决条件
This guide is for developers familiar with the Unity Editor and C# scripting, but new to UI Toolkit. Unity recommends that you have a basic understanding of the following concepts:
Create a custom Editor window
- From the Project window, right-click and select Create > UI Toolkit > Editor Window.
- In UI Toolkit Editor Window Creator, enter
MyCustomEditorand disable USS. - Click Confirm.
This creates a custom Editor window with two labels. You can open the Editor window from the menu (Window > UI Toolkit > MyCustomEditor). You can find the source files for it in the Asset/Editor folder.
向窗口添加 UI 控件
You can add UI controls into your window in the following ways:
- Use the UI Builder to visually add the UI controls
- Use an XML-like text file (UXML) to add the UI controls
- Use C# script to add the UI controls
You can use any of these methods individually, or combine. The following examples create three sets of labels, buttons, and toggles using a combination of these methods.
Use UI Builder to add UI controls
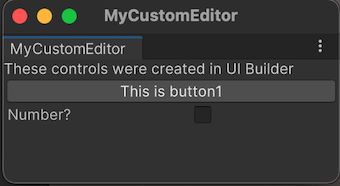
To visually add UI controls to your window, use UI Builder. The following example demonstrates how to add a button and a toggle into your custom Editor window in addition to the default label.
In the
Editorfolder, double-clickMyCustomEditor.uxmlto open the UI Builder.In the UI Builder, drag Button and Toggle from Library > Controls into the Hierarchy or the window preview in the Viewport.
-
In Hierarchy, add some attributes to your controls:
- Click the label, and then in the Text field of the Inspector, change the default text to
These controls were created in UI Builder. - Click the button, and then in the Text field of the Inspector, enter
This is button1. In the Name field of the Inspector, enterbutton1. - Click the toggle, and then in the Label field of the Inspector, enter
Number?. In the Name field of the Inspector, entertoggle1.
- Click the label, and then in the Text field of the Inspector, change the default text to
Save and close the UI Builder window.
Open your custom Editor window. You should see the button and the toggle you just added in your window.
Use UXML to add UI controls
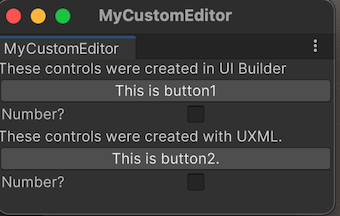
If you prefer define your UI in a text file, you can edit the UXML to add the UI controls. The example adds another set of label, button, and toggle into your window.
In the
Editorfolder, click Assets > Create > UI Toolkit > UI Document to create a UXML file calledMyCustomEditor_UXML.uxml.-
Open
MyCustomEditor_UXML.uxmlon a text editor.Tip: You can do so by clicking the arrow on
MyCustomEditor_UXML.uxmlin the Project window, and then double-clickinginlineStyle. -
By default, the UXML document displays a single element with the
engine:UXMLtag. This is the root element of the XML tree. Within this element, you can add the UI controls with their attributes.Your finished
MyCustomEditor_UXML.uxmlfile should look like the following:<?xml version="1.0" encoding="utf-8"?> <engine:UXML xmlns:xsi="http://www.w3.org/2001/XMLSchema-instance" xmlns:engine="UnityEngine.UIElements" xmlns:editor="UnityEditor.UIElements" xsi:noNamespaceSchemaLocation="../../UIElementsSchema/UIElements.xsd" > <engine:Label text="These controls were created with UXML." /> <engine:Button text="This is button2." name="button2"/> <engine:Toggle label="Number?" name="toggle2"/> </engine:UXML> Open
MyCustomEditor.cs.-
Add a private
VisualTreeAssetfield calledm_UXMLTreeto theMyCustomEditorclass. Put the attribute[SerializeField]above it:[SerializeField] private VisualTreeAsset m_UXMLTree; -
Add the following line of code to the end of
CreateGUI().rootVisualElement.Add(m_UXMLTree.Instantiate()); In the Project window, select
MyCustomEditor.cs.Drag
MyCustomEditor_UXML.uxmlfrom the Project window into the UXML Tree field in the Inspector. This assigns your UXML to the visual tree.Open your custom Editor window. You should see three labels, two buttons, and two toggles in your window.
Use C# script to add UI controls
If you prefer coding, you can add UI Controls to your window using C# script. The following example adds another set of label, button, and toggle into your window.
Open
MyCustomEditor.cs.-
Unity uses
UnityEngine.UIElementsfor basic UI controls like label, button, and toggle. To work with UI controls, you must add the following declaration if it’s not already present.using UnityEngine.UIElements; Change the text of the existing label from
"Hello World! From C#"to"These controls were created using C# code.".-
The EditorWindow class has a property called
rootVisualElement. To add the UI controls to your window, first instantiate the element class with some attributes, and then use theAddmethods of therootVisualElement.Your finished
CreateGUI()method should look like the following:public void CreateGUI() { // Each editor window contains a root VisualElement object VisualElement root = rootVisualElement; // VisualElements objects can contain other VisualElements following a tree hierarchy. Label label = new Label("These controls were created using C# code."); root.Add(label); Button button = new Button(); button.name = "button3"; button.text = "This is button3."; rootVisualElement.Add(button); Toggle toggle = new Toggle(); toggle.name = "toggle3"; toggle.label = "Number?"; rootVisualElement.Add(toggle); // Import UXML var visualTree = AssetDatabase.LoadAssetAtPath<VisualTreeAsset>("Assets/Editor/MyCustomEditor.uxml"); VisualElement labelFromUXML = visualTree.Instantiate(); root.Add(labelFromUXML); rootVisualElement.Add(m_UXMLTree.Instantiate()); } Go to the Editor and open your custom Editor window. You should see three labels, three buttons, and three toggles in your window.

Define the behavior of your UI controls
You can set up event handlers for your UI controls so that when you click the button, and select or clear the toggle, your UI controls perform some tasks.
The code below shows example event handlers that do the following:
- When a button is clicked, the Editor Console displays a message.
- When a toggle is selected, the Console shows how many times the buttons have been clicked.
using UnityEditor;
using UnityEngine;
using UnityEngine.UIElements;
public class MyCustomEditor : EditorWindow
{
[MenuItem("Window/UI Toolkit/MyCustomEditor")]
public static void ShowExample()
{
MyCustomEditor wnd = GetWindow<MyCustomEditor>();
wnd.titleContent = new GUIContent("MyCustomEditor");
}
[SerializeField]
private VisualTreeAsset m_UXMLTree;
private int m_ClickCount = 0;
private const string m_ButtonPrefix = "button";
public void CreateGUI()
{
// Each editor window contains a root VisualElement object
VisualElement root = rootVisualElement;
// VisualElements objects can contain other VisualElements following a tree hierarchy.
Label label = new Label("These controls were created using C# code.");
root.Add(label);
Button button = new Button();
button.name = "button3";
button.text = "This is button3.";
rootVisualElement.Add(button);
Toggle toggle = new Toggle();
toggle.name = "toggle3";
toggle.label = "Number?";
rootVisualElement.Add(toggle);
// Import UXML
var visualTree = AssetDatabase.LoadAssetAtPath<VisualTreeAsset>("Assets/Editor/MyCustomEditor.uxml");
VisualElement labelFromUXML = visualTree.Instantiate();
root.Add(labelFromUXML);
rootVisualElement.Add(m_UXMLTree.Instantiate());
//Call the event handler
SetupButtonHandler();
}
//Functions as the event handlers for your button click and number counts
private void SetupButtonHandler()
{
var buttons = rootVisualElement.Query<Button>();
buttons.ForEach(RegisterHandler);
}
private void RegisterHandler(Button button)
{
button.RegisterCallback<ClickEvent>(PrintClickMessage);
}
private void PrintClickMessage(ClickEvent evt)
{
++m_ClickCount;
//Because of the names we gave the buttons and toggles, we can use the
//button name to find the toggle name.
Button button = evt.currentTarget as Button;
string buttonNumber = button.name.Substring(m_ButtonPrefix.Length);
string toggleName = "toggle" + buttonNumber;
Toggle toggle = rootVisualElement.Q<Toggle>(toggleName);
Debug.Log("Button was clicked!" +
(toggle.value ? " Count: " + m_ClickCount : ""));
}
}
其他资源
UI Toolkit simple workflow added in Unity 2021.2 NewIn20212
Copyright © 2023 Unity Technologies
优美缔软件(上海)有限公司 版权所有
"Unity"、Unity 徽标及其他 Unity 商标是 Unity Technologies 或其附属机构在美国及其他地区的商标或注册商标。其他名称或品牌是其各自所有者的商标。
公安部备案号:
31010902002961