グリッドスナップ
Unity provides a visual grid in the Editor’s Scene view window, which can help precisely align GameObjects by snapping (moving) them to the nearest grid location.

X、Y、Z 軸に沿って表示されたグリッドにゲームオブジェクトをスナップする方法はいくつかあります。
- 選択したオブジェクトを最も近いグリッド位置に整列 させます。
- ゲームオブジェクトを移動、回転、スケールするときに、グリッドスナップ をオンにします。
グリッド線に合わせずに、ゲームオブジェクトをインクリメントに変換 することもできます。移動、回転、スケーリングの量を変更する必要がある場合は、スナップの増加値を変更できます。
デフォルトではグリッドは非表示ですが、グリッドを表示 し、揃える 軸を切り替える ことができます。以下を変更することで、 グリッドの外観と動作をカスタマイズできます。
- グリッドの サイズ (線の間隔を調整します)
- グリッド線自体の 色
- グリッド線の表示の 透明度/不透明度
- The position of the grid in the Scene view window (move it closer or farther).
これらの アクションの多くはキーボードショートカットをサポート しています。これらのアクションに割り当てられているキーの組み合わせを確認し、ショートカットマネージャー を使用してそれらをカスタマイズできます。
Grid and Snap toolbar Overlay
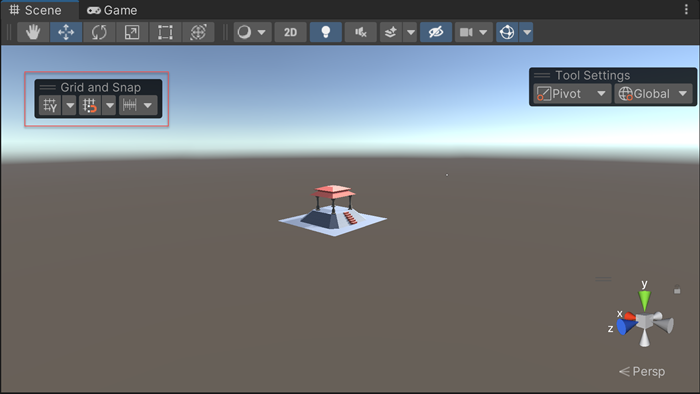
| Icon | Actions |
|---|---|
|
|
Toggle grid on or off Change grid axis Change grid opacity Move grid to gizmo handle or back to origin |
|
|
Toggle grid snapping on or off Change grid size Align a GameObject to an axis |
|
|
Change the default increment snap values |
Note: The settings on the Grid and Snap Overlay are global to all Scene views.
Align, snap, and incremental movements
このセクションは以下のアクションのをどのように行うかに関する情報を提供します。
Align (push) to the grid
ゲームオブジェクトは、1 つの軸上で最も近いグリッド位置に配置することも、すべての軸に一度に配置することもできます。
ゲームオブジェクトを特定の軸の最も近いグリッド位置に揃えるには、以下を行います。
In the Grid and Snap Overlays toolbar, open the grid snapping drop-down menu (
 ).
).-
In the Align Selected section, click the X, Y, or Z button that matches the axis you want to push to.
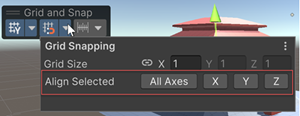
Align Selection to Grid section of the Grid and Snap window
ゲームオブジェクトをすべての軸に一度に整列するには、以下を行います。
グリッドに揃えるゲームオブジェクト (複数可) を選択します。
-
Ctrl + \ (Windows) または Command + \ (macOS) ショートカットを使用して、ゲームオブジェクトをすべての軸のグリッドに揃えます。
Alternatively, from the Grid and Snap Overlays toolbar, open the grid visibility drop-down menu (
 ) and in the Align Selected section, click All Axes.
Activate auto-snapping
グリッドへの自動スナップをオンにするには、以下を行います。
- Activate the Move tool and make sure the handle orientation in the Tool Settings Overlay is set to Global (
 ).
). - Click the grid snapping icon (
 ) in the Grid and Snap toolbar Overlay. The icon is blue when activated.
自動グリッドスナップを有効にすると、 Move 、Rotate、Scale の トランスフォームツールは、選択したゲームオブジェクトをアクティブなギズモ軸に沿ったグリッドにスナップします。ゲームオブジェクトを少しずつ移動する必要がある場合は、インクリメントに変化させる こともできます。
Move, rotate, and scale in increments
スナップ値を増加して移動、 回転、スケールするには、以下を行います。
- Control キー (Windows) または Command キー (macOS) を押しながら、いずれかの トランスフォームギズモ を使用します。
スナップのデフォルトの増加値を変更するには、以下の手順を行います。
From the Grid and Snap Overlays toolbar, open the snap increment drop-down menu (
 ).
).-
Increment Snap セクションには、すべての軸に同じ値を設定したり、異なる値を設定したりできるプロパティがあります。

Increment Snap section of the Grid and Snap window Move: With the link icon selected, enter a uniform increment snap value for all axes, or unlink the axes and set different increment snap values in the X, Y, and Z axis properties.
Rotate: Enter a rotation increment value in degrees.
Scale: Enter a scale increment value as a scale factor. For example, if the Scale value is 2, the selected GameObject will scale at an increment of twice its original size.
Customize the grid
このセクションでは、以下のカスタマイズについて説明します。
Show and hide the grid lines
Toggle grid visibility by clicking the grid visibility icon (![]() ) on the Grid and Snap Overlay toolbar to display or hide the grid on any axis (X, Y, Z). If you are in orthographic mode (Iso), Unity chooses the view.
) on the Grid and Snap Overlay toolbar to display or hide the grid on any axis (X, Y, Z). If you are in orthographic mode (Iso), Unity chooses the view.
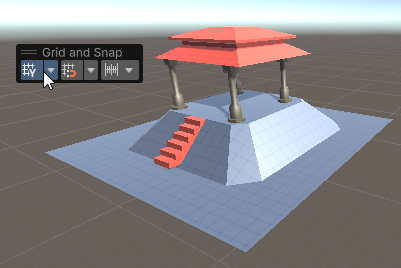
Change the axis where the grid appears
グリッドが表示される軸を変更するには、以下の手順を行います。
From the Grid and Snap Overlays toolbar, open the grid visibility drop-down menu (
 ).
).-
From the Grid Plane section, select the axis you want to appear.
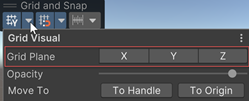
The Grid Axis section under the grid visibility drop-down menu
Resize the grid
You can set the size of the gridlines as they appear in the Scene view window. This affects the appearance of the grid and how your GameObjects automatically snap to the grid, but doesn’t affect how much your GameObject(s) move, rotate, or scale in increments.
すべての軸のサイズを一度に設定すると、均一な (正方形ベースの) グリッドが表示されます。ただし、3 つの軸のいずれかに異なる値を使用して、不均一な (長方形ベースの) グリッドを表示することもできます。デフォルトでは、グリッドは統一された距離 (すべての軸で 1) に設定されています。
グリッドのサイズを変更するには、以下の手順を行います。
From the Grid and Snap Overlays toolbar, open the snap increment drop-down menu (
 ).
).-
Use the Size property with the link icon selected to enter a uniform value for the visual grid (all grid lines the same length), or unlink the axes and specify a non-uniform distance between the grid lines for the X, Y, and Z.
例えば、X 軸と Y 軸に矩形のグリッドを作成するには、軸のリンクを解除し、 X と Y を 1 に、Z を 2 に設定します。
-
グリッド線の値を共通にしたい場合は、
- リンクアイコンを選択します。
- Size プロパティは、 X に入力された値を持つすべての軸の値を表示するようになりました。
ノート: キーボードショートカットを使用してグリッドのサイズを増減することもできます。
- グリッドサイズを大きくするには、Ctrl + ] (Windows) または Command + ] (macOS) を使用します。
- グリッドサイズを小さくするには、Ctrl + [ (Windows) または Command + [ (macOS) を使用します。
Change the default color of the grid lines
To change the color of the visible grid lines in the Scene view window:
Unity の Preferences (環境設定) ページを開きます (Windows の場合は Edit > Preferences、macOS の場合は Unity > Preferences に移動します。
-
リストの Colors カテゴリをクリックすると、Colors ページが表示されます。
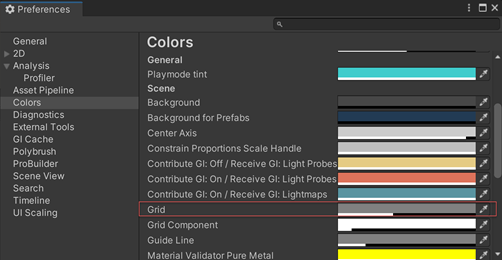
Preferences ページのグリッド設定プロパティ Grid プロパティのカラーピッカーを使用して、新しい色を選択します。
Change the opacity of the grid
グリッド線が明るすぎるか暗すぎる場合は、調整することができます。
From the Grid and Snap Overlays toolbar, open the grid visibility drop-down menu (
 ).
).-
Adjust the Opacity using the slider.
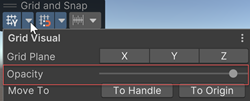
Adjust opacity in the grid visibility drop-down menu
Adjust the grid’s location
軸に沿ってグリッドを前方後方へ移動するには、次のキーボードショートカットを使用することができます。
- To nudge the grid backward, use Shift+[.
- グリッドを前方に移動するには、Shift + ] を使用します。
グリッドに軽くふれて、グリッドを近くに移動 (ゲームオブジェクトに対してグリッドが遠くて見えにくい場合など)、または、遠くに移動できます。
ゲームオブジェクトのハンドルにグリッドを移動
From the grid visibility drop-down menu (![]() ) in the Grid and Snap Overlay toolbar, use the Move To section to move the grid to the handle of the selected GameObject (Handle) or back to the default position (Origin).
) in the Grid and Snap Overlay toolbar, use the Move To section to move the grid to the handle of the selected GameObject (Handle) or back to the default position (Origin).
Reset values and settings to default
グリッド軸と不透明度の設定をデフォルトにリセットするには、以下を行います。
From the Grid and Snap Overlays toolbar, open the grid visibility drop-down menu (
 ).
).Click the More menu (⋮) and then click Reset.
グリッドのサイズをデフォルトに リセットするには、以下の手順を行います。
From the Grid and Snap Overlays toolbar, open the grid snapping drop-down menu (
 ).
).Click the More menu (⋮) and then click Reset.
スナップの増加値をデフォルトの値にリセットするには、以下の手順を行います。
From the Grid and Snap Overlays toolbar, open the snap increment drop-down menu (
 ).
).-
Click the More menu (⋮) and then click Reset.
Increment Snap セクションの値のみが元のデフォルト値に戻ります。
ショートカットのデフォルト
これらのデフォルトの Unity ショートカットで以下のアクションを実行できます。
| アクション | デフォルトのショートカット |
|---|---|
| グリッドサイズを大きくする |
Ctrl + ] (Windows) Command + ] (macOS) |
| グリッドサイズを小さくする |
Ctrl + [ (Windows) Command + [ (macOS) |
| グリッドを後方に移動する | Shift + [ |
| グリッドを前方に移動する | Shift + ] |
| グリッドに合わせる (選択したものをグリッドに揃える) |
Ctrl+\ (Windows) Command+\ (macOS) |
| グリッドをリセット | (デフォルトではショートカットなし) |
これらのデフォルトのキーボードショートカットを変更するには、ショートカットマネージャー を使用します。