環境設定
Use preferences to customize the behavior of the Unity Editor.
Preferences ウィンドウにアクセスするには、Edit > Preferences (Windows) または Unity > Preferences (macOS) の順に Unity のメインメニューから選択します。次の Preferences カテゴリがあります。
- 全般的な設定
- 2D
- Analysis
- Asset Pipeline
- Colors
- Diagnostics
- External Tools
- GI Cache
- Scene View
- Search
- Custom package preferences
Preferences ウィンドウ
検索フィールドを使用して設定カテゴリのリストをフィルタリングし、右側の詳細ペインでキーワードを強調表示します。
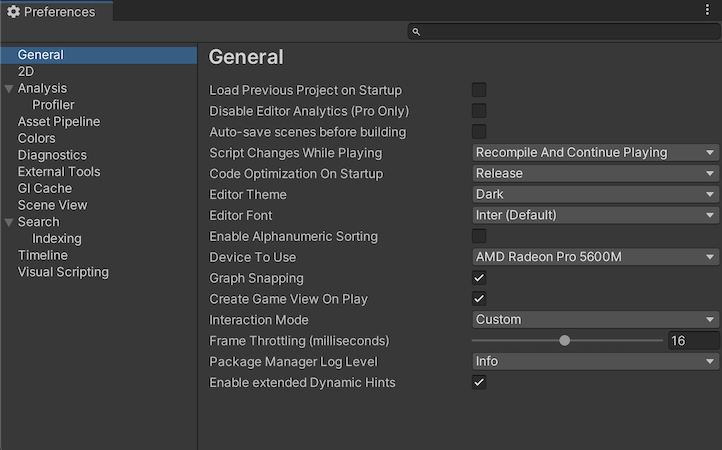
General
General (一般) 環境設定では、Unity で作業する際の全体的な動作をカスタマイズできます。
| プロパティ | 機能 | |
|---|---|---|
| Load Previous Project on Startup | これを有効にすると、常に、Unity 起動時に、以前開いていたプロジェクトを開きます。 | |
| Disable エディター Analytics (Pro only) | これを有効にすると、Unity に情報を送信して自動的にエディターを停止します。 | |
| Show Asset Store search hits | Enable this setting to display the number of free/paid Assets from the Asset Store in the Project Browser. | |
| Script Changes While Playing | ゲームがエディターで実行されている間にスクリプトが変更されたときの Unity の動作を選択します。 | |
| Recompile And Continue Playing | スクリプトを再コンパイルし、シーンを実行し続けます。これはデフォルトの動作ですが、スクリプトがシリアライズ可能でないデータに依存している場合は、変更したほうがよい場合があります。 | |
| Recompile After Finished Playing | 手動でシーンを停止するまで再コンパイルを行い、いかなる中断も避けます。 | |
| Stop Playing And Recompile | 即座にシーンを停止して再コンパイルし、テストを素早く再開できます。 | |
| Code Optimization On Startup | Choose whether to set code optimization mode to Debug or Release when the Unity Editor starts. Debug mode allows you to attach external debugger software, but gives slower C# performance when you run your Project in Play mode in the Editor. Release mode gives faster C# performance when you run your Project in Play mode in the Editor, but you can’t attach any external debuggers. For more information, see Code Optimization Mode. | |
| Editor Theme | Unity エディターで使用するスキンを選択します。これは、Plus と Pro Unity のサブスクリプションでのみ利用可能です。 | |
| Personal | 黒いテキストとライトグレーの背景を使用します。 | |
| Professional | 白いテキストとダークグレーの背景を使用します。 | |
| Editor Font | Unity エディターに表示するフォントを選択します。 デフォルトのフォントは Inter です。 | |
| Enable Alpha Numeric Sorting | これを有効にすると、Hierarchy ウィンドウの上部右端に新しいボタンを表示し、Transform Sorting (デフォルトの動作) と Alphanumeric Sorting を切り替えられるようにします。 | |
| Create Objects at Origin | これを有効にすると、ワールド座標 0,0,0 で新しい 3D オブジェクトをインスタンス化します。これを無効にすると、シーンのピボット (シーンビューカメラの正面) でインスタンス化します。 | |
| Interaction Mode | エディターが更新されるまでにアイドル状態が可能な時間を指定します。1 つのフレームが終了した後、エディターは指定された時間まで待機してから、次のフレームが開始します。 これにより、エディターのパフォーマンスを抑制し、CPU リソースと電力の消費を削減します。 例えば、エディターのパフォーマンスをテストする場合は、このプロパティを No Throttling (スロットルなし) に設定します。電力を節約したい場合 (例えば、ラップトップコンピューターのバッテリー寿命を延ばしたい場合)、このプロパティをスロットルモードの 1 つに設定します。 スロットルモードでは、エディターを操作すると (例えば、シーンビューでパンすることにより)、エディターはアイドリングを停止します。 ノート: 再生モードでは、Unity はこの設定を使用して適用するスロットルを無視します。ゲームビューで VSync オプションを有効にするか、 Application.targetFrameRate を –1 以外の値に設定しない限り、エディターは可能な限り短時間で更新されます。 |
|
| Default | エディターは、1ティックごとに最大4 msアイドルします。フレームに5ミリ秒以上かかる場合、エディターはアイドル状態にならず、次のフレームが自動的に開始されます。 | |
| No Throttling | フレームが終了するたびに、すぐに次のフレームが開始されます。エディターは待機せず、可能な限り速く更新されます。 このモードは、多くのCPUリソースを消費します。ラップトップコンピューターを使用している場合は、バッテリーの消耗が早くなります。 |
|
| Monitor Refresh Rate | エディターは、ミリ秒単位のモニターの更新レートまでアイドル状態になります。ほとんどのモニターでは、これは16 msです。 | |
| Custom | アプリケーションがアイドル状態でいられる最大時間を指定します。 このオプションを選択すると 、 Frame Throttling(milliseconds) プロパティが表示されます。 |
|
| Frame Throttling (milliseconds) | Interaction Mode が Custom に設定されている場合、このプロパティはエディターがフレーム間でアイドル状態でいられる時間を指定します。値は0から33 msの間です。 0は Interaction Mode を No Throttling に設定するのと同等です。 |
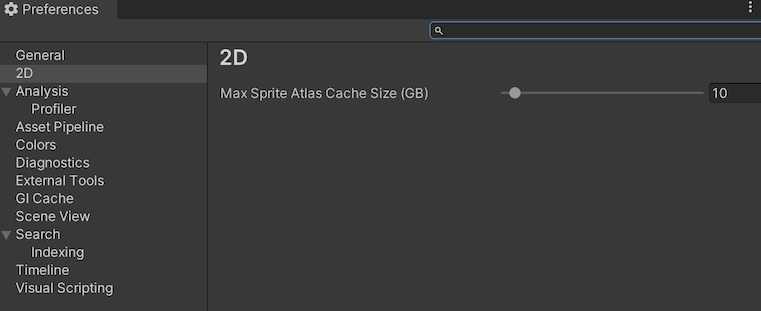
2D
Use the Max Sprite Atlas Cache Size (GB) preference to set the maximum size of the Sprite Atlas cache folder using the slider. Whenever possible, Unity keeps the size of this folder below this level.
For information on how to create Sprite Atlas in Unity, see Sprite Atlas and the SpriteAtlas API.
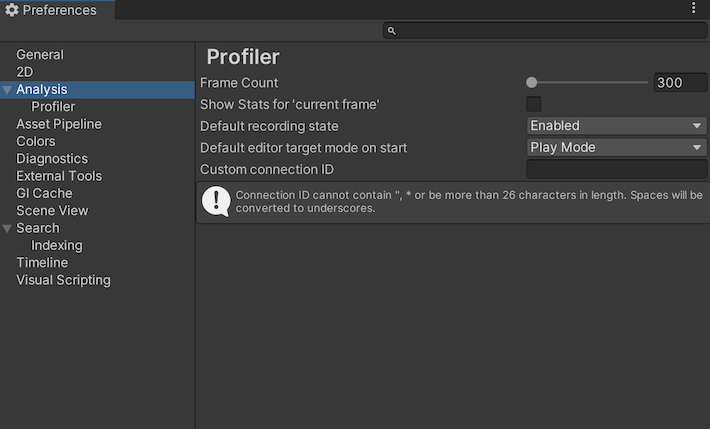
Analysis
The Analysis preferences let you define settings for the Profiler.
| プロパティ | 機能 |
|---|---|
| Frame count | プロファイラーがキャプチャするフレームの最大数を設定します。300 - 2,000 の間で設定できます。 |
| Show stats for ‘current frame’ | By default, when you select the Current Frame button and enter Current Frame mode, the frame indicator line doesn’t have annotations with the stats for the current frame. This is because the stats annotations might make it difficult to view data in real-time. To display the annotations, enable this setting. |
| Default recording state | プロファイラーをどのような記録状態で開くかを選択します。Enabled、Disabled、Remember から選択します。Enabled は、セッションの合間も Record ボタンを有効にしたままにし、Disbled は、プロファイリングセッション中の有効/無効の設定に関わらず、無効にします。Remember の状態は、セッション中に Record ボタンを有効にしたか無効にしたかを記憶し、次回 Profiler ウィンドウを開いたときに、その状態を維持します。 |
| Default editor target mode | Attach to Player ドロップダウンがデフォルトで対象とするモードを選択します。Playmode または Editor のいずれかを選択します。 |
Asset Pipeline

| プロパティ | 機能 |
|---|---|
| Auto Refresh | Enable this setting to import Assets automatically as they change. |
| Import Worker Count % | Enter your Desired Import Worker Count for new projects in percentage of available logical CPU cores. For example, if your system has 16 logical cores and this preference is set to 25%, the Desired Import Worker Count for new projects is set to 4. If you set this value too high, your import worker processes need to compete over other processes and system resources such as reading and writing files. The default value of 25% is suitable for most situations. |
| Directory Monitoring (available only on Windows) | Enable this setting to monitor directories instead of scanning all project files to detect asset changes. |
| Compress Textures on Import | Disable this setting to skip texture compression during import Textures are typically imported into uncompressed formats. |
| Verify Saving Assets | Enable this setting to verify which Assets to save individually. An information dialog appears any time Unity saves any assets. |
| Unity Accelerator (Cache Server) | |
| Default Mode | Define the default setting for the Cache Server, whether to enable or disable it by default. You can override this per Project in the Unity Editor settings. For more information, see Unity Accelerator. |
| Default IP address | キャッシュサーバーが使用するデフォルトの IP アドレスを設定します。Unity エディターの設定でプロジェクトごとにオーバーライドできます。 |
| Check Connection | このボタンをクリックすると、リモートキャッシュサーバーに接続しようとします。 |
Colors
The Colors preferences let you pick colors for various user interface elements in the Unity Editor.

| プロパティ | 機能 | |
|---|---|---|
| Animation | Use this setting to customize color preferences for animated properties. | |
| Property Animated | The color to indicate a property that’s being animated. | |
| Property Candidate | The color to indicate the animated property that you modified recently. | |
| Property Recorded | The color to indicate that an animated property automatically records changes in the animation clip. | |
| General | Use this setting to customize color preferences for General settings. | |
| Playmode Tint | The color to tint the editor to for ease of identifying when you’re in Playmode. Unity tints the whole editor with the color you pick here when you enter Play mode. Some operations in the Editor aren’t available when in Play mode, and you can reset some edited values when exiting the Play mode. | |
| Scene | Use this setting to customize preferences for a Scene. | |
| Background | Set the color for the scene camera to clear to when the Scene FX skybox setting is turned off. | |
| Background for Prefabs | Set the color for the scene camera to clear to when the Scene FX skybox setting is turned off. | |
| Contribute GI: Off / Recieve GI: Light Probes | Set the color to display when ContributeGI is disabled in the GameObject’s Static Editor Flags. | |
| Contribute GI: On / Recieve GI: Light Probes | Set the color to display when ContributorGI is enabled in the GameObject’s Static Editor Flags, and the Renderer’s ReceiveGI property is set to Lightmaps. | |
| Contribute GI: On / Recieve GI: Lightmapss | Set the color to display when ContributeGI is enabled in the GameObject’s Static Editor Flags, and the Renderer’s ReceiveGI property is set to Light Probes. | |
| Grid | Set the color of the grid in the Scene view. | |
| Guide Line | Set the color of the Guide Line in the Scene view. | |
| Material Validator Pure Metal | Set the color for the Validate Albedo/Metal Specular debug render mode to indicate the material properties. | |
| Material Validator Value Too High | Set the color for the Validate Albedo/Metal Specular debug render mode to indicate when the material value is too high. | |
| Material Validator Value Too Low | Set the color for the Validate Albedo/Metal Specular debug render mode to indicate when the material value is too low. | |
| Selected Axis | Set the color for the selected handle to display highlighted in, when Move, Rotate, or the Scale tool is engaged. | |
| Selected Children Outline | Set the outine color for the children of the selected objects. | |
| Selected Material Highlight | Set the outline color that shows when clicking on a mesh in the MeshRenderer to ping the submesh in the Scene view. | |
| Selected Outline | Set the outine color for the selected GameObjects. | |
| UI Collider Handle | Set the color to use for the Unity UI’s padding visualization. | |
| Volume Gizmo | Set the color to indicate the audio source in Gizmo. | |
| Wireframe | Set the color of the wireframe when the wireframe render mode is active. | |
| Wireframe Overlay | Set the color of the wireframe when the textured wireframe render mode is active. | |
| Wireframe Selected | If you’ve enabled Selection Wire in the Gizmo options, then the selected wireframes appear in the color that you set here. | |
| X Axis | The color that you set here is indicated for any built-in transform tool handle affecting X axis. | |
| Y Axis | The color that you set here is indicated for any built-in transform tool handle affecting Y axis. | |
| z Axis | The color that you set here is indicated for any built-in transform tool handle affecting Z axis. |
Diagnostics
When you report a problem to Unity, the Unity Support Team might need you to enable diagnostic switches to help them identify the cause. Running diagnostics on an application, whether in the Editor or a player, impacts performance and user experience. You should only run diagnostics when the Unity Support Team asks for them.
If diagnostic switches are active in your application, Unity shows a warning in the console. To reset switches, in the Diagnostics tab, click Reset all.
If an active diagnostic switch prevents the Unity Editor from opening, use the --reset-diagnostic-switches parameter to reset all switches from the command line. For more information on using command line arguments at launch, see Command line arguments.
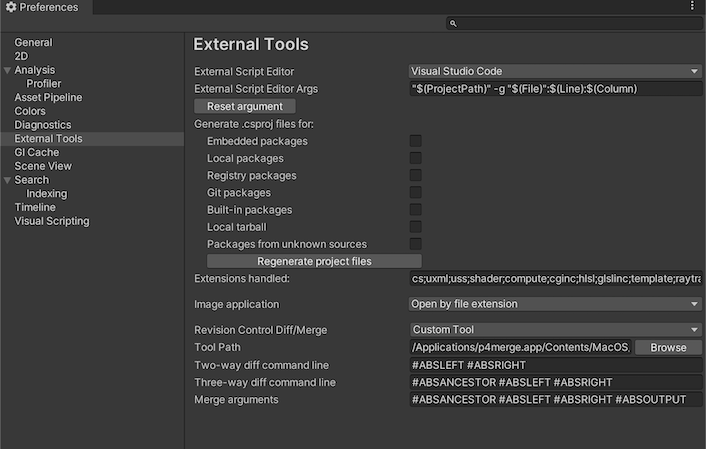
External Tools
External Tools 設定では、スクリプティング、画像の操作、ソース管理のための外部アプリケーションを設定できます。
| プロパティ | 機能 |
|---|---|
| External Script Editor | Unity がスクリプトファイルを開くために使用するアプリケーションを選択します。Unity はビルトインサポートのスクリプトエディターに自動的に正しい引数を渡します。Unity は Visual Studio Community、Visual Studio Code (VSCode)、JetBrains Rider のためのビルトインのサポートを備えています。Open by file extension オプションは、ファイルを開くときに、ファイルタイプに合ったデフォルトのアプリケーションを使用します。デフォルトの アプリケーションが利用できない場合は、ファイルを開くアプリケーションを選択するためのウィンドウが開きます。 |
| External Script Editor Args | このフィールドは、ファイルを開いたときに Unity がコードエディターに送信するパラメーターを制御します。引数 $(File)、$(Line)、$(Column) はファイル名、行番号、列番号を外部コードエディターに渡します。コードエディターはこれらの引数を使用して、カーソルを正しい位置に置いて正しいファイルを開きます。例えば、Unity コンソールでエラーメッセージをダブルクリックすると、Unity はエラーメッセージからこれらの引数を外部エディターに渡し、エラーが発生した位置で正しいファイルを開きます。このフィールドを手動で編集して、Unity が外部 コードエディターに送信する引数をカスタマイズできます。Reset argument (引数のリセット) ボタンをクリックすると、このフィールドをデフォルトの設定 (上のスクリーンショット) にリセットします 。 |
| Generate all .csproj files. | この設定を有効にすると、すべての .csproj ファイルを生成できます。コードエディターは .sln と .csproj ファイルを使用してプロジェクトに関するデータにアクセスします。.csproj ファイルは、XML 形式の記述データまたはメタデータを格納します。このデータには、バージョン情報、プラットフォーム要件、ビルドファイル、データベース設定などが含まれます。 これらのファイルが存在する場合、コードエディターは、含まれるデータを使用して、潜在的なコンパイルエラーをハイライトするなどの便利な機能を提供します。この設定を有効にすると、プロジェクトで可能な限り .csproj ファイルを作成します。 |
|
Extensions handled (External Script Editor (外部スクリプトエディター) として Rider または Visual Studio Code を選択した場合にのみ使用可能) |
このフィールドは、External Script Editor が開くファイルタイプを決定します。フィールドには、 スクリプトエディターがデフォルトで開くファイルのリストが事前に入力されています。このリストに他のファイルタイプを追加するには、ファイル拡張子を入力し、各拡張子をセミコロンで区切ります。 |
| Image application | 画像ファイルを開くのに使うアプリケーションを選択します。 |
| Revision Control Diff/Merge | アセットサーバーとのファイルの不一致を解決するために使用するアプリケーションを選択します。Unity は、デフォルトのインストール場所でこれらのツールを検出します。Windows ではTortoiseMerge、WinMerge、PlasticSCM Merge、Beyond Compare 4 のレジストリキーを確認します。 詳しくは、後述の リビジョン管理の Diff/Marge セクションを参照してください。 |
Revision Control Diff/Merge
Unity は現在以下のツールをサポートしています。
- SourceGear DiffMerge
- TkDiff
- P4Merge
- TortoiseMerge
- WinMerge
- PlasticSCM Merge
- Beyond Compare 4
Note: As these are third-party tools that Unity doesn’t include by default, you might want to download and install them separately.
カスタムのリビジョンツールを設定するには、以下の手順で行います。
- Revision Control Diff/Merge ドロップダウンから Custom Tool を選択します。
- カスタムツールのインストールフォルダーへのパスを入力します。Mac では、これはツールのインストールフォルダーの Contents / MacOS フォルダーを指す必要があります。
- 2 者間差分、3 者間差分、マージの引数を入力します。
リビジョンツールでファイルレイアウトを指定するには、以下の引数を使用します。
| プロパティ | 機能 |
|---|---|
#LTITLE |
左のタイトル |
#RTITLE |
右のタイトル |
#ATITLE |
祖先のタイトル |
#LEFT |
左のファイル |
#RIGHT |
右のファイル |
#ANCESTOR |
祖先ファイル |
#OUTPUT |
出力ファイル |
#ABSLEFT |
左のファイルへの絶対パス |
#ABSRIGHT |
右のファイルへの絶対パス |
#ABSANCESTOR |
祖先ファイルへの絶対パス |
#ABSOUTPUT |
出力ファイルへの絶対パス |
例:


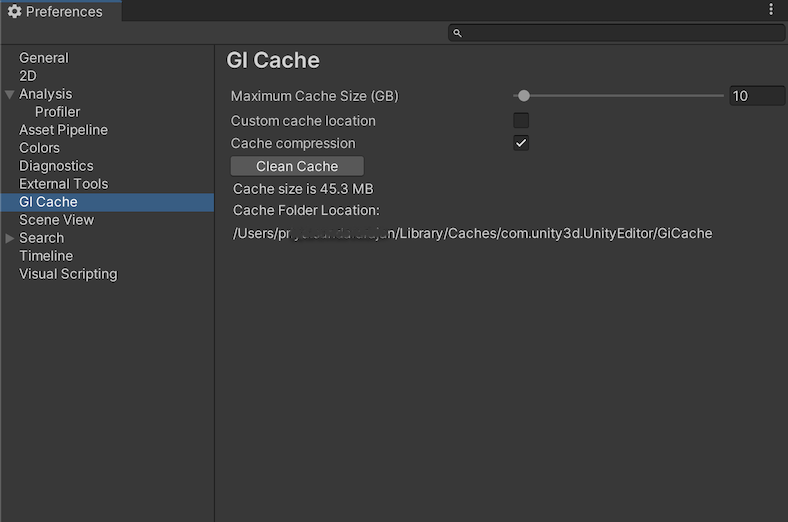
GI Cache
The Global Illumination (GI) system uses a cache on each computer to store intermediate files used to pre-compute real-time Global Illumination. All projects on the computer share the cache.
| プロパティ | 機能 |
|---|---|
| Maximum Cache Size (GB) | Use the slider to set the maximum GI cache folder size. Unity keeps the GI cache folder size below this number whenever possible. Unity periodically deletes unused files to create more space (deleting the oldest files first). This is an automatic process, and doesn’t require you to do anything. Note: If the current Scene is using all the files in the GI cache, increase your cache size. Otherwise, resource-intensive recomputation occurs when baking. This can happen when the Scene is large or the cache size is too small. |
| Custom cache location | これを有効にすると、GI キャッシュフォルダーをカスタムのフォルダーに保存可能になります。デフォルトでは、Caches フォルダーに保存されます。すべてのプロジェクトがこのキャッシュフォルダーを共有します。 *ヒント GI キャッシュを SSD ドライブに保存すると、ベイク処理が I/O バウンドな場合にベイクを高速化できます。 |
| Cache Folder Location | Browse ボタンをクリックして、キャッシュの場所を指定します。 |
| Cache compression | This option enables Unity to compress datafiles in the GI cache to use less hard drive space. The datafiles are LZ4-compressed by default, and the naming scheme is a hash and a file extension. Unity computes the hashes based on the inputs to the lighting system, so changing any of the following settings, properties or assets can lead to lighting recomputation: - Materials (Textures, Albedo, Emission) - Lights - Geometry - Static flags - Light Probe groups - Reflection probes - Lightmap Parameters Tip: If you need to access the raw Enlighten Realtime Global Illumination data, disable Cache Compression and clear the cache. |
| Clean Cache | Use this button to clear the cache directory. It’s not safe to delete the GI Cache directory manually while the Editor is running. This is because the Editor creates the GiCache folder when it starts and maintains a set of references to those files. The Clean Cache button ensures that the Editor releases all references to the files on disk before they’re deleted. |
| Cache size is | キャッシュの現在のサイズを表示します。 |
| Cache Folder Location | 現在のキャッシュフォルダーの場所を表示します 。 |
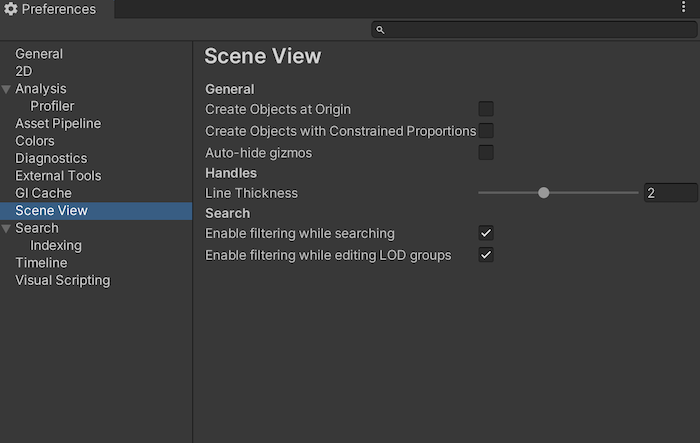
Scene View
Use the Scene view preferences to customize object placement and visibility while editing.
| プロパティ | 機能 |
|---|---|
| Create Objects at Origin | Scene pivot ではなく、ワールド座標 0,0,0 で新規オブジェクトを作成します。デフォルトでは無効になっています。 |
| Create Objects with Constrained Proportions | Defines the default behavior for Scale in the Transform component. If enabled, when you adjust the value of a scale axis, the other values adjust proportionately. |
| Line Thickness | トランスフォームツール の線の太さを設定します。 |
| Enable filtering while searching | シーンビューで一致しないアイテムをグレーアウトすることができます。デフォルトでは有効になっています。 |
| Enable filtering while editing LOD groups | LOD グループの編集時に、シーン内の他のオブジェクトをグレーアウトすることを有効にします。デフォルトでは有効になっています。 |
Search
You can set Search preferences from the Unity Preferences window (menu: Edit > Preferences).
Tip: You can also access the Search preferences in any of the following ways:
- Enter ? (question mark) in the search field and select Open Search Preferences from the results.
- From More Options (:) in the top-left of the Search window, select Preferences.
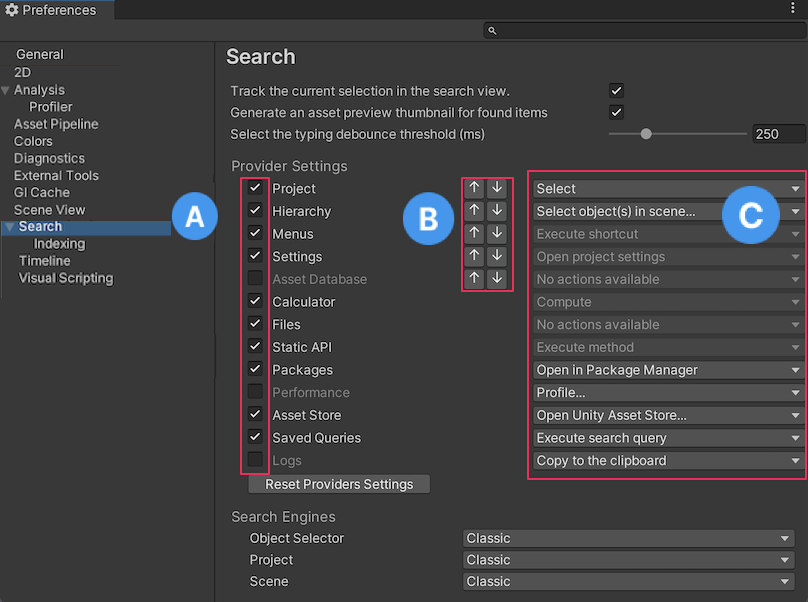
Search Preferences
| 設定: | 機能 | |
|---|---|---|
| Track the current selection in the search | Enable this setting to execute the SearchProvider.trackSelection callback each time the Search selection changes.The callback pings Assets in the Project window or Hierarchy window, which can slow Search navigation in large Projects. |
|
| Generate an asset preview thumbnail for found items | Enable this setting to display thumbnails for items that are currently visible in the results pane of the Search window. When you disable this setting, Search displays a generic icon. This is useful in large Projects, where generating icons can slow Search navigation. |
|
| Select the typing debounce threshold | The debouncing threshold is the time the system waits for the user to finish typing before executing the search. | |
| Provider Settings | ||
| A [Provider Toggles] | Enable and disable providers. When you disable a provider, Search ignores it when executing searches. | |
| B [Provider Order] | Use these settings to modify the order in which search items are shown on the screen. All items of a given provider priority appear before any lower priority items. | |
| C [Default Actions] | Use these settings to choose the default actions to execute when you select (for example, double-click) an item in the search results. | |
| Reset Priorities | Resets all providers to their default on/off state and priority. | |
| Search Engines | Set the search fields in the Object Selector, Project, and Scene to one of the available search engines. Classic - The original search functionality. Advanced - The latest version of Search for Unity (formerly QuickSearch). |
Indexing
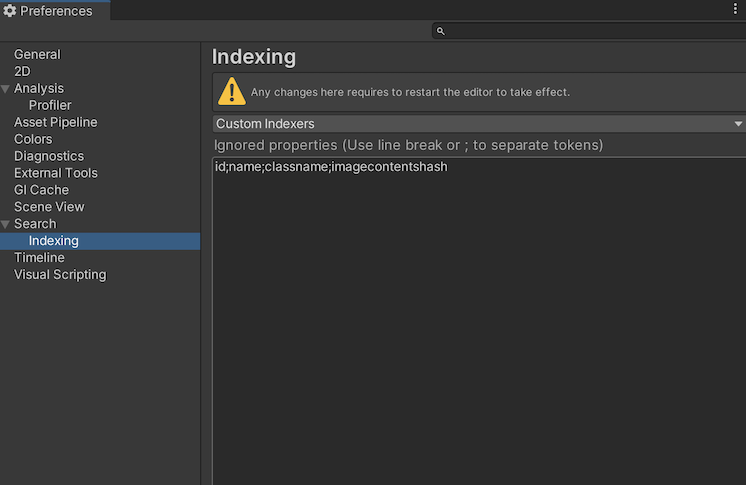
Set the Custom index pages by selecting them or deselecting them from the Custom Indexers drop-down list.
カスタムパッケージの設定
Some Asset Store or Unity packages add their own custom preferences to the Preferences window. Typically, these use the package name as the preferences category. In this example, you can see the Cinemachine package preferences:
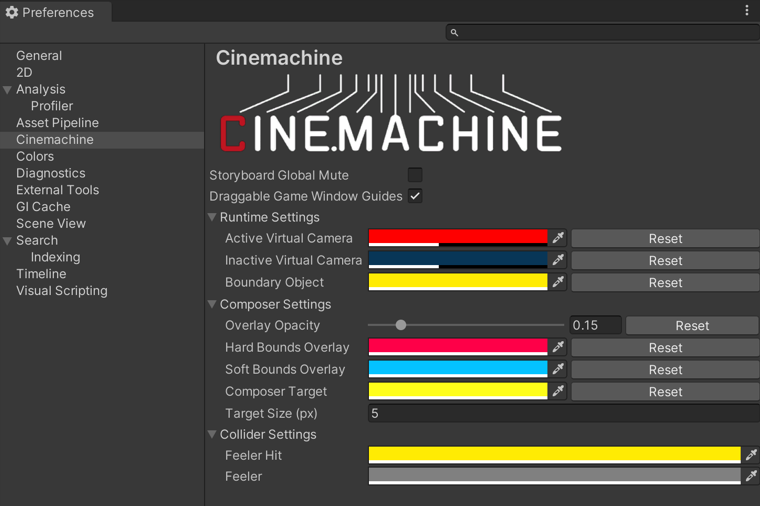
特定のパッケージの環境設定については、そのパッケージのドキュメントを参照してください。ここでは、Unity の標準の環境設定のみを説明します。
Interaction Mode Preferences は 2019.3 で追加
2019.3 でAnalysis と UI Scaling タブを追加し、Grid Brush と Tile Palette タブを削除
Gradle for Android のオプションを 2019.1 で External Tools セクションに追加
Tile Palette Preferences でキーを削除し、オプションを 2019.1 で追加NewIn20191
子ゲームオブジェクトの色の選択のアウトライン色の設定は 2018.3 で追加
Unity 2018.3 の新しい統一設定とその他の更新
プレイ中のスクリプトの変更とデバイスの使用ドロップダウンメニューはUnity 2018.2で追加
2018.1 で外部スクリプトエディターのリストを更新
Copyright © 2023 Unity Technologies
优美缔软件(上海)有限公司 版权所有
"Unity"、Unity 徽标及其他 Unity 商标是 Unity Technologies 或其附属机构在美国及其他地区的商标或注册商标。其他名称或品牌是其各自所有者的商标。
公安部备案号:
31010902002961