WebGL の Player 設定
This page details the Player settings specific to the WebGL platform. For a description of the general Player settings, see Player settings.

以下のセクションのプロパティが説明されています。
- Resolution and Presentation (解像度と表示)
- Splash Image (スプラッシュ画像)
- Other Settings (その他の設定)
- Publishing Settings (公開設定)
Note: Although the Icon panel appears on the WebGL Player settings, there are no icon settings because WebGL games don’t use icons.
For more information about WebGL Publishing Settings, see WebGL Building and Running.
Resolution and Presentation
このセクションでは、スクリーンモードとデフォルトサイズをカスタマイズできます。
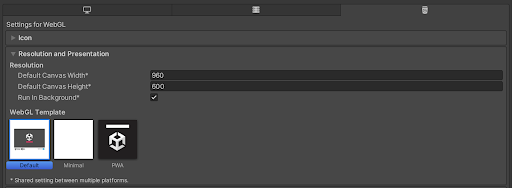
Resolution
| 設定 | 機能 |
|---|---|
| Default Canvas Width | WebGL キャンバス要素の幅を設定します。 |
| Default Canvas Height | WebGL キャンバス要素の高さを設定します。 |
| Run In Background | これを有効にすると、キャンバスやブラウザーウィンドウがフォーカスを失ったときにもコンテンツを継続して実行できます。 |
WebGL Template
WebGL プロジェクトに使用するテンプレートを選択します。
- Default ページはグレーのキャンバスにプログレスバーがあるシンプルな白いページです。
- Minimal ページには WebGL コンテンツを実行するのに必要な定型コードのみが含まれます。
- The PWA page has a Progressive Web App including a web manifest file and service worker code.
独自のテンプレートを指定して、完成したゲームと同様の環境でゲームを実行することができます。WebGL テンプレートの使用 を参照してください。
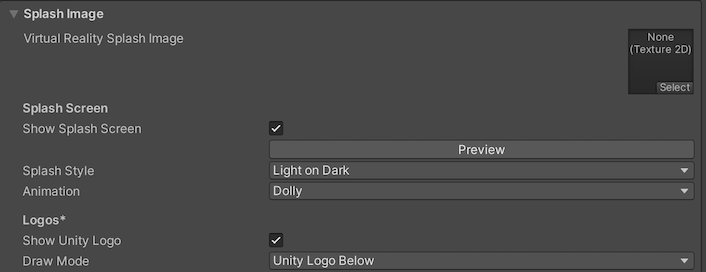
Splash Image
Use the Virtual Reality Splash Image setting to select a custom splash image for XR displays. For information on common Splash Screen settings, see Splash Screen.
Other Settings (その他の設定)
このセクションでは、以下のグループに分類されたさまざまなオプションをカスタマイズできます。
- Rendering (レンダリング)
- Configuration (設定)
- Shader Variant Loading
- Optimization (最適化)
- Stack Trace
- Legacy (古い機能)
Rendering
これらの設定を使用して、WebGL プラットフォーム向けにゲームをレンダリングする方法をカスタマイズします。
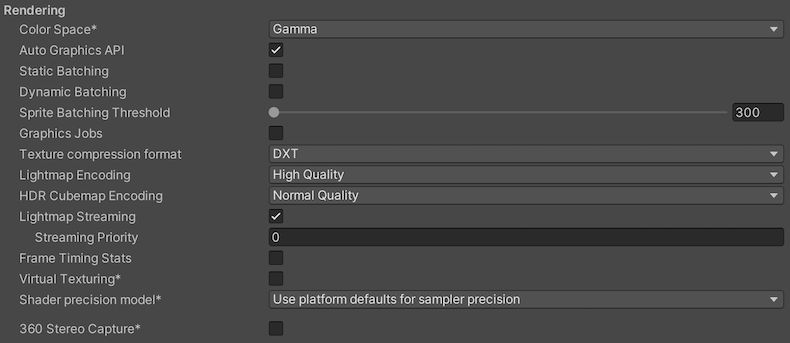
| 設定 | 機能 | ||
|---|---|---|---|
| Color Space | Choose what color space to use for rendering: Gamma or Linear. See Linear rendering overview for an explanation of the difference between the two. |
||
| Auto Graphics API | Disable this option to manually pick and reorder the graphics APIs. By default this option is enabled, and Unity includes WebGL2.0, with WebGL1.0 as a fallback for devices where WebGL2.0 isn’t supported. | ||
| Static Batching | このオプションを有効にして、静的バッチ処理を行います。 | ||
| Dynamic Batching | これを有効にして、 ダイナミックバッチング をビルドに使用します (デフォルトでは有効になっています)。 | ||
| Graphics Jobs | Enable this option to instruct Unity to offload graphics tasks (render loops) to worker threads running on other CPU cores. Use it to reduce the time spent in Camera.Render on the main thread, which is often a bottleneck. Note: This feature is experimental. It might not deliver a performance improvement for your project, and might introduce new crashes. |
||
| テクスチャ圧縮形式 | Choose DXT, ETC2, or ASTC to set the texture compression format for WebGL. For information on how to pick the right format, refer to Texture compression format overview and to learn how to create builds for desktop and mobile browsers from a script, refer to Texture Compression in WebGL. | ||
| Lightmap Encoding | ライトマップのエンコードを設定するには、Low Quality、Normal Quality、High Quality のいずれかを選択します。この設定は、ライトマップのエンコードスキームと圧縮形式に影響します。 | ||
| HDR Cubemap Encoding | Choose Low Quality, Normal Quality, or High Quality to set the HDR Cubemap encoding. This setting affects the encoding scheme and compression format of the HDR Cubemaps. | ||
| Lightmap Streaming Enabled | Whether to use Mipmap Streaming for lightmaps. Unity applies this setting to all lightmaps when it generates them. Note: To use this setting, you must enable the Texture Streaming Quality setting. |
||
| Streaming Priority | Set the priority for all lightmaps in the Mipmap Streaming system. Unity applies this setting to all lightmaps when it generates them. Positive numbers give higher priority. Valid values range from —128 to 127. |
||
| Frame Timing Stats | これを有効にすると、CPU/GPUフレームタイミング統計を収集します。 | ||
| Virtual Texturing | Indicates whether to enable Virtual Texturing. Note: The Unity Editor requires a restart for this setting to take effect. |
||
| Shader precision model | Controls the default precision of samplers used in shaders. See Shader data types and precision for more details. | ||
| 360 Stereo Capture | Indicates whether Unity can capture stereoscopic 360 images and videos. When enabled, Unity compiles additional shader variants to support 360 capture (currently only on Windows/OSX). When enabled, enable_360_capture keyword is added during the Stereo RenderCubemap call. Note that this keyword is not triggered outside the Stereo RenderCubemap function. For more information, see Stereo 360 Image and Video Capture. |
||
| Load/Store Action Debug Mode | Highlights undefined pixels that might cause rendering problems in your built application. The highlighting appears only in the Game view, and your built application if you select Development Build in Build Settings. See LoadStoreActionDebugModeSettings. | ||
| Editor Only | Highlights undefined pixels in the Game view, but not in your built application. | ||
Configuration

| Property | Description | |
|---|---|---|
| Scripting Backend | Choose the scripting backend you want to use. The scripting backend determines how Unity compiles and executes C# code in your Project. | |
| Mono | Compiles C# code into .NET Common Intermediate Language (CIL) and executes that CIL using a Common Language Runtime. For more information, refer to the Mono page. | |
| IL2CPP | Compiles C# code into CIL, converts the CIL to C++ and then compiles that C++ into native machine code, which executes directly at runtime. For more information, refer to IL2CPP. | |
| API Compatibility Level | Choose which .NET APIs you can use in your project. This setting can affect compatibility with third-party libraries. However, it has no effect on Editor-specific code (code in an Editor directory, or within an Editor-specific Assembly Definition). Tip: If you are having problems with a third-party assembly, you can try the suggestion in the API Compatibility Level section below. |
|
| .Net Standard 2.1 | Compatible with .NET Standard 2.1. Produces smaller builds and has full cross-platform support. | |
| .Net Framework | Compatible with the .NET Framework 4 (which includes everything in the .NET Standard 2.0 profile plus additional APIs). Choose this option when using libraries that access APIs not included in .NET Standard 2.0. Produces larger builds and any additional APIs available aren’t necessarily supported on all platforms. For more information, refer to Referencing additional class library assemblies. | |
| IL2CPP Code Generation | Defines how Unity manages IL2CPP code generation. This option is only available if you use the IL2CPP scripting backend. | |
| Faster runtime | Generates code optimized for runtime performance. This setting is activated by default. | |
| Faster (smaller) builds | Generates code optimized for build size and iteration. This setting generates less code and produces a smaller build, but can reduce runtime performance for generic code. Use this option when faster build times are important, such as when iterating on changes. | |
| C++ Compiler Configuration | Choose the C++ compiler configuration used when compiling IL2CPP generated code. Note: This property is disabled unless Scripting Backend is set to IL2CPP. |
|
| Use incremental GC | Uses the incremental garbage collector, which spreads garbage collection over several frames to reduce garbage collection-related spikes in frame duration. For more information, refer to Automatic Memory Management. | |
| Allow downloads over HTTP | Indicates whether to allow downloading content over HTTP. The options are Not allowed, Allowed in Development builds only, and Always allowed. The default option is Not allowed due to the recommended protocol being HTTPS, which is more secure. | |
| Active Input Handling | Choose how to handle input from users. | |
| Input Manager (old) | Use the default Input window. | |
| Input System Package (New) | Use the newer Input system. To try the new Input System, install the InputSystem package. | |
| Both | Use both systems side by side. | |
Shader Variant Loading
Use these settings to control how much memory shaders use at runtime.
| 設定 | 説明 |
|---|---|
| Default chunk size (MB) | Sets the maximum size of compressed shader variant data chunks Unity stores in your built application for all platforms. The default is 16. For more information, refer to Shader loading. |
| Default chunk count | Sets the default limit on how many decompressed chunks Unity keeps in memory on all platforms. The default is 0, which means there’s no limit. |
| Override | Enables overriding Default chunk size and Default chunk count for this build target. |
| Chunk size (MB) | Overrides the value of Default chunk size (MB) on this build target. |
| Chunk count | Overrides the value of Default chunk count on this build target. |
API Compatibility Level
You can choose your mono API compatibility level for all targets. Sometimes a 3rd-party .NET library uses functionality that’s outside of your .NET compatibility level. To understand what’s going on in such cases, and how to best fix it, try following these suggestions:
- Install ILSpy for Windows.
- Drag the .NET assemblies for the API compatilibity level that you are having issues with into ILSpy. You can find the problematic files under
Frameworks/Mono/lib/mono/YOURSUBSET/. - サードパーティ製のアセンブリをドラッグします。
- サードパーティ製のアセンブリを右クリックし、Analyze を選択します。
- In the analysis report, inspect the Depends on section. The report highlights anything that the 3rd-party assembly depends on, but that’s not available in the .NET compatibility level of your choice in red.
Script Compilation
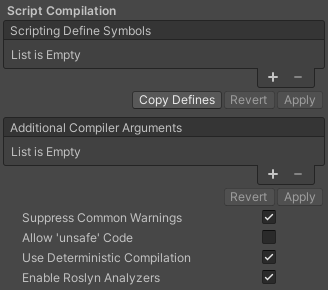
| 設定 | 機能 | |
|---|---|---|
| Scripting Define Symbols | カスタムコンパイルフラグを設定します。詳細は、プラットフォーム依存コンパイル のドキュメントを参照してください。 | |
| Additional Compiler Arguments | Add entries to this list to pass additional arguments to the Roslyn compiler. Use one new entry for each additional argument. To create a new entry, press the ‘+’ button. To remove an entry, press the ‘-’ button. When you have added all desired arguments, click the Apply button to include your additional arguments in future compilations. The Revert button resets this list to the most recent applied state. |
|
| Suppress Common Warnings | C#の警告 CS0169 と CS0649 を表示するには、この設定を無効にします。 | |
| Allow ‘unsafe’ Code | 事前に定義されたアセンブリ (例えば Assembly-CSharp.dll) の ‘unsafe’ C# code をコンパイルするサポートを有効にします。アセンブリ定義ファイル ( .asmdef) の場合、.asmdef ファイルの 1 つをクリックし、表示されたインスペクターウィンドウでオプションを有効にします。 |
|
| Use Deterministic Compilation | Disable this setting to prevent compilation with the -deterministic C# flag. With this setting enabled, compiled assemblies are byte-for-byte identical each time they’re compiled. For more information, see Microsoft’s deterministic compiler option documentation. |
|
| Enable Roslyn Analyzers | この設定を無効にすると、プロジェクト内に存在する可能性のある Roslyn アナライザー DLL を使用せずに、ユーザーが作成したスクリプトをコンパイルします。 | |
Optimization

| Property | Description | |
|---|---|---|
| Prebake Collision Meshes | Adds collision data to Meshes at build time. | |
| Keep Loaded Shaders Alive | Indicates whether to prevent shaders from being unloaded. For more information, see Shader Loading. |
|
| Preloaded Assets | Sets an array of Assets for the player to load on startup. To add new Assets, increase the value of the Size property and then set a reference to the Asset to load in the new Element box that appears. |
|
| AOT compilation options | Additional options for Ahead of Time (AOT) compilation. This helps optimize the size of the built iOS player. | |
| Strip Engine Code | Enable this option if you want the Unity Linker tool to remove code for Unity Engine features that your Project doesn’t use. This setting is only available with the IL2CPP scripting backend. Most apps don’t use every available DLL. This option strips out DLLs that your app doesn’t use to reduce the size of the built Player. If your app is using one or more classes that would normally be stripped out under your current settings, Unity displays a debug message when you try to build the app. |
|
| Managed Stripping Level | Chooses how aggressively Unity strips unused managed (C#) code. The options are Minimal, Low, Medium, and High. When Unity builds your app, the Unity Linker process can strip unused code from the managed DLLs your Project uses. Stripping code can make the resulting executable significantly smaller, but can sometimes accidentally remove code that’s in use. For more information about these options and bytecode stripping with IL2CPP, refer to ManagedStrippingLevel. |
|
| Vertex Compression | Sets vertex compression per channel. This affects all the meshes in your project. Typically, Vertex Compression is used to reduce the size of mesh data in memory, reduce file size, and improve GPU performance. For more information on how to configure vertex compression and limitations of this setting, refe to Compressing mesh data. |
|
| Optimize Mesh Data | Enable this option to strip unused vertex attributes from the mesh used in a build. This option reduces the amount of data in the mesh, which can help reduce build size, loading times, and runtime memory usage. Warning: If you have this setting enabled, you should remember to not change material or shader settings at runtime. For more information, refer to PlayerSettings.stripUnusedMeshComponents. |
|
| Texture MipMap Stripping | Enables mipmap stripping for all platforms. This strips unused mipmaps from Textures at build time. Unity determines unused mipmaps by comparing the value of the mipmap against the Quality Settings for the current platform. If a mipmap value is excluded from every Quality Setting for the current platform, then Unity strips those mipmaps from the build at build time. If QualitySettings.masterTextureLimit is set to a mipmap value that has been stripped, Unity will set the value to the closest mipmap value that has not been stripped. | |
Stack Trace
Select the logging settings for the WebGL platform.
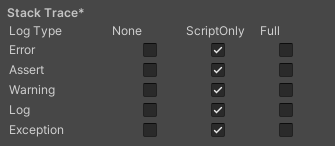
- Select your preferred stack trace method by enabling the option that corresponds to each Log Type (Error, Assert, Warning, Log, and Exception) based on the type of logging you require. For example:
-
ScriptOnly: Logs only when running scripts.
-
Full: Logs all the time.
-
None: No logs are ever recorded.
-
ScriptOnly: Logs only when running scripts.
See stack trace logging for more information.
Legacy
Enable the Clamp BlendShapes (Deprecated) option to clamp the range of blend shape weights in Skinned Mesh Renderers.

Publishing settings
Use the Publishing Settings to configure how Unity builds your WebGL app. For example, you can choose to enable the browser cache to store its files in your build.

| 設定 | 機能 | |
|---|---|---|
| Enable Exceptions | 実行時の予期しないコードの動作 (通常はエラーとみなされる) を処理する方法を選択します。選択肢は None、Explicitly Throw Exceptions Only、Full Without Stacktrace、Full With Stacktrace です。詳細は、WebGL プロジェクトのビルドと実行 を参照してください。 | |
| Compression Format | Choose the compression format to use for release build files. The options are: Gzip, Brotli, or Disabled (none). Note that this option doesn’t affect development builds. | |
| Name Files As Hashes | これを有効にすると、ビルドの各ファイルのファイル名として非圧縮ファイルコンテンツの MD5 ハッシュを使用できます。 | |
| Data caching | これを有効にすると、自動的にコンテンツのアセットデータをユーザーマシン上にキャッシュします。そのため、(コンテンツが変更されない限り) その後の実行で再度ダウンロードする必用がありません。 Caching は、ブラウザーによって提供される IndexedDB API を使用して実装されます。ブラウザーによっては、あるサイズを超えるデータをキャッシュする時にユーザーの許可を求める、などの IndexedDB API 関連の制限を実装している場合があります。 |
|
| Debug Symbols | Enable this option to preserve debug symbols and perform demangling (displaying the original function names) of the stack trace when an error occurs. For release builds, all the debug information is stored in a separate file which is downloaded from the server on demand when an error occurs. Development builds always have demangling support embedded in the main module and therefore aren’t affected by this option. | |
| Show Diagnostics Overlay | Enable this option to display an overlay in WebGL builds that displays diagnostics information. It’s available for both Development and Release builds. For more information, see Show Diagnostics Overlay Player settings. | |
| Decompression Fallback | Include decompression fallback code for build files in the loader. Use this option if you are unable to configure server response headers according to the selected compression method. | |
| Initial Memory Size | The initial size of the WASM heap memory in megabytes (MB). By default, this is set to 32 MB. If Memory Growth Mode is set to None, then this is also the maximum size of WASM heap memory. | |
| Memory Growth Mode | Choose the growth mode for the WASM heap memory from the following options. The recommended option is Geometric. | |
| None | The WASM heap memory has a fixed size configured in Initial Memory Size. | |
| Linear | The WASM heap memory increases by a fixed amount configured by Linear Memory Growth Step. | |
| Geometric | The WASM heap memory increases relative to the current heap size depending on the factor configured in Geometric Memory Growth Step and Geometric Memory Growth Cap. | |
| Maximum Memory Size | The maximum size of the WASM heap memory in MB. By default, this is set to 2048 MB. This option is only available for the Memory Growth Mode Linear or Geometric. | |
| Linear Memory Growth Step | Advanced tuning option to control the WASM heap growth step in MB. By default, this is set to 16 MB. A growth step of 16MB indicates that the heap is increased by 16MB each time it needs to grow. Only available if Memory Growth Mode is set to Linear. | |
| Geometric Memory Growth Step | Advanced tuning option to control the WASM heap growth factor relative to the current heap size. By default, this is set to 0.2. A growth factor of 0.2 means that the size of the heap is increased by 0.2 * currentHeapSize each time the heap needs to grow. Only available if Memory Growth Mode is set to Geometric. | |
| Geometric Memory Growth Cap | Advanced tuning option to control the upper limit for a heap growth step in MB. By default, this is set to 96 MB. A growth cap of 96MB means that the size of the heap is increased by at most 96 MB. Only available if Memory Growth Mode is set to Geometric. | |
Show Diagnostic Overlay setting
To help optimize WebGL builds and diagnose potential problems, you can view diagnostics information (currently limited to memory usage) by enabling this setting. Once enabled, an icon appears on the build that displays an overlay with useful data about the build. It’s available for both Development and Release builds.
-
To view the diagnostics information, enable the Show Diagnostics Overlay option in the Player settings window (File > Build Settings > Player Settings > Publishing Settings).
On desktop, the Diagnostics icon appears on the footer of the WebGL canvas:

Diagnostics button on the footer of the canvas On a mobile device, the Diagnostics icon appears on the bottom-right of the screen:

An Android phone displaying the diagnostics button Click the Diagnostics
 icon. An overlay appears showing the JavaScript memory, which is further broken down to display WASM heap memory usage:

The following diagnostics appear on the overlay screen:
| プロパティ | 機能 |
|---|---|
| Total JS (JavaScript) Memory | The current size of the JS heap, including unused memory not allocated to any JS objects, in megabytes. |
| Used JS Memory | Memory in use by JS objects, in megabytes. |
| Total WASM heap memory | MLinear memory representing the entire heap of the C/C++ Unity engine that’s compiled with Emscripten, including unallocated memory, in megabytes. |
| Used WASM heapy | The space of the WASM heap that’s allocated, in megabytes. |
Important note about JS Memory
The JS Memory information is obtained using the performance.memory API, which is currently only supported on Chrome or Edge. There are no other APIs available that return this information for Safari or Firefox.
Note: This API isn’t supported on iOS devices.
On browsers where this API isn’t supported, a message showing N/A appears.

Additional resources:
- Texture Compression in WebGL
- Using WebGL Templates
- Splash Screen
- Texture compression format overview
- WASM memory options were added in Unity 2022.1.
- Show Diagnostics Overlay added in Unity 2022.2.
PlayerSettingsWebGL