환경 설정
Use preferences to customize the behavior of the Unity Editor.
To access the Preferences window, go to Edit > Preferences (Windows) or Unity > Preferences (macOS) from the main menu in Unity.
To navigate the Preferences window, use the search box to filter the list of settings categories and highlight keywords in the details pane on the right of the Preferences window.
The following preference categories are available:
- 일반
- 2D
- 분석
- 에셋 파이프라인
- 컬러
- 진단
- Display Settings
- 외부 툴
- GI 캐시
- Package Manager
- Scene view
- 검색
- Custom package preferences
일반
General 환경 설정을 사용하여 Unity 작업에 대한 전반적인 동작을 커스터마이즈할 수 있습니다.
| 프로퍼티 | 기능 | |
|---|---|---|
| Load Previous Project on Startup | 시작할 때 항상 이전 프로젝트를 로드하려면 이 설정을 활성화합니다. | |
| Disable Editor Analytics(Pro에만 해당) | 에디터에서 자동으로 정보를 Unity로 되돌려 보내는 기능을 중지하려면 이 설정을 활성화합니다. | |
| Script Changes While Playing | 에디터에서 게임이 실행되는 동안 스크립트가 변경되는 경우 Unity의 동작을 선택합니다. | |
| Recompile And Continue Playing | 스크립트를 재컴파일하고 씬을 계속해서 실행합니다. 기본 동작이지만, 스크립트가 직렬화할 수 없는 데이터에 의존하는 경우 변경하는 것이 좋습니다. | |
| Recompile After Finished Playing | 씬을 수동으로 정지할 때까지 재컴파일을 지연하여 중단을 방지합니다. | |
| Stop Playing And Recompile | Immediately stops your Scene for recompilation, allowing you to quickly restart testing. | |
| Code Optimization On Startup | Choose whether to set code optimization mode to Debug or Release when the Unity Editor starts. Debug mode allows you to attach external debugger software, but gives slower C# performance when you run your Project in Play mode in the Editor. Release mode gives faster C# performance when you run your Project in Play mode in the Editor, but you can’t attach any external debuggers. For more information, see Code Optimization Mode. | |
| Editor Theme | Choose the background to use in the Unity Editor. | |
| Light | Applies the light grey background with black text. | |
| Dark | Applies the dark theme with white text. | |
| Editor Font | Unity 에디터에 표시할 폰트를 선택합니다. 기본 폰트는 Inter입니다. | |
| Enable Alpha Numeric Sorting | 계층 창 오른쪽 상단 모서리에 트랜스폼(기본값) 정렬과 영숫자 정렬 간 전환할 수 있는 버튼을 표시하려면 이 설정을 활성화합니다. | |
| Interaction Mode | 업데이트 전에 에디터가 대기할 수 있는 시간을 지정합니다. 한 프레임이 끝나면 에디터는 다음 프레임이 시작되기 전에 지정된 시간까지 기다립니다. 이를 통해 에디터 성능을 조절하고 CPU 리소스 및 전력 소비를 줄일 수 있습니다. 예를 들어 에디터의 성능을 테스트하려면 이 프로퍼티를 No Throttling으로 설정합니다. 전원을 절약(예: 노트북의 배터리 수명 연장)하려면 이 프로퍼티를 조절 모드 중 하나로 설정합니다. 조절 모드에서 상호작용(예: 씬 뷰 패닝)하면 에디터가 대기 상태를 중지합니다. 참고: 플레이 모드에서 Unity는 이 환경 설정을 사용하여 적용하는 조절을 무시합니다. 게임 뷰에서 VSync 옵션을 활성화하거나 Application.targetFrameRate를 –1 이외의 값으로 설정하지 않는 한 에디터는 최대한 빠르게 업데이트를 수행합니다. |
|
| Default | 에디터는 틱당 최대 4ms까지 대기 상태를 유지합니다. 프레임이 5ms 이상 걸리는 경우 에디터는 대기 상태가 아니고 다음 프레임이 자동으로 시작됩니다. | |
| No Throttling | 프레임이 끝날 때마다 다음 프레임이 즉시 시작됩니다. 에디터는 대기하지 않고 최대한 빠르게 업데이트를 수행합니다. 이 모드는 많은 CPU 리소스를 소모합니다. 노트북을 사용하는 경우 배터리가 빨리 소모될 수 있습니다. |
|
| Monitor Refresh Rate | 에디터가 모니터의 업데이트 속도(밀리초 단위)까지 대기합니다. 대부분의 모니터에서 이 값은 16ms입니다. | |
| Custom | 애플리케이션이 대기 상태를 유지할 수 있는 최대 시간을 지정합니다. 이 옵션을 선택하면 Frame Throttling (milliseconds) 프로퍼티가 나타납니다. |
|
| Frame Throttling (milliseconds) | Interaction Mode가 Custom으로 설정된 경우 이 프로퍼티는 에디터가 프레임 간에 대기할 수 있는 시간을 지정합니다. 이 값은 0–33ms 사이일 수 있습니다. 0은 Interaction Mode를 No Throttling으로 설정한 것과 동일합니다. | |
| Package Manager Log Level | Choose the level of detail you want the Package Manager logs to report. The options are: | |
| Error | Unexpected errors and failures only. | |
| Warn | Unusual situations that can cause issues. | |
| Info | High-level informational-only messages. | |
| Verbose | Detailed informational messages. | |
| Debug | High-level debugging messages. | |
| Silly | Detailed debugging messages. | |
| Enable extended Dynamic hints | Select this to enable extended dynamic hints, which displays more information when a property, object, or tool is hovered for enough time, or when a dynamic hint appears. | |
| Perform Bump Map Check | Select this to enable bump map checks upon material imports, which helps check that textures used in a normal map material slot are actually defined as normal maps. |
2D
The 2D preference settings allow you to define the settings of 2D-related features and packages. When you install 2D related packages (such as the Tilemap Editor package) into your Project, their preference settings will appear in this section.
Physics
Use the Physics preferences to configure the 2D physics settings, such as the colors used in the UI.
| 프로퍼티 | 기능 | |
|---|---|---|
| Colliders | Set the colors for the following UI elements. | |
| Awake Color (Outline) | Set the color of the Collider 2D Gizmo’s outline when the Rigidbody 2D it’s attached to is Awake. | |
| Awake Color (Filled) | Set the color of the Collider 2D Gizmo’s interior fill when the Rigidbody 2D it’s attached to is Awake. | |
| Asleep Color (Outline) | Set the color of the Collider 2D Gizmo’s outline when the Rigidbody 2D it’s attached to is Asleep. | |
| Asleep Color (Filled) | Set the color of the Collider 2D Gizmo’s interior fill when the Rigidbody 2D it’s attached to is Asleep. | |
| Bounds Color | Set the color of the bounds for all PhysicsShape2D that a Collider 2D creates. | |
| Contacts | Set the colors used for the following UI elements. | |
| Contact Color | Set the color of the Collider 2D Gizmo’s contacts which are displayed as a directional arrow starting at the contact point in the direction of the contact normal. | |
| Contact Arrow Scale | Set the scale of the Collider 2D contacts arrow. Larger values draw the arrow larger. |
분석
분석 환경 설정으로 프로파일러에 대한 설정을 정의할 수 있습니다.
| 프로퍼티 | 기능 |
|---|---|
| Frame count | 프로파일러가 캡처할 최대 프레임 수를 설정합니다. 이 숫자는 300에서 2,000 사이에서 설정할 수 있습니다. |
| Show stats for ‘current frame’ | By default, when you select the Current Frame button and enter Current Frame mode, the frame indicator line doesn’t have annotations with the stats for the current frame. This is because the stats annotations might make it difficult to view data in real-time. To display the annotations, enable this setting. |
| Default recording state | 프로파일러를 열 기록 상태를 선택합니다. Enabled, Disabled 또는 Remember를 선택합니다. Enabled를 선택하면 Record 버튼이 세션 간에 활성 상태로 유지되고, Disabled를 선택하면 비활성화됩니다. 이는 프로파일링 세션 중에 켜고 끄는지와는 관계가 없습니다. Remember 상태는 세션 중에 Record 버튼을 활성화 또는 비활성화했는지 여부를 기억하고, 다음에 프로파일러 창을 열 때 마지막으로 사용한 상태를 유지합니다. |
| Default editor target mode | Select what mode the Attach to Player dropdown should target by default. Choose from either Playmode or Editor. |
| Custom connection ID | Enter the connection name that you want to use for the device that’s running your application in the Attach to Player drop down in the Profiler Window or Console Window. |
에셋 파이프라인
| 프로퍼티 | 기능 |
|---|---|
| Auto Refresh | 변경 시 에셋을 자동으로 임포트하려면 이 설정을 활성화합니다. |
| Import Worker Count % | Enter your Desired Import Worker Count for new projects in percentage of available logical CPU cores. For example, if your system has 16 logical cores and this preference is set to 25%, the Desired Import Worker Count for new projects is set to 4. If you set this value too high, your import worker processes need to compete over other processes and system resources such as reading and writing files. The default value of 25% is suitable for most situations. |
| Directory Monitoring (available only on Windows) | Enable this setting to monitor directories instead of scanning all project files to detect asset changes. |
| Compress Textures on Import | Disable this setting to skip texture compression during import. Textures are typically imported into uncompressed formats. |
| Verify Saving Assets | Enable this setting to verify which Assets to save individually. A dialog is shown any time Unity saves any assets. |
| Unity Accelerator (Cache Server) | |
| Default Mode | Define the default setting for the Cache Server, whether to enable or disable it by default. You can override this per Project in the Unity Editor settings. For more information, see Unity Accelerator. |
| Default IP address | 캐시 서버가 사용할 기본 IP 주소를 설정합니다. Unity 에디터 설정에서 프로젝트마다 이 설정을 오버라이드할 수 있습니다. |
| Check Connection | 원격 캐시 서버에 연결을 시도할 때 이 버튼을 클릭합니다. |
컬러
The Colors preferences let you pick colors for various user interface elements in the Unity Editor.
| 프로퍼티 | 기능 | |
|---|---|---|
| Animation | Use this setting to customize color preferences for animated properties. | |
| Property Animated | The color to indicate a property that’s currently being animated. | |
| Property Candidate | The color to indicate the animated property that you modified recently. | |
| Property Recorded | The color to indicate that an animated property automatically records changes in the animation clip. | |
| General | Use this setting to customize color preferences for General settings. | |
| Playmode Tint | The color to tint the editor to for ease of identifying when you’re in Play mode. Unity tints the whole editor with the color you pick here when you enter Play mode. Some operations in the Editor aren’t available when in Play mode, and you can reset some edited values when exiting the Play mode. | |
| Scene | Use this setting to customize preferences for a Scene. | |
| Background | Set the color for the scene camera to clear to when the Scene FX skybox setting is turned off. | |
| Background for Prefabs | Set the color for the scene camera to clear to when the Scene FX skybox setting is turned off. | |
| Contribute GI: Off / Receive GI: Light Probes | Set the color to display when ContributeGI is disabled in the GameObject’s Static Editor Flags. | |
| Contribute GI: On / Receive GI: Light Probes | Set the color to display when ContributorGI is enabled in the GameObject’s Static Editor Flags, and the Renderer’s ReceiveGI property is set to Lightmaps. | |
| Contribute GI: On / Receive GI: Lightmaps | Set the color to display when ContributeGI is enabled in the GameObject’s Static Editor Flags, and the Renderer’s ReceiveGI property is set to Light Probes. | |
| Grid | Set the color of the grid in the Scene view. | |
| Guide Line | Set the color of the Guide Line in the Scene view. | |
| Material Validator Pure Metal | Set the color for the Validate Albedo/Metal Specular debug render mode to indicate the material properties. | |
| Material Validator Value Too High | Set the color for the Validate Albedo/Metal Specular debug render mode to indicate when the material value is too high. | |
| Material Validator Value Too Low | Set the color for the Validate Albedo/Metal Specular debug render mode to indicate when the material value is too low. | |
| Selected Axis | Set the color for the selected handle to show highlighted in, when Move, Rotate, or the Scale tool is engaged. | |
| Selected Children Outline | Set the outline color for the children of the selected objects. | |
| Selected Material Highlight | Set the outline color that shows when clicking on a mesh in the MeshRenderer to ping the submesh in the Scene view. | |
| Selected Outline | Set the outline color for the selected GameObjects. | |
| UI Collider Handle | Set the color to use for the Unity UI’s padding visualization. | |
| Volume Gizmo | Set the color to indicate the audio source in Gizmo. | |
| Wireframe | Set the color of the wireframe when the wireframe render mode is active. | |
| Wireframe Overlay | Set the color of the wireframe when the textured wireframe render mode is active. | |
| Wireframe Selected | If you’ve enabled Selection Wire in the Gizmo options, then the selected wireframes appear in the color that you set here. | |
| X Axis | The color that you set here is indicated for any built-in transform tool handle affecting x-axis. | |
| Y Axis | The color that you set here is indicated for any built-in transform tool handle affecting y-axis. | |
| Z Axis | The color that you set here is indicated for any built-in transform tool handle affecting z-axis. |
진단
When you report a problem to Unity, the Unity Support Team might need you to enable diagnostic switches to help identify the cause. Running diagnostics on an application, whether in the Editor or a player, impacts performance and user experience. You should only run diagnostics when the Unity Support Team requires them.
애플리케이션에서 진단 스위치를 활성화하면 Unity는 콘솔에 경고를 표시합니다. 스위치를 초기화하려면 Diagnostics 탭에서 Reset all을 클릭합니다.
활성화된 진단 스위치로 인해 Unity 에디터가 열리지 않는 경우 --reset-diagnostic-switches 파라미터를 사용하여 커맨드 라인에서 모든 스위치를 초기화합니다. 실행 시 커맨드 라인 인자를 사용하는 데 대한 자세한 내용은 커맨드 라인 인자를 참조하십시오.
Display Settings
Use the Display Settings preferences to customize the behavior of the Game view for attached monitors.
| 프로퍼티 | 기능 |
|---|---|
| Sort Display Order (Windows Only) | Enable this setting to sort the display numbers of the attached monitors by distance to the main display. Note that this setting works on Windows only. |
| Show notification when entering fullscreen | Enable this to display a notification in fullscreen mode to view the shortcut required (CTRL+SHIFT+F7) to exit the fullscreen mode in Game view. When disabled, the shortcut notification to exit the fullscreen mode doesn’t appear. |
| Show game view toolbar on Fullscreen | When enabled, the Game view Control Bar that contains game objects like gizmos and stats is visible on the fullscreen mode. |
| Standalone simulation monitor mapping | Displays the number of standalone monitors mapped to your device. |
외부 툴
External Tools 환경 설정을 사용하여 이미지와 소스 제어를 활용하는 스크립팅용 외부 애플리케이션을 설정할 수 있습니다.
| 프로퍼티 | 기능 |
|---|---|
| External Script Editor | Unity가 스크립트 파일을 여는 데 사용할 애플리케이션을 선택합니다. Unity에서 기본적으로 지원하는 스크립트 에디터에 올바른 인수가 자동으로 전달됩니다. Unity는 Visual Studio Community, Visual Studio Code(VSCode), JetBrains Rider를 기본적으로 지원합니다. Open by file extension 옵션은 파일을 열 때 관련 파일 타입에 대해 기기의 기본 애플리케이션을 사용합니다. 사용 가능한 기본 애플리케이션이 없는 경우 기기는 파일을 여는 데 사용할 애플리케이션을 선택하라는 창을 표시합니다. |
| External Script Editor Args | This field controls parameters that Unity can send to your code editor when you open a file. The $(File), $(Line) and $(Column) arguments pass the filename, line number and column number to your external code editor. Your code editor uses these arguments to open the correct file with the cursor at the correct position. For example, if you double click an error message in the Unity Console, Unity passes these arguments from that error message to the external editor, which then opens the right file at the position where that error occurred.You can manually edit this field to customize the arguments Unity sends to your external code editor. Click the Reset argument button to reset this field to its default setting. |
| Generate all .csproj files | 모든 .csproj 파일을 생성하려면 이 설정을 활성화합니다. 코드 에디터는 .sln 및 .csproj 파일을 사용하여 프로젝트에 대한 데이터에 액세스합니다. .csproj 파일은 설명 데이터 또는 메타데이터를 XML 포맷으로 저장합니다. 이 데이터에는 버전 정보, 플랫폼 요구 사항, 빌드 파일 또는 데이터베이스 설정이 포함될 수 있습니다. 이러한 파일이 존재하는 경우 코드 에디터는 포함된 데이터를 사용하여 잠재 컴파일 오류 강조 표시 등과 같은 유용한 기능을 제공할 수 있습니다. 이 설정을 활성화하여 Unity가 프로젝트에서 가능한 경우 .csproj 파일을 생성하도록 지시하십시오. |
|
Extensions handled (Rider 또는 Visual Studio Code를 외부 스크립트 에디터로 선택한 경우에만 이용 가능) |
이 필드는 외부 스크립트 에디터에서 열리는 파일 포맷을 결정합니다. 이 필드는 스크립트 에디터가 기본적으로 여는 파일 리스트로 미리 채워져 있습니다. 이 리스트에 다른 파일 포맷을 추가하려면 파일 확장자를 입력하고 각 확장자를 세미콜론으로 구분하십시오. |
| Image application | Unity에서 이미지 파일을 여는 데 사용할 애플리케이션을 선택합니다. |
| Revision Control Diff/Merge | Unity에서 에셋 컨트롤 저장소에서 파일 차이를 확인하는 데 사용할 애플리케이션을 선택합니다. Unity는 기본 설치 위치에서 이러한 툴을 검색합니다. Windows에서는 TortoiseMerge, WinMerge, PlasticSCM Merge 및 Beyond Compare 4의 레지스트리 키를 확인합니다. 자세한 내용은 아래의 리비전 컨트롤 비교/병합 섹션을 참조하십시오. |
리비전 컨트롤 비교/병합
Unity는 현재 다음의 툴을 지원합니다.
- SourceGear DiffMerge
- TkDiff
- P4Merge
- TortoiseMerge
- WinMerge
- PlasticSCM Merge
- Beyond Compare 4
Note: As these are third-party tools that Unity doesn’t include by default, you might want to download and install them separately.
커스텀 리비전 툴을 설치하려면 다음 단계를 따르십시오.
- From the Revision Control Diff/Merge dropdown list, select Custom Tool.
- 커스텀 툴의 설치 폴더 경로를 입력합니다. Mac에서는 툴의 설치 폴더에 있는 Contents / MacOS 폴더를 가리켜야 합니다.
- 양방향 비교, 삼방향 비교 및 병합을 위한 인수를 입력합니다.
리비전 툴의 파일 레이아웃을 지정하려면 다음 인수를 사용하십시오.
| 프로퍼티 | 기능 |
|---|---|
#LTITLE |
왼쪽 타이틀 |
#RTITLE |
오른쪽 타이틀 |
#ATITLE |
조상 타이틀 |
#LEFT |
왼쪽 파일 |
#RIGHT |
오른쪽 파일 |
#ANCESTOR |
조상 파일 |
#OUTPUT |
출력 파일 |
#ABSLEFT |
왼쪽 파일의 절대 경로 |
#ABSRIGHT |
오른쪽 파일의 절대 경로 |
#ABSANCESTOR |
조상 파일의 절대 경로 |
#ABSOUTPUT |
출력 파일의 절대 경로 |
예제:


GI 캐시
전역 조명(GI) 시스템은 각 컴퓨터에서 캐시를 사용하여 실시간 전역 조명을 사전 계산하는 데 사용되는 중간 파일을 저장합니다. 캐시를 컴퓨터의 모든 프로젝트에서 공유합니다.
| 프로퍼티 | 기능 |
|---|---|
| Maximum Cache Size (GB) | Use the slider to set the maximum GI cache folder size. Unity keeps the GI cache folder size below this number whenever possible. Unity periodically deletes unused files to create more space (deleting the oldest files first). This is an automatic process, and doesn’t require you to do anything. Note: If the current Scene is using all the files in the GI cache, increase your cache size. Otherwise, resource-intensive recomputation occurs when baking. This can happen when the Scene is large or the cache size is too small. |
| Custom cache location | GI 캐시 폴더의 커스텀 위치를 허용하려면 이 옵션을 활성화합니다. 기본적으로 GI 캐시는 Caches 폴더에 저장됩니다. 캐시 폴더를 모든 프로젝트에서 공유합니다. 팁: SSD 드라이브에 GI 캐시를 저장하면 베이킹 과정이 I/O 기반인 경우 베이킹을 더 빠르게 진행할 수 있습니다. |
| Cache Folder Location | 캐시 위치를 지정하려면 Browse 버튼을 클릭합니다. |
| Cache compression | 이 옵션을 사용하여 Unity가 GI 캐시의 데이터 파일을 압축하고 하드 드라이브 공간을 더 적게 사용합니다. 데이터 파일은 기본적으로 LZ4 형식으로 압축되며 이름은 해시와 파일 확장자로 구성됩니다. Unity는 조명 시스템에 입력된 값을 기반으로 해시를 계산하므로 다음 설정이나 프로퍼티, 에셋 중 하나라도 변경되면 조명을 다시 계산해야 합니다. - 머티리얼(텍스처, 알베도, 이미션) - 광원 - 지오메트리 - 정적 플래그 - 라이트 프로브 그룹 - 반사 프로브 - 라이트맵 파라미터 팁: 원시 인라이튼 실시간 전역 조명 데이터에 액세스해야 하는 경우 캐시 압축을 비활성화하고 캐시를 지웁니다. |
| Clean Cache | Use this button to clear the cache directory. It’s not safe to delete the GI Cache directory manually while the Editor is running. This is because the Editor creates the GiCache folder when it starts and maintains a set of references to those files. The Clean Cache button ensures that the Editor releases all references to the files on disk before they’re deleted. |
| Cache size is | 캐시의 현재 크기를 표시합니다. |
| Cache Folder Location | 현재 캐시 폴더 위치를 표시합니다. |
패키지 관리자
Use the Package Manager preferences to change the default cache location for the following packages:
- Packages installed from the Unity Registry
- Packages downloaded from the Asset Store
| 프로퍼티 | 기능 |
|---|---|
| 패키지 | Set the cache location that determines where packages installed from the Unity Registry are stored. For more information, see Customizing the global cache location. |
| My Assets | Set the cache location that determines where packages downloaded from the Asset Store are stored. For more information, see Customize the Asset Store cache location. |
씬 뷰
씬 뷰 환경 설정을 사용하면 편집하는 동안 오브젝트 배치 및 가시성을 커스터마이즈할 수 있습니다.
| 프로퍼티 | 기능 |
|---|---|
| Create Objects at Origin | 원점에 새 오브젝트를 생성합니다(씬 피벗과 반대). 기본적으로 비활성화됩니다. |
| Create Objects with Constrained Proportions | Enable to define the default behavior for Scale in the Transform component. If enabled, when you adjust the value of a scale axis, the other values adjust proportionately. |
| Line Thickness | 변환 툴의 라인 두께를 설정합니다. |
| Enable filtering while searching | 씬 뷰에서 일치하지 않는 항목을 회색으로 표시합니다. 기본적으로 활성화됩니다. |
| Enable filtering while editing LOD groups | Enable to gray out other objects in the scene while editing level of detail (LOD) groups. Enabled by default. |
검색
Use the Search preferences to set your search preferences for the Editor.
Tip: You can also access the Search preferences in one of the following ways:
- 검색 필드에 ?(물음표)를 입력하고 결과에서 Open Search Preferences를 선택합니다.
- Search 창의 왼쪽 상단에 있는 More Options(:)에서 Preferences를 선택합니다.
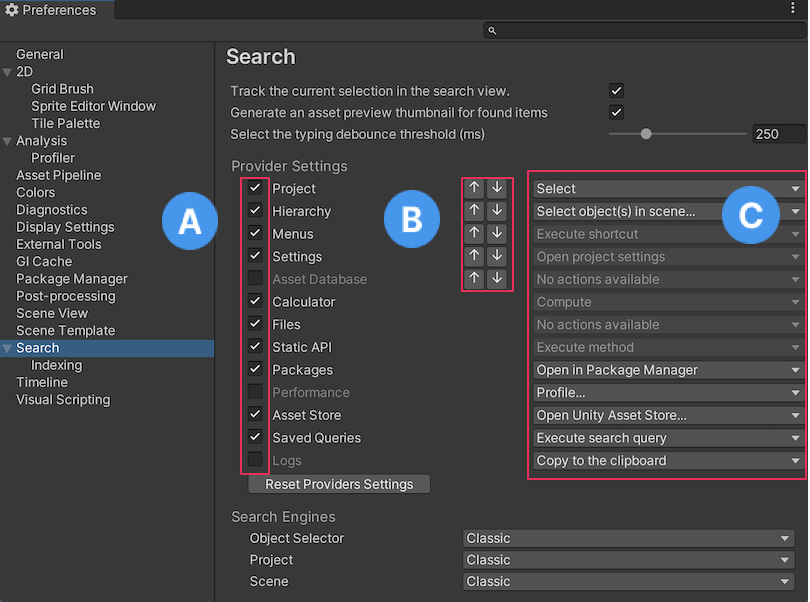
검색 환경 설정
| 설정 | 기능 | |
|---|---|---|
| Track the current selection in the search | Enable this setting to execute the SearchProvider.trackSelection callback each time the Search selection changes.The callback pings Assets in the Project window or Hierarchy window, which can slow Search navigation in large Projects. |
|
| Generate an asset preview thumbnail for found items | Search 창의 결과 창에 현재 표시된 항목의 썸네일을 표시하려면 이 설정을 활성화합니다. 이 설정을 비활성화하면 검색이 일반 아이콘을 표시합니다. 이는 아이콘 생성이 검색 내비게이션의 속도를 늦출 수 있는 큰 프로젝트에서 특히 유용합니다. |
|
| Select the typing debounce threshold (ms) | 디바운스 임계값은 시스템이 검색을 실행하기까지 사용자의 입력을 기다리는 시간입니다. | |
| Provider Settings | ||
| A [Provider Toggles] | 제공자를 활성화/비활성화합니다. 제공자를 비활성화하면 검색이 검색을 실행할 때 해당 제공자를 무시합니다. | |
| B [Provider Order] | 검색 항목이 화면에 표시되는 순서를 변경하려는 경우 이러한 설정을 사용합니다. 특정 제공자 우선순위의 모든 항목이 우선순위가 더 낮은 항목보다 앞에 표시됩니다. | |
| C [Default Actions] | 검색 결과에서 항목 선택 시 실행할 기본 동작(예: 더블 클릭)을 정하려면 이 설정을 사용합니다. | |
| Reset Priorities | 모든 제공자를 기본 켜기/끄기 상태 및 우선순위로 재설정합니다. | |
| Search Engines |
오브젝트 선택자, 프로젝트 및 씬의 검색 필드를 사용할 수 있는 검색 엔진 중 하나로 설정합니다. Classic - 원래의 검색 기능입니다. Advanced - Unity용 검색의 최신 버전입니다(이전의 QuickSearch). |
인덱싱
Set the Custom index pages by selecting them or deselecting them from the Custom Indexers dropdown list.
커스텀 패키지 환경 설정
Some Asset Store or Unity packages add their own custom preferences to the Preferences window. Typically, these use the package name as the preferences category. In this example, you can see the Cinemachine package preferences:
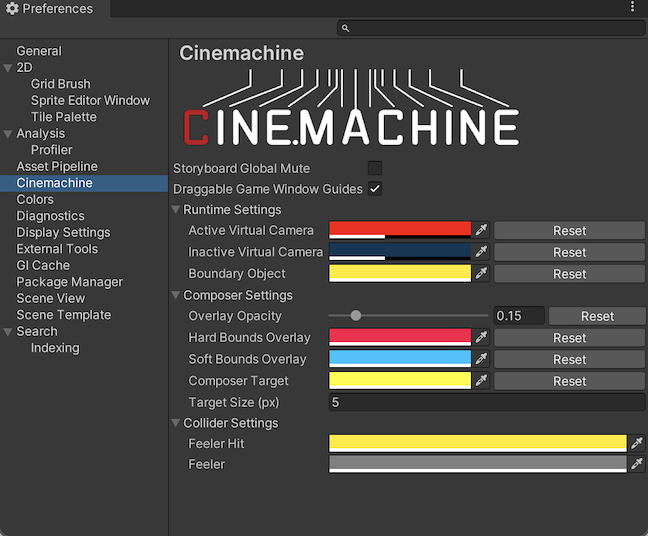
특정 패키지의 환경 설정에 대한 내용은 해당 패키지에 관한 문서를 참조하십시오. 이 섹션은 Unity 표준 환경 설정에 대한 문서만 포함합니다.
Copyright © 2023 Unity Technologies
优美缔软件(上海)有限公司 版权所有
"Unity"、Unity 徽标及其他 Unity 商标是 Unity Technologies 或其附属机构在美国及其他地区的商标或注册商标。其他名称或品牌是其各自所有者的商标。
公安部备案号:
31010902002961