3D textures
A 3D texture is a bitmap image that contains information in three dimensions rather than the standard two. 3D textures are commonly used to simulate volumetric effects such as fog or smoke, to approximate a volumetric 3D mesh, or to store animated textures and blend between them smoothly.
In your Unity Project, the Unity Editor represents 3D textures as Texture Assets. To configure a Texture Asset’s import settings you can select the Texture Asset and use the Inspector, or write a script that uses the TextureImporter API.
In the Unity engine, Unity uses the Texture3D class to represent 3D textures. Use this class to interact with 3D textures in C# scripts.
3D texture size
The maximum resolution of a 3D texture is 2048 x 2048 x 2048.
Be aware that the size of a 3D texture in memory and on disk increases quickly as its resolution increases. An RGBA32 3D texture with no mip maps and a resolution of 16 x 16 x 16 has a size of 128KB, but with a resolution of 256 x 256 x 256 it has a size of 512MB.
Creating a 3D texture
To create a 3D texture in your Project, you must use a script.
The following example is an Editor script that creates an instance of the Texture3D class, populates it with color data, and then saves it to your Project as a Texture Asset.
using UnityEditor;
using UnityEngine;

public class ExampleEditorScript : MonoBehaviour
{
    [MenuItem("CreateExamples/3DTexture")]
    static void CreateTexture3D()
    {
        // Configure the texture
        int size = 32;
        TextureFormat format = TextureFormat.RGBA32;
        TextureWrapMode wrapMode =  TextureWrapMode.Clamp;

        // Create the texture and apply the configuration
        Texture3D texture = new Texture3D(size, size, size, format, false);
        texture.wrapMode = wrapMode;

        // Create a 3-dimensional array to store color data
        Color[] colors = new Color[size * size * size];

        // Populate the array so that the x, y, and z values of the texture will map to red, blue, and green colors
        float inverseResolution = 1.0f / (size - 1.0f);
        for (int z = 0; z < size; z++)
        {
            int zOffset = z * size * size;
            for (int y = 0; y < size; y++)
            {
                int yOffset = y * size;
                for (int x = 0; x < size; x++)
                {
                    colors[x + yOffset + zOffset] = new Color(x * inverseResolution,
                        y * inverseResolution, z * inverseResolution, 1.0f);
                }
            }
        }

        // Copy the color values to the texture
        texture.SetPixels(colors);

        // Apply the changes to the texture and upload the updated texture to the GPU
        texture.Apply();

        // Save the texture to your Unity Project
        AssetDatabase.CreateAsset(texture, "Assets/Example3DTexture.asset");
    }
}
Using a 3D texture in a shader
Here is an example of a simple raymarching shader that uses a 3D texture to visualize a volume.
Shader "Unlit/VolumeShader"
{
    Properties
    {
        _MainTex ("Texture", 3D) = "white" {}
        _Alpha ("Alpha", float) = 0.02
        _StepSize ("Step Size", float) = 0.01
    }
    SubShader
    {
        Tags { "Queue" = "Transparent" "RenderType" = "Transparent" }
        Blend One OneMinusSrcAlpha
        LOD 100

        Pass
        {
            CGPROGRAM
            #pragma vertex vert
            #pragma fragment frag

            #include "UnityCG.cginc"

            // Maximum amount of raymarching samples
            #define MAX_STEP_COUNT 128

            // Allowed floating point inaccuracy
            #define EPSILON 0.00001f

            struct appdata
            {
                float4 vertex : POSITION;
            };

            struct v2f
            {
                float4 vertex : SV_POSITION;
                float3 objectVertex : TEXCOORD0;
                float3 vectorToSurface : TEXCOORD1;
            };

            sampler3D _MainTex;
            float4 _MainTex_ST;
            float _Alpha;
            float _StepSize;

            v2f vert (appdata v)
            {
                v2f o;

                // Vertex in object space this will be the starting point of raymarching
                o.objectVertex = v.vertex;

                // Calculate vector from camera to vertex in world space
                float3 worldVertex = mul(unity_ObjectToWorld, v.vertex).xyz;
                o.vectorToSurface = worldVertex - _WorldSpaceCameraPos;

                o.vertex = UnityObjectToClipPos(v.vertex);
                return o;
            }

            float4 BlendUnder(float4 color, float4 newColor)
            {
                color.rgb += (1.0 - color.a) * newColor.a * newColor.rgb;
                color.a += (1.0 - color.a) * newColor.a;
                return color;
            }

            fixed4 frag(v2f i) : SV_Target
            {
                // Start raymarching at the front surface of the object
                float3 rayOrigin = i.objectVertex;

                // Use vector from camera to object surface to get ray direction
                float3 rayDirection = mul(unity_WorldToObject, float4(normalize(i.vectorToSurface), 1));

                float4 color = float4(0, 0, 0, 0);
                float3 samplePosition = rayOrigin;

                // Raymarch through object space
                for (int i = 0; i < MAX_STEP_COUNT; i++)
                {
                    // Accumulate color only within unit cube bounds
                    if(max(abs(samplePosition.x), max(abs(samplePosition.y), abs(samplePosition.z))) < 0.5f + EPSILON)
                    {
                        float4 sampledColor = tex3D(_MainTex, samplePosition + float3(0.5f, 0.5f, 0.5f));
                        sampledColor.a *= _Alpha;
                        color = BlendUnder(color, sampledColor);
                        samplePosition += rayDirection * _StepSize;
                    }
                }

                return color;
            }
            ENDCG
        }
    }
}
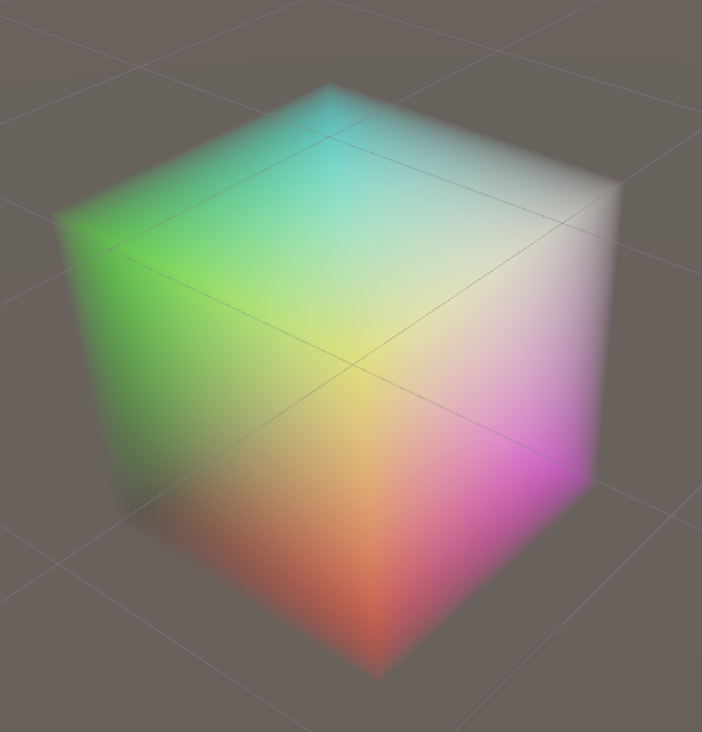
If you use this shader with the 3D texture created in the example at the top of the page, the result looks like this:
