Package Manager
The Package Manager settings (menu: Edit > Project Settings, then the Package Manager category) let you manage your scoped registries and modify the advanced settings for your current project.
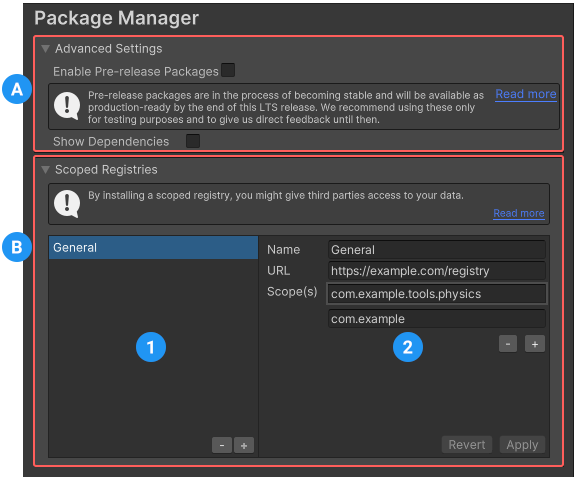
(A) Under the Advanced Settings section, toggle whether or not pre-release packages and package dependencies are visible in the Package Manager window.
(B) Add, modify, and remove scoped registries for your project under the Scoped Registries group, which contains the following areas:
(1) The list of scoped registries currently defined for this project
(2) The details for the selected scoped registry
Advanced Settings
Use the Advanced Settings group to toggle the Enable Pre-release Packages and Show Dependencies settings for your current project.
Enable Pre-release Packages
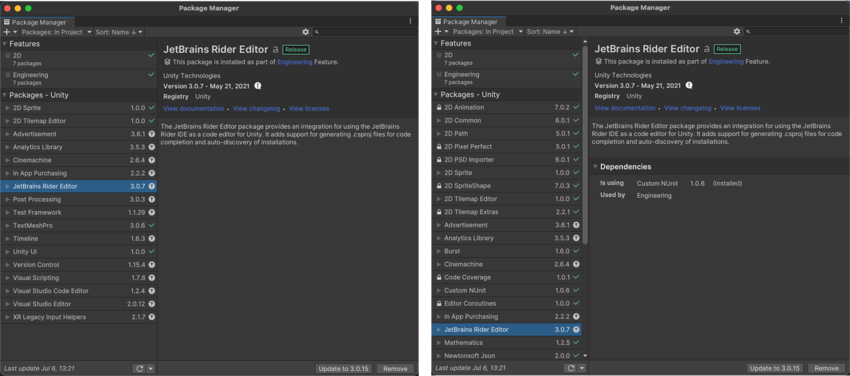
Enable the Enable Pre-release Packages setting to display pre-release packages in the Package Manager window. Pre-release packages appear with the  tag in the list view and the
  tag in the details view, as a reminder of which packages will be released with the LTS version of the Editor.
Warning:
By default this setting is disabled because pre-release packages are still being verified as stable enough for production, but are not fully released yet. For more information about the lifecycle of packages, see Package states and lifecycle.
Show Dependencies
Enable the Show Dependencies setting to:
- Show any packages that are installed as indirect dependenciesAn indirect, or transitive dependency occurs when your project requests a package which itself “depends on” another package. For example, if your project depends on the
alembic@1.0.7package which in turn depends on thetimeline@1.0.0package, then your project has an direct dependency on Alembic and an indirect dependency on Timeline. More info
See in Glossary in the Package Manager window’s list of packages. - Display a package’s dependency information in the package’s details on the Package Manager window. This includes the following:
- Is using lists any packages that this package requires, including the specific version.
- Used by lists the names and versions of any other packages that depend on this one.
Note: By default, this setting is disabled. For more information about how dependencies work with packages, see Dependency and resolution.
Scoped Registries
The Scoped Registries group displays a list of scoped registries already added to the current project on the left, and the details of the selected registry on the right.
For detailed information about scoped registries, including how to use and configure them with the Unity Package Manager, see the documentation on Scoped Registries.
Note: If you added a scoped registry but you don’t see it in the My Registries context or the My Registries context isn’t available at all, it might be because the package registry server you added does not implement the /-/v1/search or /-/all endpoints, which means that it is not compatible with Unity’s Package Manager.
Adding a new registry
To add a new scoped registry to your project:
- Select the + button at the bottom of the list. A new entry appears as New Scoped Registry in the list and blank values for the details on the right and the Revert and Apply buttons change to Cancel and Save buttons.
- Enter values for the Name, URL, and Scope(s) properties.
- If you need to specify more than one scope, select the + button underneath the last Scope(s) value. Another text box appears.
- When you are finished entering the information for the selected scoped registry, click Save. To cancel adding the new scoped registry entirely, click Cancel.
Modifying an existing registry
To modify an existing scoped registry:
- Select the registry you want to modify from the list on the left. The existing information appears on the right.
- Modify any of the Name, URL, and Scope(s) properties.
- When you are finished updating the information for the selected scoped registry, click Apply. To cancel adding the new scoped registry entirely, click Revert.
Removing a registry
To delete an existing scoped registry:
- Select the registry you want to delete from the list
- Click the - button underneath the list. A dialog box prompts you to confirm the removal.
- Click Ok to proceed or Cancel to leave it intact.
- Scoped Registries, __Enable Preview Packages__ and __Show Dependencies__ project settings added in 2020.1 NewIn20201
- Enable Preview Packages project setting changed to __Enable Pre-release Packages__ in 2021.1 NewIn20211
PackageManager
Copyright © 2023 Unity Technologies
优美缔软件(上海)有限公司 版权所有
"Unity"、Unity 徽标及其他 Unity 商标是 Unity Technologies 或其附属机构在美国及其他地区的商标或注册商标。其他名称或品牌是其各自所有者的商标。
公安部备案号:
31010902002961