iOS Player settings
This page details the Player settings specific to iOS. For a description of general Player settings that apply to all platforms, see Player - General settings.
You can find documentation for the properties in the following sections:
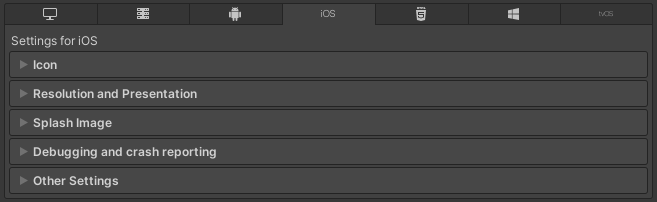
Icon
Use the Icon settings to customize the branding for your app on the Apple Store.
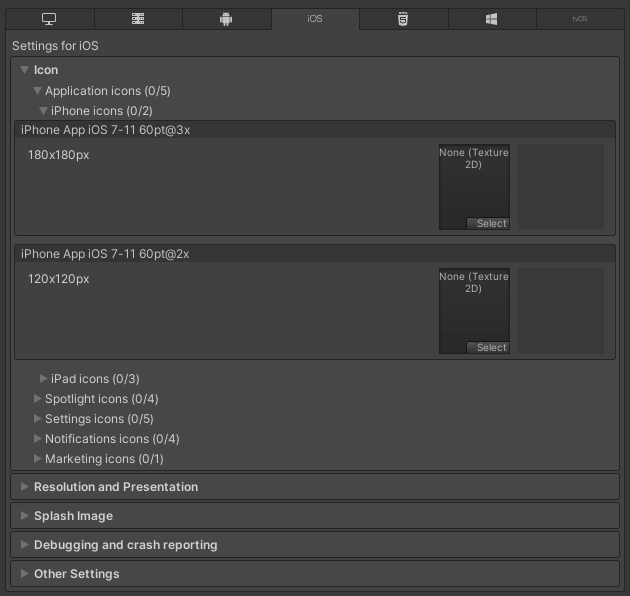
You can upload and assign these types of custom icons for each iOS device (iPhone, iPad):
| Icon type | Where it displays |
|---|---|
| Application icons | Main icons for your app |
| Spotlight icons | Spotlight search results for your app |
| Settings icons | Device’s main Settings page |
| Notification icons | Notifications sent from your app |
| Marketing icons | App Store |
All icons you upload are Texture 2D-type Assets. If an icon Texture is missing, Unity scales the icon Texture with the nearest size, with a preference towards using larger Textures.
Resolution and presentation
Use the Resolution and Presentation section to customize aspects of the screen’s appearance.
These settings are split into the following categories:
- Resolution Scaling
- Orientation
- Allowed Orientations for Auto Rotation
- Multitasking Support
- Status Bar
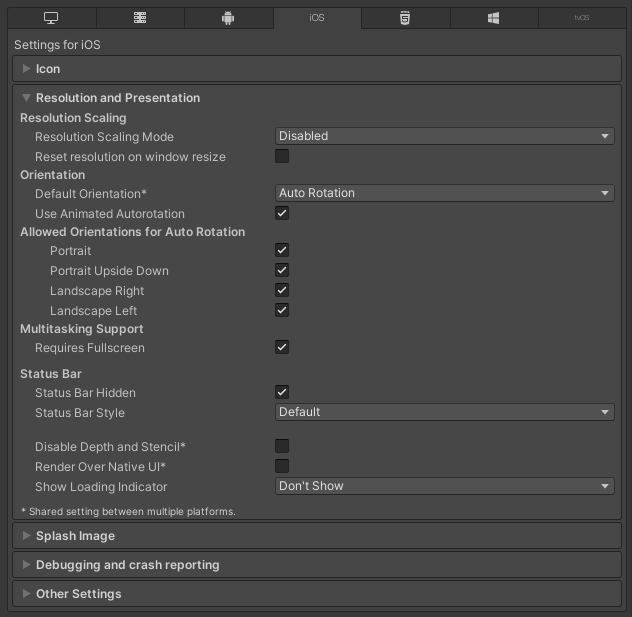
Resolution Scaling
Use the Resolution Scaling Mode setting to set the scaling to be equal to or below the native screen resolution:
| Setting | Function |
|---|---|
| Disabled | Scaling doesn’t apply and the application renders to its native screen resolution. |
| FixedDPI | When you select this value, the Target DPI property appears. Use the Target DPI property to set the target DPI of the game screen. Unity downscales the game screen to match this setting if the device’s native screen DPI is higher than this value. This helps you optimize performance and battery life. You can also use it to target a specific DPI setting. Unity calculates the scale as min(Target DPI * Factor / Screen DPI, 1). The Factor uses the Resolution Scaling Fixed DPI Factor value you enter in the Quality settings. |
| Reset resolution on window resize | Indicates whether to set the screen resolution to the new native window size when the native window size changes. If you set Resolution Scaling Mode to Fixed DPI, Unity recalculates the resolution based on Fixed DPI property. |
Orientation
Choose the game’s screen orientation from the Default Orientation drop-down menu. The default setting is Auto Rotation. If selected, this setting causes the screen to rotate with device orientation.
Select a different setting to determine a fixed location for where the Home button appears on the screen:
| Setting | Home button position |
|---|---|
| Portrait | Bottom |
| Portrait Upside Down | Top |
| Landscape Left | Right side |
| Landscape Right | Left side. |
| Auto Rotation | Screen orientation changes with device orientation. This is the default. |
Note: The Default Orientation setting applies to both iOS and Android devices.
When you select Auto Rotation as the Default Orientation, these settings appear:
Multitasking Support
Enable the Requires Fullscreen option if your application needs to run in full screen mode.
Status Bar
Use the Status Bar section to specify parameters related to the iOS status bar.
| Setting | Function |
|---|---|
| Status Bar Hidden | Enable this option to hide the status bar when your application launches. |
| Status Bar Style | Define the style of the status bar when the application launches. The options are Default and Light. |
| Disable Depth and Stencil | Enable this option to disable the depth and stencil buffers. |
| Render Over Native UI | Enable this option to force your app to render on top of the native iOS UI. |
| Show Loading Indicator | Select how the loading indicator appears. The options are White Large, White, and Gray. |
Splash image
Use the Splash Image section to customize your app’s splash image for different iOS-supported devices.
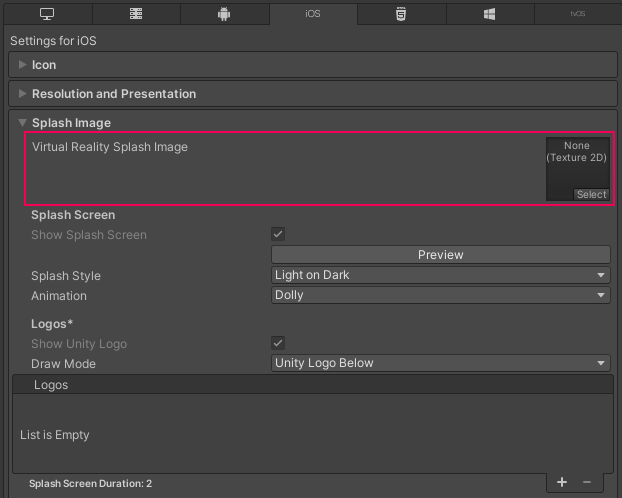
The Virtual Reality Splash Image setting, located above the common Splash Screen settings, allows you to select a custom splash image for Virtual Reality displays.
Custom storyboards
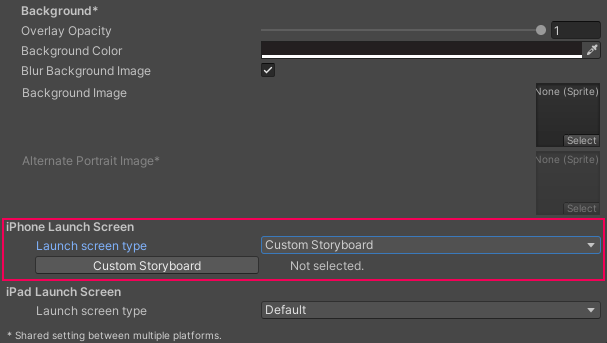
When you select the Custom Storyboard option in the Launch screen type dropdown for either iPhone or iPad, the Custom Storyboard button appears.
Click the Custom Storyboard button to select a storyboard to display when your game starts up on the device. For your storyboard to appear here, you must first create the storyboard in Xcode and copy it to your Project. For more information, see Apple developer documentation about storyboards, scenes, and connections.
When you disable the Use Storyboard for Launch Screen checkbox, you can implement splash images with one of these methods:
If you don’t use custom storyboards, you can use Unity’s built-in launch screens to implement splash images.
Launch Screens
A launch screen is a Storyboard file from which iOS creates a splash screen on the device. It has the following limitations:
- You can’t display different content based on device orientation for iPads.
- All iPhones support landscape launch screens, but certain iOS versions display the Landscape Left launch screen instead of the Landscape Right one due to a bug.
- Before iOS 13, it was impossible to override the root view controller for a storyboard, so the launch screen supports all orientations and ignores some UI(User Interface) Allows a user to interact with your application. Unity currently supports three UI systems. More info
See in Glossary settings, like status bar behavior. Starting with iOS 13, launch screen is fully compliant with your app’s settings for orientation and status bar appearance.
These limitations also apply to custom storyboards.
Select the Launch screen type for iPhone and iPad in the iPhone Launch Screen and iPad Launch Screen sections:
| Value | Function | |
|---|---|---|
| Default | When you select this option, Unity adds a solid blue-black image that’s the same color as the background for Unity’s default splash screen. The image is used for both portrait and landscape orientations, and displays using aspect-fill mode. | |
| None | Apple no longer supports Launch Images. This option exists for backwards compatibility reasons. If you select it, your project will use Unity’s default splash screen instead. | |
| Image and background (relative size) | Displays an image in the center of the screen and fills the remaining area with a solid color. | |
| Portrait Image | Select an image for portrait orientation. | |
| Landscape Image | Select an image for landscape orientation. | |
| Background Color | Select a background color to fill any screen space that the image doesn’t cover. | |
| Fill percentage | Specify image size as a percentage of the screen size. Unity calculates image size based on the length or width of the screen, whichever one is smaller (vertical for landscape displays, horizontal for portrait ones). | |
| Image and background (constant size) | Displays an image in the center of the screen and fills the area with a solid color. This has the same options as Image and background (relative size), except that you specify image size in points rather than as a percentage. Tip: Points and pixels aren’t the same. A pixel (px) is a single dot in your image. A point (pt) is a unit of length that measures 1/72th of an inch. Pixel sizes are relative to the screen size and resolution, while point sizes are the size on any screen. For more information, see W3C guidance on size units. |
|
| Custom XIB | When you select this option, the Custom XIB button appears. Click the button to select a custom XIB file to use as a loading screen. | |
| Custom Storyboard | When you select this option, the Custom Storyboard button appears. Click the button to select a custom Storyboard file to use as a loading screen. | |
Note: With a Unity Personal subscription, the Unity Splash Screen displays as soon as the engine initializes, in addition to your chosen splash screen.
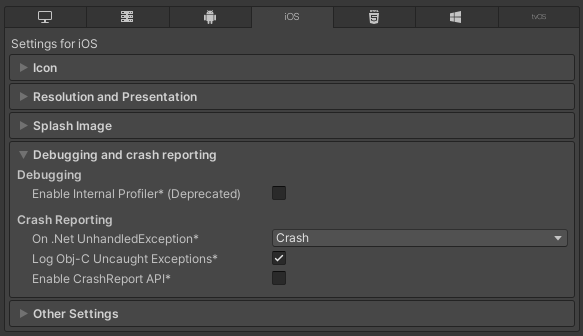
Debugging and crash reporting
Use the Debugging and crash reporting settings to gather data about your app’s performance and troubleshoot crashes.
| Setting | Function |
|---|---|
| Enable Internal Profiler (Deprecated) | This feature is deprecated and will be retired in a future version of Unity. Use the Profiler window instead (menu: Window > Analytics > Profiler). The Profiler collects application performance data and prints a report to the console. The report contains the number of milliseconds each Unity subsystem takes to execute on each frame, averaged across 30 frames. |
| On .Net UnhandledException | Select the action Unity takes when a .NET unhandled exception occurs. The options are Crash (the app crashes and generates a crash report, which users can submit to iTunes and developers can use to troubleshoot the crash), or Silent Exit (the application exits with no errors and doesn’t generate a crash report). |
| Log Obj-C Uncaught Exceptions | When you enable this action, Unity prints Objective-C Uncaught Exception information to the console. |
| Enable Crash Report API | Enables a custom crash reporter to capture crashes. You can use scripts to access crash logs via the CrashReport API. |
Other settings
You can configure a range of Player settingsSettings that let you set various player-specific options for the final game built by Unity. More info
See in Glossary in the Other Settings section. These options are organized into the following groups:
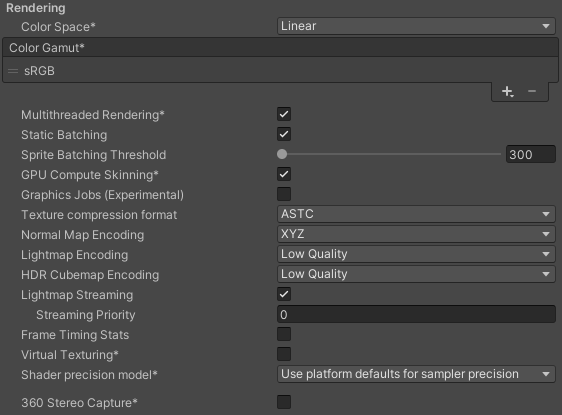
Rendering
Use these settings to customize how Unity renders your application for the iOS platform.
| Setting | Function | |
|---|---|---|
| Color Space | Choose which color space Unity uses for rendering: Gamma or Linear. For more information, see Linear rendering overview. Gamma: Gamma color space is typically used for calculating lighting on older hardware restricted to 8 bits per channel for the frame buffer format. Even though monitors today are digital, they might still take a gamma-encoded signal as input. Linear: Linear color space rendering gives more precise results. When you select to work in linear color space, the Editor defaults to using sRGB sampling. If your Textures are in linear color space, you need to work in linear color space and disable sRGB sampling for each Texture. |
|
| Color Gamut | You can add or remove color gamuts for the iOS platform to use for rendering. Click the plus (+) icon to see a list of available gamuts. A color gamut defines a possible range of colors available for a given device (such as a monitor or screen). The sRGB gamut is the default (and required) gamut. When targeting recent tvOS devices with wide color gamut displays, use DisplayP3 to use the full display capabilities. Use Metal Editor Support as a fallback for older devices. |
|
| Multithreaded Rendering | Enable this option to move graphics API calls from Unity’s main thread to a separate worker thread. This can help to improve performance in applications that have high CPU usage on the main thread. | |
| Static Batching | Uses Static batching. For more information, see Draw call batching. |
|
| Sprite Batching Threshold | Controls the maximum vertex threshold used when batching. | |
| Compute Skinning | Enable this option to use Metal GPU compute skinning, which frees up CPU resources. To learn more about GPU compute skinning, see the Wikipedia page on skeletal animation. | |
| Graphics Jobs (Experimental) | Enable this option to instruct Unity to offload graphics tasks (render loops) to worker threads running on other CPU cores. This reduces the time spent in Camera.Render on the main thread, which is often a bottleneck. Note: This feature is experimental. It might not deliver a performance improvement for your Project, and might introduce instability. |
|
| Texture compression format | Choose between ASTC and PVRTC as the default texture compression format for iOS. Check the texture compression format overview for more information. | |
| Normal Map Encoding | Choose XYZ or DXT5nm-style to set the normal map encoding. This affects the encoding scheme and compression format used for normal maps. DXT5nm-style normal maps are of higher quality, but more expensive to decode in shaders. | |
| Lightmap Encoding | Defines the encoding scheme and compression format of the lightmaps. You can choose from Low Quality, Normal Quality, or High Quality. |
|
| HDR Cubemap Encoding | Defines the encoding scheme and compression format of the HDR Cubemaps. You can choose from Low Quality, Normal Quality, or High Quality. |
|
| Lightmap Streaming | Uses Mipmap Streaming for lightmaps. Unity applies this setting to all lightmaps when it generates them. Note: To use this setting, you must enable the Texture Streaming Quality setting. |
|
| Streaming Priority | Sets the priority for all lightmaps in the Mipmap Streaming system. Unity applies this setting to all lightmaps when it generates them. Positive numbers give higher priority. Valid values range from –128 to 127. |
|
| Frame Timing Stats | Allows Unity to gather CPU/GPU frame timing statistics. Use this option with the Dynamic ResolutionA Camera setting that allows you to dynamically scale individual render targets, to reduce workload on the GPU. More info See in Glossary camera setting to determine if your application is CPU or GPU bound. |
|
| Virtual Texturing | Currently not supported on iOS. | |
| Shader precision model | Controls the default precision of samplers used in shaders. For more information, see Shader data types and precision. | |
| 360 Stereo Capture | Currently not supported on iOS. | |
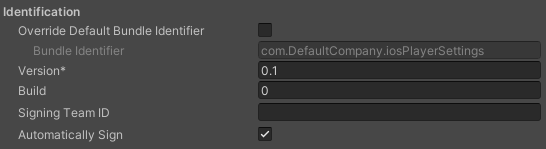
Identification
Enter identifying information for your app.
| Setting | Function |
|---|---|
| Override Default Bundle Identifier | Indicates whether you can manually set the bundle identifier. Note: This setting affects macOS, iOS, tvOS, and Android. |
| Bundle Identifier | Enter the provisioning profile of the application you are building. The basic structure of the identifier is com.CompanyName.ProductName. This structure might vary based on which country you live in, so always default to the string Apple provides to you for your Developer Account. Your ProductName is set up in your provisioning certificates. The Bundle Identifier must follow the convention com.YourCompanyName.YourProductName and must contain only alphanumeric and hyphen characters. For more information, see CFBundleIdentifier.Important: Unity automatically replaces any invalid characters you type with a hyphen. To set this property, enable Override Default Bundle Identifier. |
| Version | Enter the release-version-number string for the bundle (for example, 4.3.6). This value appears as CFBundleShortVersionString in the associated info.plist file. For more information, see Apple developer documentation on CFBundleShortVersionString. |
| BuildThe process of compiling your project into a format that is ready to run on a specific platform or platforms. More info See in Glossary |
Enter the build number for this version of your app. This value appears as CFBundleVersion in the associated info.plist file. For more information, see Apple developer documentation on CFBundleVersion. |
| Signing Team ID | Enter your Apple Developer Team ID. You can find this on the Apple Developer website under Xcode Help. This sets the Team ID for the generated Xcode project, allowing developers to use Build and Run functionality. You must enter an Apple Developer Team ID for automatic signing of your app. For more information, see the Apple developer documentation on Creating Your Team Provisioning Profile. |
| Automatically Sign | Enable this option to instruct Xcode to automatically sign your build. |
Configuration
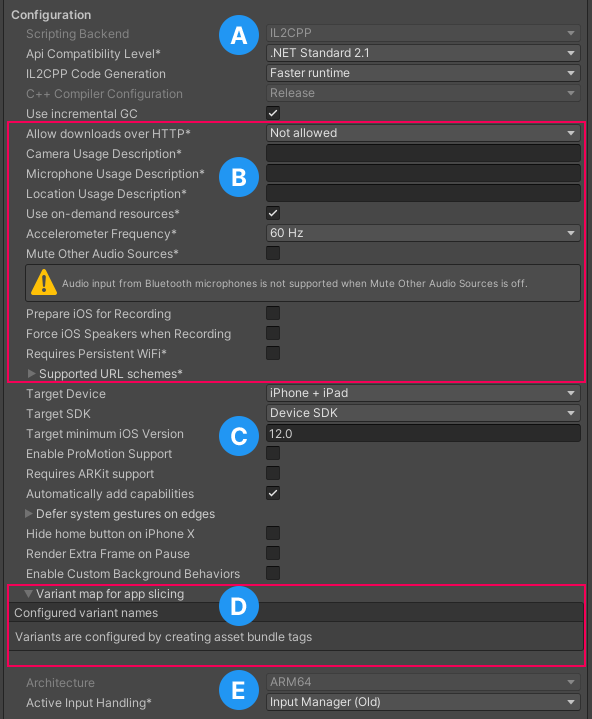
- A: API configuration settings
- B: Apple-specific information
- C: Device information
- D: Variant map for app slicing
- E: Other configuration settings
Shader Variant Loading
Use these settings to control how much memory shadersA program that runs on the GPU. More info
See in Glossary use at runtime.
| Setting | Function |
|---|---|
| Default chunk size (MB) | Sets the maximum size of compressed shader variant data chunks Unity stores in your built application for all platforms. The default is 16. See Shader loading for more information. |
| Default chunk count | Sets the default limit on how many decompressed chunks Unity keeps in memory on all platforms. The default is 0, which means there’s no limit. |
| Override | Enables overriding Default chunk size and Default chunk count for this build target. |
| Chunk size (MB) | Overrides the value of Default chunk size (MB) on this build target. |
| Chunk count | Overrides the value of Default chunk count on this build target. |
API configuration settings
| Setting | Function | |
|---|---|---|
|
Scripting BackendA framework that powers scripting in Unity. Unity supports three different scripting backends depending on target platform: Mono, .NET and IL2CPP. Universal Windows Platform, however, supports only two: .NET and IL2CPP. More info See in Glossary |
The scripting backend determines how Unity compiles and executes C# code in your Project. This setting defaults to IL2CPP for iOS and can’t be changed. IL2CPP compiles C# code into CIL, converts the CIL to C++, and then compiles that C++ into native machine code, which executes directly at run time. For more information, see documentation on IL2CPPA Unity-developed scripting back-end which you can use as an alternative to Mono when building projects for some platforms. More info See in Glossary. C++ code generated by the IL2CPP scripting backend can be updated incrementally, which allows incremental C++ build systems to compile only the changed source files. This can significantly lower iteration times. |
|
| API Compatibility Level | Choose which .NET APIs you can use in your project. This setting can affect compatibility with 3rd-party libraries. However, it has no effect on Editor-specific code (code in an Editor directory, or within an Editor-specific Assembly Definition). | |
| .Net Standard 2.0 | Compatible with .NET Standard 2.0. Produces smaller builds and has full cross-platform support. | |
| .Net 4.x | Compatible with the .NET Framework 4 (which includes everything in the .NET Standard 2.0 profile as well as additional APIs). Choose this option when using libraries that access APIs not included in .NET Standard 2.0. Produces larger builds and any additional APIs available are not necessarily supported on all platforms. See Referencing additional class library assemblies for more information. | |
| C++ Compiler Configuration | The C++ compiler configuration used when compiling IL2CPP generated code. This setting defaults to Release for iOS and can’t be changed. | |
| Use incremental GC | Uses the incremental garbage collector, which spreads garbage collection over several frames to reduce garbage collection-related spikes in frame duration. For more information, see Automatic Memory Management. | |
API Compatibility Level
You can choose your mono API compatibility level for all targets. Sometimes a third-party .NET library uses functionality that is outside of your .NET compatibility level. If you’re on Windows, you can use the third-party software ILSpy to understand what’s happening and how to fix it. Follow these steps:
- Install ILSpy for Windows.
- Drag the .NET assemblies for the API compatibility level that you are having issues with into ILSpy. You can find these under Frameworks/Mono/lib/mono/YOURSUBSET/.
- Drag in your third-party assembly.
- Right-click your third-party assembly and select Analyze.
- In the analysis report, inspect the Depends on section. Anything that the third-party assembly depends on, but that’s not available in the .NET compatibility level of your choice, is highlighted in red.
Apple-specific information
| Setting | Function |
|---|---|
| Camera Usage Description | Enter the reason for accessing the camera on the device. |
| Location Usage Description | Enter the reason for accessing the location of the device. |
| Microphone Usage Description | Enter the reason for accessing the microphone on the device. |
| Use On-Demand Resources | Enable this option to use on-demand resources. When enabled, the Variant map for app slicing section appears. |
| Accelerometer Frequency | Define how often to sample the accelerometer. You can set the frequency at 15Hz, 30Hz, 60Hz, or 100Hz. Use a lower frequency for better performance. If your app doesn’t use the accelerometer, select Disabled. |
| Prepare iOS for Recording | Enable this option to initialize the microphone recording APIs. This lowers recording latency, but it also re-routes iPhone audio output via earphones. |
| Force iOS Speakers when Recording | Enable this option to send the phone’s audio output through the internal speakers, even when headphones are plugged in and recording. |
| Requires Persistent WiFi | Enable this option to require a Wi-Fi connection. This maintains the active Wi-Fi connection while the app is running. |
| Supported URL schemes | A list of supported URL schemes. To add new schemes, increase the value of the Size property, then set a reference to the Asset to load in the new Element box that appears. |
Device information
| Setting | Function | |
|---|---|---|
| Disable HW Statistics | Enable this option to instruct the app not to send information about the hardware to Unity. | |
| Target Device | Select which devices the app targets. The options are iPhone Only, iPad Only, and iPhone + iPad. | |
| Target SDK | Select which SDK the app targets. The options are Device SDK and Simulator SDK. Note: Be sure to select the correct SDK. For example, if you select the Device SDK in Unity and target the Simulator in Xcode, your build will fail. |
|
| Target minimum iOS Version | Select the minimum version of iOS that the app works on. | |
| Enable ProMotion Support | Enable this option to allow high frequency refresh rates (120 Hz) on ProMotion displays. This might cause your app to use more battery power. | |
| Requires ARKit support | Enable this option to restrict the app to iPhone 6s/iOS 11 or newer devices when you publish it to the App Store. | |
| Automatically add capabilities | When you enable this option, Unity generates an entitlements.plist file and adds capabiities for iOS APIs that your app implements (for example, Game Center or Notifications). For more information, see Apple developer documentation on Entitlements. | |
| Defer system gestures on edges | Select one or more edges that users must swipe twice to enact system gestures. The options are Top Edge, Left Edge, Bottom Edge, and Right Edge | |
| Hide home button on iPhone X | Enable this option to hide the home button on iPhone X devices when the app is running. | |
| Render Extra Frame on Pause | Enable this option to issue an additional frame after the frame when the app is paused. This allows your app to display graphics that indicate the paused state when the app goes into the background. | |
| Enable Custom Background Behaviors | Select what the app is allowed to do when the user presses the home button to send the app to the background. For an example, see the BackgroundFetch Github project. The options are: - Audio, AirPlay, PiP, - Location updates - Voice over IP - Newsstand downloads - External accessory communication - Uses Bluetooth LE accessories - Act as a Bluetooth LE accessory - Background fetch - Remote notifications |
|
Variant map for app slicing
Expand the Variant map for app slicing section to see the list of variant names configured in scripting. For more information on variants, see App slicing.
Note: If you don’t see the section, make sure the Use on Demand Resource property is enabled.
You can add and remove new variants with the plus (+) and minus (-) icons. You can also select a variant from the list and see or modify its settings under Variant settings. For any of these settings except Variant name, if you choose Custom value, an additional property appears underneath where you can enter your own value to use:
| Setting | Function |
|---|---|
| Variant name | Displays the name of the variant from the loading script. |
| Device | Choose which device this variant targets. Options include Any (default), iPhone, iPad, iWatch, and Custom value. |
| Memory | Choose the minimum memory required for this variant. Options include Any (default), 1GB, 2GB, 3GB, 4GB, and Custom value. |
| Graphics | Choose the Metal framework to use. Options include Any (default), Metal1v2, Metal2v2, Metal2v3, Metal3v1, Metal3v2, Metal4v1, and Custom value. For more information, see the Apple developer documentation about Metal. |
| Display color space | Choose the color gamut to use. Options include Any (default), sRGB, DisplayP3, and Custom value. |
You can also add your own setting. Click the Add custom entry button and a new pair of text boxes appear:
- <key>: Enter the name of the setting.
- <value>: Enter the value for this setting.
Other configuration settings
| Setting | Function | |
|---|---|---|
| Target Architectures | Choose which architecture to target. | |
| Universal | Support all architectures. This is the recommended option. | |
| Armv7 | Support only the older 32-bit ARM architecture. | |
| Arm64 | Support only the newer 64-bit ARM architecture. You might want to consider selecting this option if your app is only for high-end devices. | |
| Active Input Handling | Chooses how to handle input from users. | |
| Input Manager (old) | Use the default Input window. | |
| Input System (Preview) | Use the newer Input system. The Input System is provided as a preview package for this release. To try a preview of the Input System, install the InputSystem package. | |
| Both | Use both systems side by side. | |
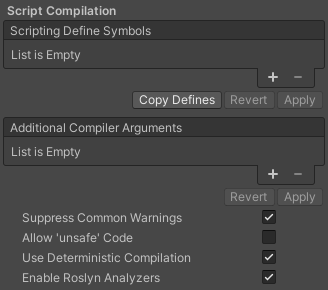
Script Compilation
| Property | Description |
|---|---|
| Scripting Define Symbols | Sets custom compilation flags. For more details, see Platform dependent compilation. |
| Additional Compiler Arguments | Adds entries to this list to pass additional arguments to the Roslyn compiler. Use one new entry for each additional argument. To create a new entry, click Add (+). To remove an entry, click Remove (-). When you have added all desired arguments, click Apply to include your additional arguments in future compilations. Click Revert to reset this list to the most recent applied state. |
| Suppress Common Warnings | Indicates whether to display the C# warnings CS0169 and CS0649. |
| Allow ‘unsafe’ Code | Enables support for compiling ‘unsafe’ C# code in a pre-defined assembly (for example, Assembly-CSharp.dll). For Assembly Definition Files ( .asmdef), click on one of your .asmdef files and enable the option in the Inspector window that appears. |
| Use Deterministic Compilation | Indicates whether to prevent compilation with the -deterministic C# flag. With this setting enabled, compiled assemblies are byte-for-byte identical each time they are compiled. For more information, see Microsoft’s deterministic compiler option. |
| Enable Roslyn Analyzers | Indicates whether to compile user-written scriptsA piece of code that allows you to create your own Components, trigger game events, modify Component properties over time and respond to user input in any way you like. More info See in Glossary without Roslyn analyzer DLLs that might be present in your project. |
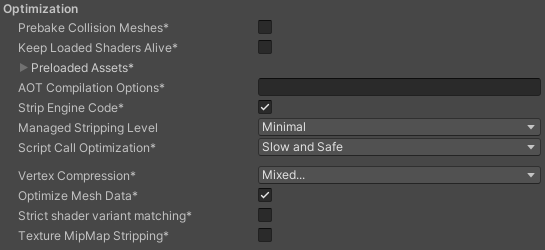
Optimization
| Setting | Function | |
|---|---|---|
| Prebake Collision Meshes | Adds collision data to Meshes at build time. | |
| Keep Loaded Shaders Alive | Indicates whether to prevent shaders from being unloaded. For more information, see Shader Loading. |
|
| Preloaded Assets | Sets an array of Assets for the player to load on startup. To add new Assets, increase the value of the Size property and then set a reference to the Asset to load in the new Element box that appears. |
|
| AOT compilation options | Additional options for Ahead of Time (AOT) compilation. This helps optimize the size of the built iOS player. | |
| Strip Engine Code | Enable this option if you want the Unity Linker tool to remove code for Unity Engine features that your Project doesn’t use. This setting is only available with the IL2CPP scripting backend. Most apps don’t use every available DLL. This option strips out DLLs that your app doesn’t use to reduce the size of the built Player. If your app is using one or more classes that would normally be stripped out under your current settings, Unity displays a debug message when you try to build the app. |
|
| Managed Stripping Level | Chooses how aggressively Unity strips unused managed (C#) code. The options are Minimal, Low, Medium, and High. When Unity builds your app, the Unity Linker process can strip unused code from the managed DLLs your Project uses. Stripping code can make the resulting executable significantly smaller, but can sometimes accidentally remove code that’s in use. For more information about these options and bytecode stripping with IL2CPP, see ManagedStrippingLevel. |
|
| Script Call Optimization | Choose how to optionally disable exception handling for a speed boost at run time. For more information, see iOS Optimization. | |
| Slow and Safe | Use full exception handling (with some performance impact on the device when using the Mono scripting backend). | |
| Fast but no Exceptions | No data provided for exceptions on the device (the app runs faster when using the Mono scripting backend). Note: Using this option with the IL2CPP scripting backend doesn’t impact performance, but it might help avoid undefined behavior on release builds. |
|
| Vertex Compression | Sets vertex compression per channel. This affects all the meshes in your project. Typically, Vertex Compression is used to reduce the size of mesh data in memory, reduce file size, and improve GPU performance. For more information on how to configure vertex compression and limitations of this setting, see Compressing mesh data. |
|
| Optimize Mesh Data | Enable this option to strip unused vertex attributes from the mesh used in a build. This option reduces the amount of data in the mesh, which can help reduce build size, loading times, and runtime memory usage. Warning: If you have this setting enabled, you should remember to not change material or shader settings at runtime. See PlayerSettings.stripUnusedMeshComponents for more information. |
|
| Strict shader variant matching | If a shader variant is missing, the editor uses the bright pink error shader whilst displaying an error message in the Console. | |
| Texture MipMap Stripping | Enables mipmap stripping for all platforms. This strips unused mipmaps from Textures at build time. Unity determines unused mipmaps by comparing the value of the mipmap against the Quality Settings for the current platform. If a mipmap value is excluded from every Quality Setting for the current platform, then Unity strips those mipmaps from the build at build time. If QualitySettings.masterTextureLimit is set to a mipmap value that has been stripped, Unity will set the value to the closest mipmap value that has not been stripped. | |
Logging
Select what type of logging to allow in specific contexts.
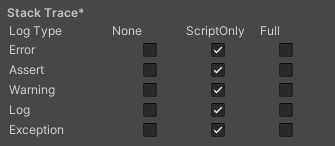
- Select your preferred stack trace method by enabling the option that corresponds to each Log Type (Error, Assert, Warning, Log, and Exception) based on the type of logging you require. For example:
-
ScriptOnly: Logs only when running scripts.
-
Full: Logs all the time.
-
None: No logs are ever recorded.
-
ScriptOnly: Logs only when running scripts.
See stack trace logging for more information.
Legacy
Enable the Clamp BlendShapes (Deprecated) option to clamp the range of Blend Shape weights in SkinnedMeshRenderers. This option has been deprecated and should no longer be used.
Copyright © 2023 Unity Technologies
优美缔软件(上海)有限公司 版权所有
"Unity"、Unity 徽标及其他 Unity 商标是 Unity Technologies 或其附属机构在美国及其他地区的商标或注册商标。其他名称或品牌是其各自所有者的商标。
公安部备案号:
31010902002961