3D textures
Switch to ScriptingA 3D texture is a bitmap image that contains information in three dimensions rather than the standard two. 3D textures are commonly used to simulate volumetric effects such as fog or smoke, to approximate a volumetric 3D meshThe main graphics primitive of Unity. Meshes make up a large part of your 3D worlds. Unity supports triangulated or Quadrangulated polygon meshes. Nurbs, Nurms, Subdiv surfaces must be converted to polygons. More info
See in Glossary, or to store animated textures and blend between them smoothly.
3D texture size
The maximum resolution of a 3D texture is 2048 x 2048 x 2048.
Be aware that the size of a 3D texture in memory and on disk increases quickly as its resolution increases. An RGBA32 3D texture with no mipmaps and a resolution of 16 x 16 x 16 has a size of 128KB, but with a resolution of 256 x 256 x 256 it has a size of 512MB.
Importing 3D textures
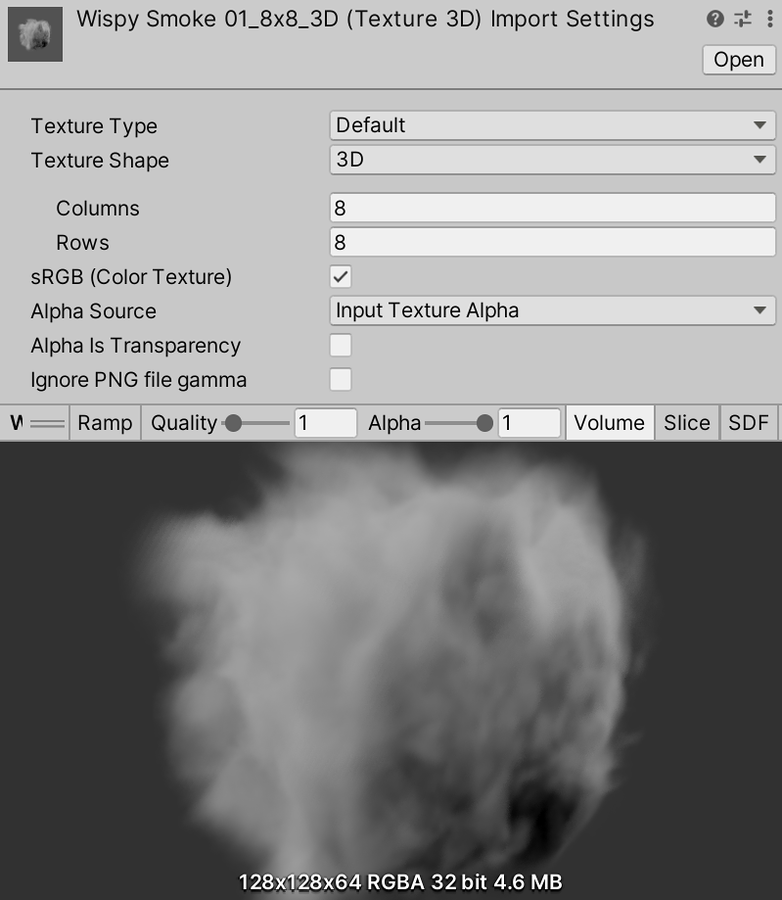
You can import 3D textures from source texture files that are divided into cells. These are called flipbook textures. To do this:
- Import the source texture into your Unity Project.
- In your Project view, select the resulting Texture Asset. Unity displays the Texture import settings in the InspectorA Unity window that displays information about the currently selected GameObject, asset or project settings, allowing you to inspect and edit the values. More info
See in Glossary. - In the Inspector, set Texture Shape to 3D. Unity displays the Columns and Rows properties.
- Set Columns and Rows to the appropriate values for your flipbook texture.
- Click Apply.
For more information, see Texture import settings.
Creating a 3D texture from a script
Unity uses the Texture3D class to represent 3D textures. Use this class to interact with 3D textures in C# scriptsA piece of code that allows you to create your own Components, trigger game events, modify Component properties over time and respond to user input in any way you like. More info
See in Glossary.
The following example is an Editor script that creates an instance of the Texture3D class, populates it with color data, and then saves it to your Project as a serialized asset file.
using UnityEditor;
using UnityEngine;

public class ExampleEditorScript : MonoBehaviour
{
    [MenuItem("CreateExamples/3DTexture")]
    static void CreateTexture3D()
    {
        // Configure the texture
        int size = 32;
        TextureFormat format = TextureFormat.RGBA32;
        TextureWrapMode wrapMode =  TextureWrapMode.Clamp;

        // Create the texture and apply the configuration
        Texture3D texture = new Texture3D(size, size, size, format, false);
        texture.wrapMode = wrapMode;

        // Create a 3-dimensional array to store color data
        Color[] colors = new Color[size * size * size];

        // Populate the array so that the x, y, and z values of the texture will map to red, blue, and green colors
        float inverseResolution = 1.0f / (size - 1.0f);
        for (int z = 0; z < size; z++)
        {
            int zOffset = z * size * size;
            for (int y = 0; y < size; y++)
            {
                int yOffset = y * size;
                for (int x = 0; x < size; x++)
                {
                    colors[x + yOffset + zOffset] = new Color(x * inverseResolution,
                        y * inverseResolution, z * inverseResolution, 1.0f);
                }
            }
        }

        // Copy the color values to the texture
        texture.SetPixels(colors);

        // Apply the changes to the texture and upload the updated texture to the GPU
        texture.Apply();

        // Save the texture to your Unity Project
        AssetDatabase.CreateAsset(texture, "Assets/Example3DTexture.asset");
    }
}
Previewing a 3D texture
The Unity Editor has three different visualization modes you can use to preview a 3D texture:
- Volumetric visualization mode renders the 3D texture as a translucent cube
- Slice visualization mode renders a single slice of each of the three axes of the 3D texture
- SDF visualization mode renders the texture as a Signed Distance Field in 3D space
You can preview the 3D texture in the Inspector, or you can write a script to preview it in the SceneA Scene contains the environments and menus of your game. Think of each unique Scene file as a unique level. In each Scene, you place your environments, obstacles, and decorations, essentially designing and building your game in pieces. More info
See in Glossary view using the Handles API. Using the Inspector is quick and convenient, but does not allow the use of custom gradients. The Handles API lets you configure the preview to your exact requirements, and allows the use of custom gradients.
Using the Inspector
To preview the 3d texture in the Inspector window:
- In your Project windowA window that shows the contents of your
Assetsfolder (Project tab) More info
See in Glossary, select the Texture Asset. The Texture Asset Importer for this Texture Asset is now visible in the Inspector, and Unity renders a preview of the 3D texture at the bottom of the Inspector. - Navigate to the toolbarA row of buttons and basic controls at the top of the Unity Editor that allows you to interact with the Editor in various ways (e.g. scaling, translation). More info
See in Glossary above the preview of the 3D texture. - Use the buttons on the right-hand side of the toolbar to choose between Volumetric, Slice, and SDF visualization modes. The preview image and the buttons on the toolbar change depending on the preview mode.
Volumetric
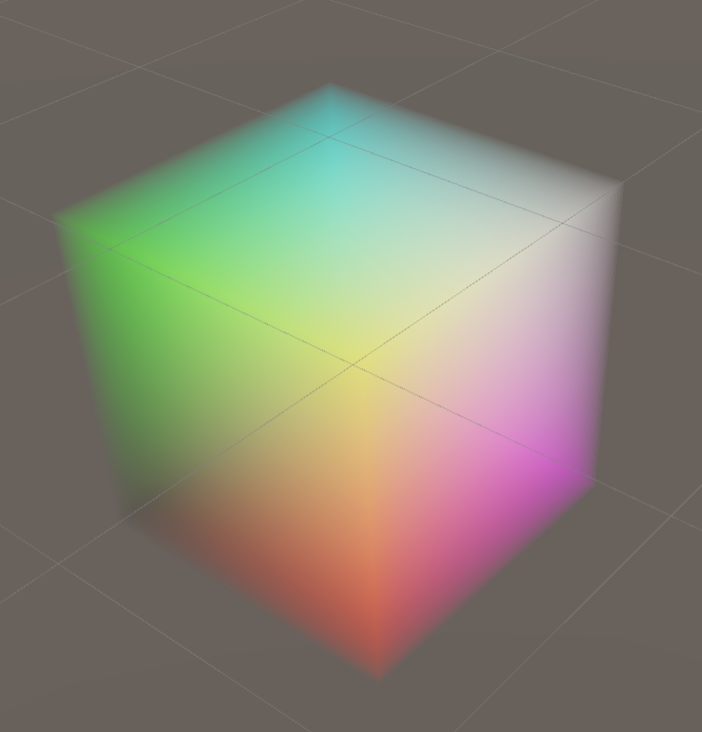
In this visualization mode, Unity renders the 3D texture as a translucent cube.
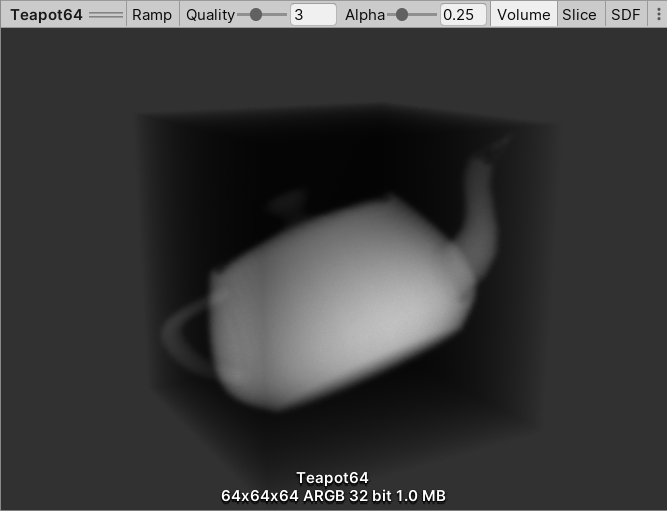
The following controls are available in the toolbar:
| Control: | Function: |
|---|---|
| Ramp | Enables and disables color ramp visualization. If the image contains a lot of subtle details, enable Ramp to make those details easier to see. |
| Quality | Sets the sample per texture pixelThe smallest unit in a computer image. Pixel size depends on your screen resolution. Pixel lighting is calculated at every screen pixel. More info See in Glossary count. Higher values result in a higher quality render. |
| Alpha | Controls the opacity of the visualization. A value of 1 is fully opaque and a value of 0 is fully transparent. Adjust to view the inner pixels. |
Slice
In this visualization mode, Unity renders slices of each axis plane of the 3D texture.
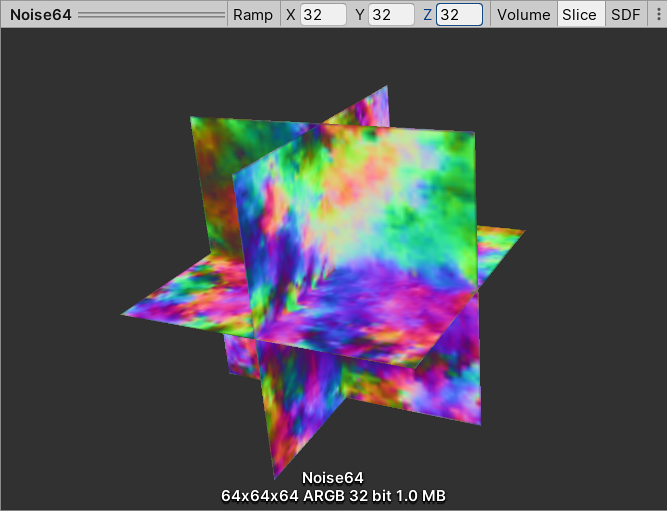
The following controls are available in the toolbar:
| Control: | Function: |
|---|---|
| Ramp | Enables and disables color ramp visualization. If the image contains a lot of subtle details, enable Ramp to make those details easier to see. |
| X | Sets the slicing position on the x axis, in texture pixels. Adjust to view a specific slice. |
| Y | Sets the slicing position on the y axis, in texture pixels. Adjust to view a specific slice. |
| Z | Sets the slicing position on the z axis, in texture pixels. Adjust to view a specific slice. |
SDF
In this visualization mode, Unity uses Signed Distance Field rendering mode in 3D space to render the 3D texture. Note that this visualization mode supports only non-directional Signed Distance Fields.
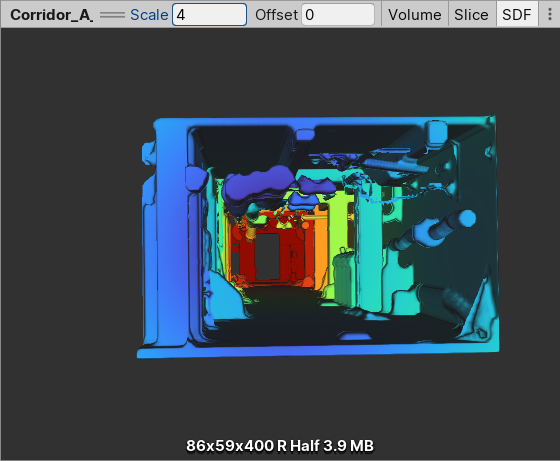
The following controls are available in the toolbar:
| Control: | Function: |
|---|---|
| Scale | The number by which to multiply the ray step size. The ray step size is the distance between 2 neighboring pixels. If distant parts of the visualization are cut off, try increasing this. If the visualization is not rendered at all, try decreasing this. |
| Offset | The intensity of the pixels at which the surface is rendered. When this value is positive, Unity will expand the rendered surface. When this value is negative, Unity will render empty space as a surface, and a surface as empty space. |
Using the Handles API
For information on previewing a 3D texture using the Handles API and code samples, see the following documentation:
Using a 3D texture in a shader
Here is an example of a simple raymarching shaderA program that runs on the GPU. More info
See in Glossary that uses a 3D texture to visualize a volume.
Shader "Unlit/VolumeShader"
{
    Properties
    {
        _MainTex ("Texture", 3D) = "white" {}
        _Alpha ("Alpha", float) = 0.02
        _StepSize ("Step Size", float) = 0.01
    }
    SubShader
    {
        Tags { "Queue" = "Transparent" "RenderType" = "Transparent" }
        Blend One OneMinusSrcAlpha
        LOD 100

        Pass
        {
            CGPROGRAM
            #pragma vertex vert
            #pragma fragment frag

            #include "UnityCG.cginc"

            // Maximum amount of raymarching samples
            #define MAX_STEP_COUNT 128

            // Allowed floating point inaccuracy
            #define EPSILON 0.00001f

            struct appdata
            {
                float4 vertex : POSITION;
            };

            struct v2f
            {
                float4 vertex : SV_POSITION;
                float3 objectVertex : TEXCOORD0;
                float3 vectorToSurface : TEXCOORD1;
            };

            sampler3D _MainTex;
            float4 _MainTex_ST;
            float _Alpha;
            float _StepSize;

            v2f vert (appdata v)
            {
                v2f o;

                // Vertex in object space this will be the starting point of raymarching
                o.objectVertex = v.vertex;

                // Calculate vector from camera to vertex in world space
                float3 worldVertex = mul(unity_ObjectToWorld, v.vertex).xyz;
                o.vectorToSurface = worldVertex - _WorldSpaceCameraPos;

                o.vertex = UnityObjectToClipPos(v.vertex);
                return o;
            }

            float4 BlendUnder(float4 color, float4 newColor)
            {
                color.rgb += (1.0 - color.a) * newColor.a * newColor.rgb;
                color.a += (1.0 - color.a) * newColor.a;
                return color;
            }

            fixed4 frag(v2f i) : SV_Target
            {
                // Start raymarching at the front surface of the object
                float3 rayOrigin = i.objectVertex;

                // Use vector from camera to object surface to get ray direction
                float3 rayDirection = mul(unity_WorldToObject, float4(normalize(i.vectorToSurface), 1));

                float4 color = float4(0, 0, 0, 0);
                float3 samplePosition = rayOrigin;

                // Raymarch through object space
                for (int i = 0; i < MAX_STEP_COUNT; i++)
                {
                    // Accumulate color only within unit cube bounds
                    if(max(abs(samplePosition.x), max(abs(samplePosition.y), abs(samplePosition.z))) < 0.5f + EPSILON)
                    {
                        float4 sampledColor = tex3D(_MainTex, samplePosition + float3(0.5f, 0.5f, 0.5f));
                        sampledColor.a *= _Alpha;
                        color = BlendUnder(color, sampledColor);
                        samplePosition += rayDirection * _StepSize;
                    }
                }

                return color;
            }
            ENDCG
        }
    }
}
If you use this shader with the 3D texture created in the example at the top of the page, the result looks like this:
Copyright © 2023 Unity Technologies
优美缔软件(上海)有限公司 版权所有
"Unity"、Unity 徽标及其他 Unity 商标是 Unity Technologies 或其附属机构在美国及其他地区的商标或注册商标。其他名称或品牌是其各自所有者的商标。
公安部备案号:
31010902002961