Manual
- Unity User Manual (2017.4)
- Working in Unity
- Getting Started
- Asset Workflow (работа с ассетами)
- The Main Windows
- Создание геймплея.
- Editor Features
- Advanced Development
- Advanced Editor Topics
- Licenses and Activation
- Upgrade Guides
- Использование автоматического обновления API
- Upgrading to Unity 2017.3
- Upgrading to Unity 2017.2
- Upgrading to Unity 2017.1
- Upgrading to Unity 5.6
- Upgrading to Unity 5.5
- Upgrading to Unity 5.4
- Upgrading to Unity 5.3
- Upgrading to Unity 5.2
- Upgrading to Unity 5.0
- Руководство по обновлению до Unity 4.0
- Обновление до Unity 3.5
- 2D
- Графика
- Обзор графических возможностей
- Освещение
- Lighting overview
- Lighting Window
- Light Explorer
- Light sources
- Shadows
- Lighting Modes
- Global Illumination
- Light troubleshooting and performance
- Related topics
- Камеры
- Materials, Shaders & Textures
- Текстуры
- Creating and Using Materials
- Standard Shader
- Standard Particle Shaders
- Physically Based Rendering Material Validator
- Accessing and Modifying Material parameters via script
- Writing Shaders
- Legacy Shaders
- Video overview
- Ландшафтный движок
- Tree Editor
- Системы Частиц
- Post-processing overview
- Reflection probes
- Расширенные возможности рендеринга
- Процедурные материалы
- Procedural Mesh Geometry
- Оптимизация производительности графики
- Слои
- Освещение
- Справка по графическим возможностям
- Справочник по камерам
- Shader Reference
- Writing Surface Shaders
- Программирование вершинных и фрагментных (пиксельных) шейдеров
- Примеры вершинных и фрагментных шейдеров
- Shader semantics
- Accessing shader properties in Cg/HLSL
- Providing vertex data to vertex programs
- Встроенные подключаемые файлы для шейдеров
- Стандартные шейдерные предпроцессорные макросы
- Built-in shader helper functions
- Built-in shader variables
- Создание программ с несколькими вариантами шейдеров
- GLSL Shader programs
- Shading Language used in Unity
- Shader Compilation Target Levels
- Shader data types and precision
- Using sampler states
- Синтаксис ShaderLab: Shader
- Синтаксис ShaderLab: свойства
- Синтаксис ShaderLab: SubShader
- Синтаксис ShaderLab: Pass
- ShaderLab: Culling & Depth Testing
- Синтаксис ShaderLab: Blending
- Синтаксис ShaderLab: тэги Pass
- Синтаксис ShaderLab: Stencil
- Синтаксис ShaderLab: Name
- Синтаксис ShaderLab: цвет, материал, освещение
- ShaderLab: Legacy Texture Combiners
- Синтакс ShaderLab: Альфа тестинг (Alpha testing)
- Синтаксис ShaderLab: туман
- Синтаксис ShaderLab: BindChannels
- Синтаксис ShaderLab: UsePass
- Синтаксис ShaderLab: GrabPass
- ShaderLab: SubShader Tags
- Синтаксис ShaderLab: Pass
- Синтаксис ShaderLab: Fallback
- #Синтаксис ShaderLab: CustomEditor
- Синтаксис ShaderLab: другие команды
- Shader assets
- Расширенные возможности ShaderLab
- Unity's Rendering Pipeline
- Performance tips when writing shaders
- Rendering with Replaced Shaders
- Custom Shader GUI
- Использование текстур глубины
- Текстура глубины камеры
- Особенности рендеринга различных платформ
- Уровень детализации шейдера (Level Of Detail)
- Texture arrays
- Debugging DirectX 11/12 shaders with Visual Studio
- Debugging DirectX 12 shaders with PIX
- Implementing Fixed Function TexGen in Shaders
- Particle Systems reference
- Particle System
- Particle System modules
- Particle System Main module
- Emission module
- Particle System Shape Module
- Velocity over Lifetime module
- Noise module
- Limit Velocity Over Lifetime module
- Inherit Velocity module
- Force Over Lifetime module
- Color Over Lifetime module
- Color By Speed module
- Size over Lifetime module
- Size by Speed module
- Rotation Over Lifetime module
- Rotation By Speed module
- External Forces module
- Collision module
- Triggers module
- Sub Emitters module
- Texture Sheet Animation module
- Lights module
- Trails module
- Custom Data module
- Renderer module
- Системы частиц (Более старая система, используемая до версии 3.5)
- Справка по Визуальным Эффектам
- Mesh Components
- Текстурные компоненты
- Компоненты рендеринга
- Rendering Pipeline Details
- Подборка уроков по графике
- How do I Import Alpha Textures?
- Как я могу создать Skybox?
- Как сделать эмиттер частиц в форме меша (Устаревшая система частиц)
- Как добавить Spot Light Cookie (Cookie текстура для Точечного Источника Света)?
- Как мне исправить вращение импортированной модели?
- Water in Unity
- Art Asset best practice guide
- How do I import models from my 3D app?
- How to do Stereoscopic Rendering
- Уроки по графике
- Обзор графических возможностей
- Physics
- Скриптинг
- Обзор Скриптинга
- Создание и Использование Скриптов
- Variables and the Inspector
- Controlling GameObjects using components
- Функции событий
- Time and Framerate Management
- Создание и уничтожение игровых объектов (GameObjects)
- Coroutines
- Пространства имён
- Атрибуты
- Порядок выполнения функций событий
- Понимание автоматического управления памятью
- Platform dependent compilation
- Специальные папки и порядок компиляции скриптов
- Script compilation and assembly definition files
- Общие функции
- Scripting restrictions
- Script Serialization
- Unity События (UnityEvents)
- What is a Null Reference Exception?
- Important Classes
- Рецепты использования векторов
- Инструменты Скриптинга
- Система событий (EventSystem)
- Обзор Скриптинга
- Multiplayer and Networking
- Multiplayer Overview
- Setting up a multiplayer project
- Using the Network Manager
- Using the Network Manager HUD
- The Network Manager HUD in LAN mode
- The Network Manager HUD in Matchmaker mode
- Converting a single-player game to Unity Multiplayer
- Debugging Information
- The Multiplayer High Level API
- Multiplayer Component Reference
- Multiplayer Classes Reference
- UnityWebRequest
- Аудио
- Аудио. Обзор.
- Аудио файлы
- Трекерные модули
- Audio Mixer
- Native Audio Plugin SDK
- Audio Profiler
- Ambisonic Audio
- Справочник по аудио
- Audio Clip
- Audio Listener
- Audio Source
- Audio Mixer
- Аудио эффекты (только для Pro версии)
- Audio Effects
- Audio Low Pass Effect
- Audio High Pass Effect
- Audio Echo Effect
- Audio Flange Effect
- Audio Distortion Effect
- Audio Normalize Effect
- Audio Parametric Equalizer Effect
- Audio Pitch Shifter Effect
- Audio Chorus Effect
- Audio Compressor Effect
- Audio SFX Reverb Effect
- Audio Low Pass Simple Effect
- Audio High Pass Simple Effect
- Reverb Zones
- Микрофон
- Audio Settings
- Анимация
- Animation System Overview
- Анимационные клипы
- Animation from external sources
- Руководство по Animation Window
- Animator Controllers (контроллеры аниматоров)
- Аниматор и контроллер аниматора
- The Animator Window
- Конечные автоматы в анимации
- Blend Trees (Деревья смешивания)
- Применение Blend Shapes (форм смешивания) для анимации
- Animator Override Controllers
- Переназначение гуманоидных анимаций
- Производительность и оптимизация в Mecanim
- Справка по анимации
- Практические рекомендации по анимации
- Playables API
- Словарь терминов анимации и Mecanim.
- Timeline
- Пользовательский интерфейс
- Сanvas (Полотно)
- Basic Layout
- Визуальные компоненты
- Компоненты взаимодействия
- Animation Integration
- Auto Layout
- «Обогащенный» текст (Rich Text)
- Справка по пользовательским интерфейсам
- Практические рекомендации по работе с UI (пользовательскими интерфейсами)
- Immediate Mode GUI (IMGUI)
- Навигация и поиск пути
- Navigation Overview
- Navigation System in Unity
- Inner Workings of the Navigation System
- Building a NavMesh
- NavMesh building components
- Advanced NavMesh Bake Settings
- Creating a NavMesh Agent
- Creating a NavMesh Obstacle
- Creating an Off-mesh Link
- Building Off-Mesh Links Automatically
- Building Height Mesh for Accurate Character Placement
- Navigation Areas and Costs
- Loading Multiple NavMeshes using Additive Loading
- Using NavMesh Agent with Other Components
- Справочник по навигации
- Navigation How-Tos
- Navigation Overview
- Unity Services
- Setting up your project for Unity Services
- Unity Organizations
- Unity Ads
- Unity Analytics
- Unity Analytics Overview
- Setting Up Analytics
- Analytics Dashboard
- Analytics events
- Funnels
- Remote Settings
- Unity Analytics A/B Testing
- Monetization
- User Attributes
- Unity Analytics Raw Data Export
- Data reset
- Upgrading Unity Analytics
- COPPA Compliance
- Unity Analytics and the EU General Data Protection Regulation (GDPR)
- Analytics Metrics, Segments, and Terminology
- Unity Cloud Build
- Automated Build Generation
- Supported platforms
- Supported versions of Unity
- Version control systems
- Using the Unity Developer Dashboard to configure Unity Cloud Build for Git
- Using the Unity Editor to configure Unity Cloud Build for Git
- Using the Unity Developer Dashboard to configure Unity Cloud Build for Mercurial
- Using the Unity Editor to configure Unity Cloud Build for Mercurial
- Using Apache Subversion (SVN) with Unity Cloud Build
- Using the Unity Developer Dashboard to configure Unity Cloud Build for Perforce
- Using the Unity Editor to configure Unity Cloud Build for Perforce
- Building for iOS
- Advanced options
- Build manifest
- Cloud Build REST API
- Unity IAP
- Setting up Unity IAP
- Cross Platform Guide
- Codeless IAP
- Defining products
- Subscription Product support
- Initialization
- Browsing Product Metadata
- Initiating Purchases
- Processing Purchases
- Handling purchase failures
- Restoring Transactions
- Purchase Receipts
- Receipt validation
- Store Extensions
- Cross-store installation issues with Android in-app purchase stores
- Store Guides
- Implementing a Store
- IAP Promo
- Unity Collaborate
- Setting up Unity Collaborate
- Adding team members to your Unity Project
- Viewing history
- Enabling Cloud Build with Collaborate
- Managing Unity Editor versions
- Reverting files
- Resolving file conflicts
- Excluding Assets from publishing to Collaborate
- Publishing individual files to Collaborate
- Restoring previous versions of a project
- In-Progress edit notifications
- Managing cloud storage
- Moving your Project to another version control system
- Collaborate troubleshooting tips
- Unity Performance Reporting
- Unity Integrations
- Multiplayer Services
- XR
- XR SDKs
- Google VR
- Vuforia
- Windows Mixed Reality
- Unity XR input
- XR API reference
- Mixed Reality Devices
- Обзор
- VR devices
- Single Pass Stereo rendering (Double-Wide rendering)
- VR Audio Spatializers
- XR SDKs
- Open-source repositories
- Asset Store Publishing
- Специфичные платформы
- Автономный
- macOS
- Apple TV
- WebGL
- WebGL Player Settings
- Getting started with WebGL development
- WebGL Browser Compatibility
- Building and running a WebGL project
- WebGL: Deploying compressed builds
- Debugging and troubleshooting WebGL builds
- WebGL Graphics
- WebGL Networking
- Using Audio In WebGL
- WebGL performance considerations
- Memory Considerations when targeting WebGL
- WebGL: Interacting with browser scripting
- Using WebGL Templates
- Cursor locking and full-screen mode in WebGL
- Input in WebGL
- iOS
- Первые шаги в iOS разработке
- iOS Player Settings
- iOS 2D Texture Overrides
- Upgrading to 64-bit iOS
- Продвинутые темы по iOS
- Features currently not supported by Unity iOS
- Решение проблем на iOS устройствах
- Сообщение об ошибках, приводящих к "падениям" на iOS
- Android
- Getting started with Android development
- Android environment setup
- Unity Remote
- Android Remote (УСТАРЕВШЕЕ)
- Troubleshooting Android development
- Inside the Android build process
- Reporting crash bugs under Android
- Support for APK expansion files (OBB)
- Написание кода для Android
- Building and using plug-ins for Android
- Кастомизация экрана приветствия (Splash Screen) на Android
- Single-Pass Stereo Rendering for Android
- Android Player Settings
- Android 2D Textures Overrides
- Gradle for Android
- Android Manifest
- Getting started with Android development
- Windows
- Windows General
- Universal Windows Platform
- Приложения Windows Store: Приступая к работе
- Universal Windows Platform: Deployment
- Universal Windows Platform: Profiler
- Universal Windows Platform: Command line arguments
- Universal Windows Platform: Association launching
- Класс AppCallbacks
- Universal Windows Platform: WinRT API in C# scripts
- Universal Windows Platform Player Settings
- Scripting Backends
- ЧаВо
- Universal Windows Platform: Examples
- Universal Windows Platform: Code snippets
- Known issues
- Web Player
- Чеклист Мобильного Разработчика
- Experimental
- Legacy Topics
- Windows Store: Windows SDKs
- Asset Server (Только Pro)
- Legacy Network Reference Guide
- Legacy Asset Bundles
- Унаследованная анимационная система
- Legacy GUI
- Legacy Unity Analytics (SDK Workflow)
- LegacyUnityRemote
- Best practice guides
- Expert guides
- New in Unity 2017
- Unity User Manual (2017.4)
- XR
- XR SDKs
- Vuforia
- Vuforia quick start guide
- Setting up Image Targets
Setting up Image Targets
This section shows you how to set up a simple Image Target and get it responding to basic tracking events.
To allow your application to recognize images and use them as Targets to trigger gameplay, display graphics or information, you need to create a Target database. You can create Target databases directly from the Vuforia Developer Portal Target Manager page, as the steps in this section describe.
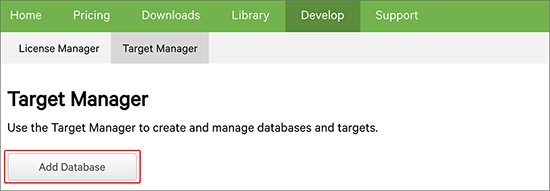
Log into your Vuforia Developer account. Then navigate to the Target Manager page and click on the Add Database button.
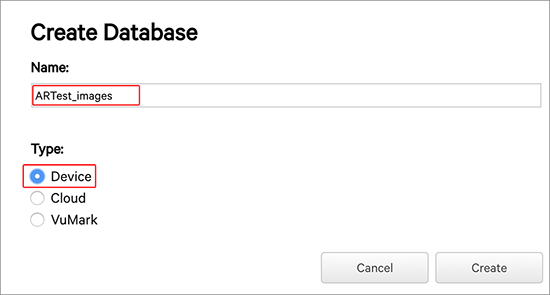
On the Create Database page, type a name for your database, select Device from the Type options, then click the Create button.
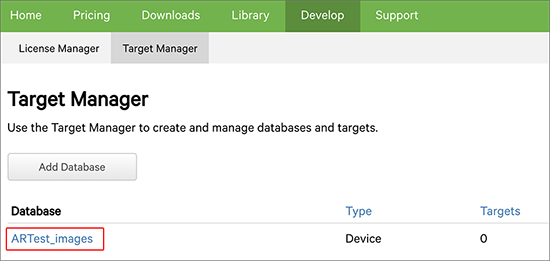
This adds the new Target database to the Target Manager list. Now click on the Database name in the list to open the Device Database list.
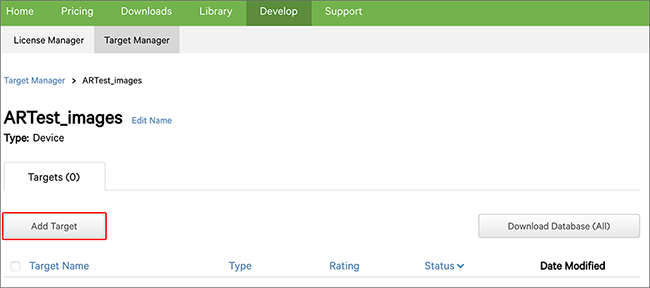
This brings you to the Target list page for the database, where you can add new Targets and download the database in specific formats for use with several platforms. Click the Add Target button to open the Add Target popup window.
The Add Target window presents you with options to specify details about the Target you want to add. There are four different types of Targets you can add: Single Image, Cuboid/Box, Cylinder and 3D Object. Under Type, Select Single Image and browse your hard drive to locate the image you want to use as an Image Target.

This example uses a playing card to demonstrate the Image Target recognition capabilities in Unity.

Use any image, but make sure that the image has enough detail to be rated as a 5-star Target so that the camera can easily track it.

The Width value is a scale value that you need to set to the size you want the image to appear in your Unity Scene (in real-world units). Unity measures everything in your Scene in relation to the size of your Target image. For this example, the width of the playing card is 5.5cm, so you would use 5.5cm as the Width value. If you need a larger size Target, then increase this Width.

Enter a name for the Target image, and click the Add button to upload the Image Target to the database.
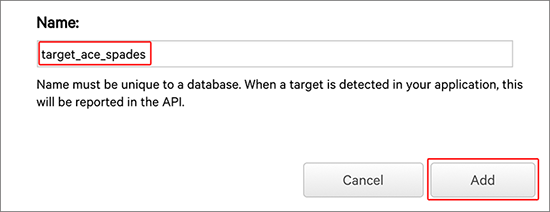
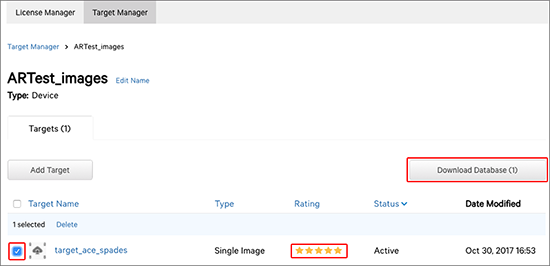
The image appears in the list of Targets with a Rating value represented by stars. If your Rating is less than 5 stars, it may be harder for the camera to track it. To learn more about what affects Image Target ratings, see Vuforia documentation on Optimizing target detection and tracking stability.
Once you are satisfied with your image’s Rating, select the checkbox to the left of the Image Target name and click the Download Database button.
On the Download Database window, under Select a development platform, select Unity Editor, then click the Download button. This downloads a Unity package of the Target database that you can save on your hard drive.
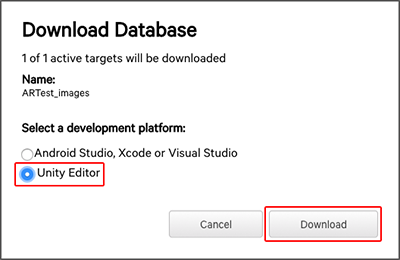
Switch back to your Unity project to import the Unity package for use in your application.
2018–03–28 Page published with editorial review
Vuforia documentation updated for Unity XR API in 2017.3