Manual
Version:
2018.1
- Unity User Manual (2018.1)
- Trabajando en Unity
- Getting Started
- Unity Hub
- Installing Unity using the Hub
- Adding components to the Unity Editor
- Installing Unity without the hub
- Installing Unity offline without the Hub
- Unity Hub advanced deployment considerations
- Proyectos 2D o 3D
- Project Templates
- Starting Unity for the first time
- Opening existing Projects
- Aprendiendo la interfaz
- Flujo de trabajo de los Assets (Asset Workflow)
- Las ventanas principales
- Creación del Gameplay
- Características del Editor
- Ajustes del Modo 2D y 3D
- Preferencias
- Presets
- Build Settings
- Project Settings (configuraciones del proyecto)
- Input Manager (Administrador de Input)
- Tags (etiquetas) y Layers (capas)
- Audio Manager (Administrador de Audio)
- El Administrador de Tiempo(Time Manager)
- Player Settings
- Physics Manager
- Configuraciones de Physics 2D (física 2D)
- Ajustes de calidad (Quality Settings)
- Graphics Settings
- Network Manager
- Editor Settings
- Ajustes del Orden de Ejecución de Scripts(Script Execution Order Settings)
- Preset Manager
- Emulación de Red
- Integración Visual Studio C#
- Integración con RenderDoc
- Analiticas del Editor
- Buscar Actualizaciones
- IME en Unity
- Nombres de carpetas de especiales
- Exportando paquetes
- Control de Versiones
- Solución de Problemas del Editor
- Desarrollo Avanzado
- Temas Avanzados del Editor
- Construir el Pipeline de un Reproductor
- Command line arguments
- Applying defaults to assets by folder
- Support for custom Menu Item and Editor features
- Detras de Escenas
- AssetDatabase
- Archivos de escena basados en texto
- Cache Server
- Modificando Assets Fuentes a través del Scripting
- Extendiendo el Editor
- Corriendo Código Script del Editor en la Ejecución
- Licencias y Activación
- Guías de Actualización
- Usando la Actualización Automática de API
- Upgrading to Unity 2018.1
- Upgrading to Unity 2017.3
- Upgrading to Unity 2017.2
- Upgrading to Unity 2017.1
- Upgrading to Unity 5.6
- Upgrading to Unity 5.5
- Actualizando a Unity 5.4
- Actualizarse a Unity 5.3
- Actualizándose a Unity 5.2
- Actualizando a Unity 5.0
- Guía de Actualización de Unity 3.5 a 4.0
- Actualizando a Unity 3.5
- Getting Started
- Importing
- 2D
- Experiencia de Juego en 2D
- Sprites
- Tilemap
- Physics Reference 2D
- Gráficos
- Información General de las Gráficas (Graphics Overview)
- Iluminación (Lighting)
- Visión general de iluminación
- Lighting Window
- Light Explorer
- Fuentes de Luz
- Shadows (Sombras)
- Global Illumination (Iluminación Global)
- Enlighten
- Progressive Lightmapper
- Parámetros de un Lightmap
- Baked ambient occlusion
- LOD para lightmaps baked
- Light Probes
- Reflection probes
- Modos de iluminación
- GI visualizations in the Scene view
- Lighting Data Asset
- Lightmap Directional Modes
- Lightmaps: Technical information
- Material properties and the GI system
- Global Illumination UVs
- GI cache
- Light troubleshooting and performance
- Temas relacionados
- Cámaras
- Materiales, Shaders y Texturas
- Texturas 2D
- Creando y utilizando Materiales
- Standard Shader
- Standard Particle Shaders
- Physically Based Rendering Material Validator
- Accediendo y Modificando los parámetros del Material vía script
- Sombreadores(Shaders) con Funciones Fijas
- Legacy Shaders (Shaders de Legado)
- Descripción general de video
- El Motor del Terreno
- Editor de Árboles
- Sistema de Partículas
- Visión general del post-procesamiento
- Características Avanzadas de Renderización
- Renderizado HDR(Imágenes de Alto Rango Dinámico) en Unity
- Rendering Paths
- Level of Detail (LOD)
- Graphics API support
- Compute shaders
- Buffers de comando de gráficos (buffers de comando de gráficos)
- GPU instancing
- Sparse Textures (Texturas Dispersas)
- Emulación y capacidades gráficas del hardware
- CullingGroup API
- Subida Asincrónica de Texturas
- Procedural Mesh Geometry
- Optimizando el Rendimiento Gráfico
- Capas (Layers)
- Iluminación (Lighting)
- Referencia de Gráficas(Graphics Reference)
- Referencia de Cámaras
- Referencia del Shader
- Writing Surface Shaders
- Escribiendo Vertex y fragment shaders
- Ejemplos del Vertex y Fragment Shader
- Semánticas de Shader
- Accediendo propiedades shader en Cg/HLSL
- Proporcionar datos del vértice a programas vertex
- El Sombreador integrado incluye archivos
- Macros del preprocesador Shader predefinidas
- Funciones Shader integradas de ayuda
- Variables shader integradas
- Creando varias variants de programas shader
- GLSL Shader programs
- Lenguaje Shading utilizado en Unity
- Niveles Objetivo de Compilación Shader
- Tipos de dato Shader y precisión
- Using sampler states
- Sintaxis ShaderLab
- Assets Shader
- Temas Avanzados de ShaderLab
- Pipeline de Rendering de Unity
- Consejos de rendimiento al escribir shaders
- Rendering con Shaders Remplazados
- Custom Shader GUI (GUI Shader Personalizado)
- Utilizando Depth Textures (Texturas de profundidad)
- La Depth Texture (Textura de Profundidad) de la cámara
- Diferencias especificas de rendering por plataforma
- Shader Level of Detail (Nivel de detalle)
- Texture arrays (arreglos de Textura)
- Debugging DirectX 11/12 shaders with Visual Studio
- Debugging DirectX 12 shaders with PIX
- Implementando la Función Fija TexGen en Shaders
- Particle Systems reference
- Particle System
- Módulos del Sistema de Partículas
- Particle System Main module
- Emission module
- Particle System Shape Module
- Velocity over Lifetime module
- Noise module
- Limit Velocity Over Lifetime module
- Inherit Velocity module
- Force Over Lifetime module
- Color Over Lifetime module
- Color By Speed module
- Módulo Size Over Lifetime
- Módulo Size By Speed
- Rotation Over Lifetime module
- Rotation By Speed module
- External Forces module
- Collision module
- Módulo Triggers
- Sub Emitters module
- Texture Sheet Animation module
- Lights module
- Trails module
- Módulo de datos personalizados
- Renderer module
- Particle Systems (Legacy, antes del lanzamiento de 3.5)
- Referencia de efectos visuales
- Componentes Mesh
- Componentes de Textura
- Componentes de Renderización
- Detalles del Rendering Pipeline
- Los Cómos de las Gráficas (Graphics HOWTOs)
- Cómo importar Texturas Alpha?
- Cómo hago una Skybox?
- Cómo creo un Mesh Particle Emitter? (Legacy Particle System)
- Cómo creo una Spot Light Cookie?
- Cómo arreglo la rotación de un modelo importado?
- Agua en Unity
- Art Asset best practice guide
- Importing models from 3D modeling software
- Cómo realizar un renderizado Estereoscópico
- Tutoriales de Gráficas
- Scriptable Render Pipeline
- Información General de las Gráficas (Graphics Overview)
- Física
- Scripting
- Visión General de Scripting
- Creando y usando scripts
- Variables y el Inspector
- Controlar GameObjects utilizando componentes
- Event Functions (Funciones de Evento)
- Administrador del Tiempo y Framerate
- Creando y destruyendo GameObjects.
- Coroutines (corrutinas)
- Namespaces
- Atributos
- Execution Order of Event Functions (Orden de Ejecución de Funciones de Evento)
- Entender la Gestión Automática de Memoria
- Compilación dependiente de la plataforma
- Carpetas especiales y orden de compilación script
- Script compilation and assembly definition files
- .NET profile support
- Referencing additional class library assemblies
- Stable scripting runtime: known limitations
- Funciones genéricas
- Scripting restrictions
- Script Serialization
- UnityEvents (Eventos de Unity)
- Qué es una Null Reference Exception? (Excepción con Referencia Null)
- Importando Clases
- "Recetas" para usar Vectores
- Herramientas de Scripting
- EventSystem (Sistema de Eventos)
- Messaging System (Sistema de Mensajería)
- Input Modules (Módulos de Input)
- Eventos Soportados
- Raycasters
- Referencia al Event System (Sistema de Eventos)
- C# Job System
- Visión General de Scripting
- Multijugador y Networking (redes)
- Multiplayer Overview
- Configurando un proyecto multijugador
- Using the Network Manager
- Using the Network Manager HUD
- The Network Manager HUD in LAN mode
- The Network Manager HUD in Matchmaker mode
- Converting a single-player game to Unity Multiplayer
- Debugging Information
- La API de Alto Nivel Multijugador
- Multiplayer Component Reference
- Clases Multijugador de referencia
- UnityWebRequest
- Audio
- Vista General del Audio
- Archivos de Audio
- Tracker Modules
- Audio Mixer (Mezclador de Audio)
- Plugin SDK del Audio Nativo de Unity
- Audio Profiler (Perfilador de Audio)
- Ambisonic Audio
- Referencias de Audio
- Audio Clip
- Audio Listener
- Audio Source (Fuente de Audio)
- Audio Mixer (Mezclador de Audio)
- Audio Filters (Filtros de Audio)
- Audio Effects (Efectos de audio)
- Audio Low Pass Effect
- Audio High Pass Effect
- Audio Echo Effect
- Audio Flange Effect
- Audio Distortion Effect
- Audio Normalize Effect
- Audio Parametric Equalizer Effect
- Audio Pitch Shifter Effect
- Audio Chorus Effect
- Audio Compressor Effect
- Audio SFX Reverb Effect
- Audio Low Pass Simple Effect
- Audio High Pass Simple Effect
- Reverb Zones (Zonas de reverberación)
- Micrófono
- Configuraciones de Audio
- Animación
- Visión general del Sistema de Animación
- Clips de Animación (Animation Clips)
- Animator Controllers
- El Asset del Animator Controller
- La Ventana Animator
- Animation State Machines (Máquinas de Estado de Animación)
- Lo básico de los Estados de Maquina
- Parámetros de animación
- Transiciones de State Machine (Estados de Maquina)
- State Machine Behaviours (Comportamientos de Maquinas de Estado)
- Sub-State Machines (Sub-Estados de Maquina)
- Capas de Animación
- Funcionalidad "Solo" y "Mute"
- Target Matching (Haciendo que coincida con un objetivo)
- Inverse Kinematics (Cinemática Inversa)
- Root Motion - Cómo funciona
- Blend Trees (Árboles de Mezcla)
- Animation Blend Shapes
- Animator Override Controllers
- Retargeting de Animaciones Humanoides
- Performance and optimization
- Animation Reference
- Preguntas más frecuentes de Animación
- Playables API
- Un Glosario de términos de Animación
- Timeline
- Timeline overview
- Flujos de trabajo de Timeline
- Timeline Editor window
- Timeline Preview and Timeline Selector
- Timeline Playback Controls
- Track List
- Vista de los Clips
- Navigating the Clips view
- Agregando clips
- Selecting clips
- Positioning clips
- Tiling clips
- Duplicando clips
- Trimming clips
- Splitting clips
- Resetting clips
- Cambiar de la velocidad de reproducción del clip
- Configurando una extrapolación de una brecha
- Easing-in y Easing-out clips (facilitando la entrada y salida de clips)
- Fusionando clips
- Coincidir los desfases de clips
- Vista de Curvas
- Configuración de Timeline
- Timeline y la ventana Inspector
- Playable Director component
- Glosario de Timeline
- UI (Interfaz de Usuario)
- Canvas
- Diseño Básico
- Componentes Visuales
- Componentes de Interacción
- Integración de Animación
- Diseño Automático
- Rich Text (Texto Enriquecido)
- Referencia UI
- Los cómos del UI
- Immediate Mode GUI (IMGUI)
- Navegación y Pathfinding (Búsqueda de Caminos)
- Visión General de la Navegación
- Sistema de Navegación de Unity
- Trabajos interiores del Sistema de Navegación
- Construyendo un NavMesh
- Componentes de construcción del NavMesh
- Ajustes Bake Avanzados del NavMesh
- Creando un Agente NavMesh
- Creando un NavMesh Obstacle (Obstáculo NavMesh)
- Creando un Off-mesh Link (Enlace Off-mesh)
- Construyendo Off-Mesh Links (Enlaces Off-mesh) Automáticamente
- Construyendo un Height Mesh (Mesh de altura) para una colocación precisa del personaje
- Áreas de Navegación y Costos
- Cargar Múltiples NavMeshes utilizando el Additive Loading
- Utilizando el NavMesh Agent con otros componentes
- Navigation Reference
- Los 'Cómos' de la Navegación
- Visión General de la Navegación
- Servicios de Unity
- Configurando su proyecto para Unity Services
- Unity Organizations
- Unity Ads
- Unity Analytics
- Unity Analytics Overview
- Configurando Analytics
- Analytics Dashboard
- Eventos de analítica
- Funnels
- Configuración remota
- Unity Analytics A/B Testing
- Monetization (Monetización)
- User Attributes (Atributos de Usuario)
- Unity Analytics Raw Data Export (Exportación de datos sin procesar)
- Restablecimiento de datos
- Actualizando Unity Analytics
- COPPA Compliance
- Unity Analytics and the EU General Data Protection Regulation (GDPR)
- Métricas, segmentos y terminología de Analytics
- Unity Cloud Build
- Automated Build Generation
- Supported platforms
- Versiones soportadas de Unity
- Sistemas de control de versiones
- Using the Unity Developer Dashboard to configure Unity Cloud Build for Git
- Using the Unity Editor to configure Unity Cloud Build for Git
- Using the Unity Developer Dashboard to configure Unity Cloud Build for Mercurial
- Using the Unity Editor to configure Unity Cloud Build for Mercurial
- Utilizar Apache Subversion (SVN) con Unity Cloud Build
- Using the Unity Developer Dashboard to configure Unity Cloud Build for Perforce
- Using the Unity Editor to configure Unity Cloud Build for Perforce
- Construyendo para iOS
- Opciones Avanzadas
- Manifest de la construcción
- Cloud Build REST API
- Unity IAP
- Configurando el Unity IAP
- Guia Multi Plataforma
- Codeless IAP
- Definiendo productos
- Subscription Product support
- Inicialización
- Mirando Metadata del Producto
- Iniciando Compras
- Procesando Compras
- Manejando fallas en las compras
- Recuperando Transacciones
- Recibos de Compra
- Validación de Recibo
- Extensiones de la Store (tienda)
- Cross-store installation issues with Android in-app purchase stores
- Guías de Tiendas
- Implementando una Tienda
- IAP Promo
- Unity Collaborate
- Configurando Unity Collaborate
- Agregar miembros del equipo a su Proyecto de Unity
- Ver el historial
- Habilitando Cloud Build con Collaborate
- Gestión de versiones del ediitor de Unity
- Revirtiendo archivos
- Resolviendo conflictos de archivo
- Excluding Assets from publishing to Collaborate
- Publicar archivos individuales a Collaborate
- Restoring previous versions of a project
- Notificaciones de edición en progreso
- Managing cloud storage
- Moving your Project to another version control system
- Consejos para solucionar problemas de Collaborate
- UnityCloudDiagnostics
- Unity Integrations
- Servicios Multiplayer
- XR
- XR SDKs
- Google VR
- Vuforia
- Windows Mixed Reality
- Input XR de Unity
- XR API reference
- Mixed Reality Devices
- Visión General de VR (Realidad Virtual)
- Dispositivos de VR (Realidad Virtual)
- Single Pass Stereo rendering (Double-Wide rendering)
- VR Audio Spatializers
- XR SDKs
- Repositorios Open-source
- Cómo contribuir a Unity
- Paso 1: Obtener una cuenta de Bitbucket
- Paso 2: Fork el repositorio al cual usted quiere contribuir
- Step 3: Clone Su Fork
- Paso 4: Aplique las modificaciones a su fork
- Paso 5: Abra una solicitud Pull en Bitbucket
- Paso 6: Espere al Feedback (retroalimentación)
- Lecturas Adicionales
- FAQ (Preguntas más frecuentes)
- Cómo contribuir a Unity
- Publicando en la Asset Store
- Indicaciones Específicas de Plataforma
- Standalone
- macOS
- Apple TV
- WebGL
- WebGL Player Settings
- Empezar con el desarrollo de WebGL
- Compatibilidad del navegador con WebGL
- Building and running a WebGL project
- WebGL: Deploying compressed builds
- Debugging and troubleshooting WebGL builds
- Gráficas WebGL
- WebGL Networking (redes)
- Utilizando Audio en WebGL
- Consideraciones de rendimiento WebGL
- Consideraciones de Memoria cuando tenga como objetivo WebGL
- WebGL: Interacting with browser scripting
- Utilizando plantillas WebGL
- Bloqueo del cursor y modo de pantalla completa en WebGL
- Input en WebGL
- iOS
- Iniciando con desarrollo iOS
- iOS Player Settings
- iOS 2D Texture Overrides
- Upgrading to 64-bit iOS
- Temas Avanzados de iOS
- Características actualmente no soportadas por Unity iOS.
- Troubleshooting en dispositivos iOS
- Reportando bugs de falla en iOS
- Android
- Empezar con el desarrollo de Android
- Android environment setup
- Unity Remote
- Android Remote (OBSOLETO)
- Troubleshooting Android development
- Inside the Android build process
- Reporting crash bugs under Android
- Support for APK expansion files (OBB)
- Scripting para Android
- Construyendo y utilizando plug-ins para Android
- Personalizando una Pantalla de Bienvenida (Splash Screen) en Android
- Un Solo Pase de Stereo Rendering para Android
- Ajustes del Android Player
- Android 2D Textures Overrides
- Gradle for Android
- Android Manifest
- Empezar con el desarrollo de Android
- Windows
- Windows General
- Universal Windows Platform
- Cómo empezar
- Universal Windows Platform: Deployment
- Universal Windows Platform: Profiler
- Universal Windows Platform: Command line arguments
- Universal Windows Platform: Association launching
- Clase AppCallbacks
- Universal Windows Platform: WinRT API in C# scripts
- Universal Windows Platform Player Settings
- Backends de Scripting (programación)
- FAQ (Preguntas más frecuentes)
- Universal Windows Platform: Ejemplos
- Universal Windows Platform: Code snippets
- Known issues
- Web Player (reproductor web)
- Lista de Verificación para Desarrolladores en Móviles
- Experimental
- Tópicos de legado
- Windows Store: Windows SDKs
- Servidor de Assets (Recursos) (Licencia de Equipo)
- Guía Legacy de referencial del Network
- Conceptos de Networking de Alto Nivel (Legacy -Depreciado)
- Elementos de redes en Unity (Legacy)
- Network Views (Legacy)
- Detalles RPC (Legacy)
- State Synchronization Details (Legacy)
- Network Instantiate (Legacy)
- Network Level Loading (Legacy)
- Master Server (Legacy)
- Minimizando el Ancho de Banda de la Red (Legacy)
- Asset Bundles Legacy (Viejos)
- Legacy Animation System
- GUI Anterior
- Legacy Unity Analytics (Flujo de trabajo SDK)
- LegacyUnityRemote (UnityRemote legacy)
- Guía de mejores prácticas
- Expert guides
- New in Unity 2018.1
- Packages Documentation
- Unity User Manual (2018.1)
- 2D
- Sprites
- Sprite Atlas
Sprite Atlas
Sprite Atlas is an asset
Sprite Atlas is created via the menu option in the Editor and will stay as an asset in the project’s folder (*.spriteatlas).
Unified Settings
Sprite Atlas asset provides a set of texture settings for the packed texture. Regardless what was the texture settings of the sprite being pack in an atlas, the result atlas texture will only respect the settings in the atlas asset.
Runtime access
Sprite Atlas asset has a runtime representation which can be accessed during Runtime.
Variants
User will be able to create another Sprite Atlas asset and declared it is a variant of one existing Sprite Atlas in the project. It then will duplicate the master’s atlas texture and resize it according to a multiplier.
Sprite Packer Settings
The Sprite Packer is disabled by default but you can configure it from the Editor settings (go to Edit > Project Settings > Editor). You can change the sprite packing mode from Disabled to either:
- Enabled for Builds, when you want to use packing for builds only and not when in Play mode.
- Always Enabled when you want the packed Sprite to resolve its texture from the Sprite Atlas during Play mode, but resolve its texture from the original Texture during Edit mode.
Use Always Enabled when testing packed Sprites loaded from an Asset Bundle during Play mode.
How to create a Sprite Atlas
The Sprite Atlas is a type of Asset in Unity projects. You can create them, and they are ready to use, via the Project View. To create a Sprite Atlas select Asset -> Create -> Sprite Atlas from the main menu.
Propiedades
| Propiedad | Función |
|---|---|
| Type | Sets the type of atlas to be either a Master or Variant Atlas. |
| Include in build | Always includes the Atlas Asset in the build. |
| Allow Rotation | Allows sprites to be rotated for packing |
| Tight Packing | Non-rectangle packing |
| Read/Write Enabled | Set this to true if you want texture data to be readable from scripts. Set it to false to prevent scripts from reading texture data. |
| Generate Mip Maps | Seleccione esto para habilitar la generación mip-map. Los Mip maps son versiones más pequeñas de la Textura que será utilizada cuando la Textura es muy pequeña en la pantalla. |
| Filter Mode | Select how the Texture is filtered |
| Platform-specific overrides panel | Use the Platform-specific overrides panel to set default options (using Default), and then override them for a specific platform using the buttons along the top of the panel. https://docs.unity.cn/Manual/class-TextureImporterOverride.html |
| Objects For Packing | The objects to be included in the packed Atlas. Folders, Textures or individual sprites can be added to the list. |
Assigning assets to be atlased
Folders, Textures or Sprites can be assigned to the Sprite Atlas. Entire folders can be assigned to the Sprite Atlas asset, all Textures within that folder including subfolders will be packed. When assigning an individual Texture, all defined sprites will be included. Single sprites can also be assigned to the atlas and other sprites within the same Texture will not be considered.
To include assets to be atlased, select the Atlas asset and add them by either adding new entry to the list or dragging and dropping them from the Project onto the list area in the inspector. You can add the folders, textures, sprites to the atlas.
Set the desired settings for the generated atlas. Changes to the setting will always mark this atlas as modified and will be packed again during the packing phase.
The packed atlas can be previewed by pressing the “Pack Preview” button in the inspector. This will trigger a packing for this atlas. Once the packing is done, the texture will appear in the preview section.
All atlases with modified settings will be packed before entering Play Mode (if Always Enabled is selected).
Down-scaled variant (HD/SD)
User will be able to create another Sprite Atlas asset and declare it is a variant of an existing Sprite Atlas in the project. It will then duplicate the Master’s atlas texture and resize it according to a multiplier.
Creating a Sprite Atlas variant
Set the Type for the Sprite Atlas to Variant.
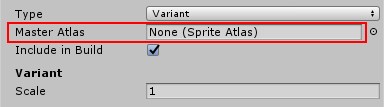
Assign an atlas to the Master Atlas slot.
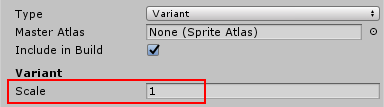
Set the scaling factor for the variant. Value can be from 0.1 to 1.
To bind the variant atlas as default instead of the master, just check the “Include in build” option in the variant and uncheck the option in master.
Checking both will randomly include one of the atlas (master/variant). You might want to uncheck both to have late binding, mentioned below.
Runtime sprites enumeration
Create a custom component that takes a “SpriteAtlas” as a variable.
Assign any of your existing Sprite Atlas to the field.
Enter play mode or run the player.
Access the variable and notice you can now call the property “.GetSprites” to get the array of Sprites packed in this atlas.
Late Binding
A Sprite can be started in runtime as “packed but not referencing any atlas” and will appear blank until an atlas is bound to it. The benefit of this behaviour is to allow user to have chance to do late binding if the source of the atlas is not available during startup e.g. asset bundles downloaded from the web.
Late Binding via callback
As long as the Sprite is packed into any Sprite Atlas but the sprite atlas is not bound as default (e.g. unchecked “Include in build” option) the Sprite will be invisible in the scene.
User can listen to callback SpriteAtlas.atlasRequested.
This delegate method will provide a tag of atlas which suppose to bind and a System.Action which takes in a SpriteAtlas asset. User is expected to load the asset by any mean (script references, Resources.load, Asset bundle) and supply the asset to the System.Action.
2017–05–26 Page published with no editorial review
New in Unity 2017.1 NewIn20171
Copyright © 2023 Unity Technologies
优美缔软件(上海)有限公司 版权所有
"Unity"、Unity 徽标及其他 Unity 商标是 Unity Technologies 或其附属机构在美国及其他地区的商标或注册商标。其他名称或品牌是其各自所有者的商标。
公安部备案号:
31010902002961