Grid snapping
Unity provides a visual grid in the Editor’s SceneA Scene contains the environments and menus of your game. Think of each unique Scene file as a unique level. In each Scene, you place your environments, obstacles, and decorations, essentially designing and building your game in pieces. More info
See in Glossary view window, which can help precisely align GameObjectsThe fundamental object in Unity scenes, which can represent characters, props, scenery, cameras, waypoints, and more. A GameObject’s functionality is defined by the Components attached to it. More info
See in Glossary by snapping (moving) them to the nearest grid location.

You can snap a GameObject to a grid projected along the X, Y, or Z axes in several ways:
- Align selected GameObjects to the nearest grid point.
- Turn on grid snapping while you move, rotate, or scale a GameObject.
You can also transform a GameObject in increments without aligning it with the gridlines. If you need to change how much you are moving, rotating, or scaling, you can change the increment snap values.
By default, the grid is hidden, but you can make it visible and switch which axis it appears along. You can customize the grid in appearance and behavior by changing the following:
- The size of the grid (adjust the distance between the lines).
- The color of the grid lines themselves.
- How transparent or opaque the grid lines appear.
- The position of the grid in the Scene viewAn interactive view into the world you are creating. You use the Scene View to select and position scenery, characters, cameras, lights, and all other types of Game Object. More info
See in Glossary window (move it closer or farther).
Many of these actions support keyboard shortcuts. You can see which key combinations are assigned to these actions and use the Shortcuts Manager to customize them.
Grid and Snap toolbar Overlay
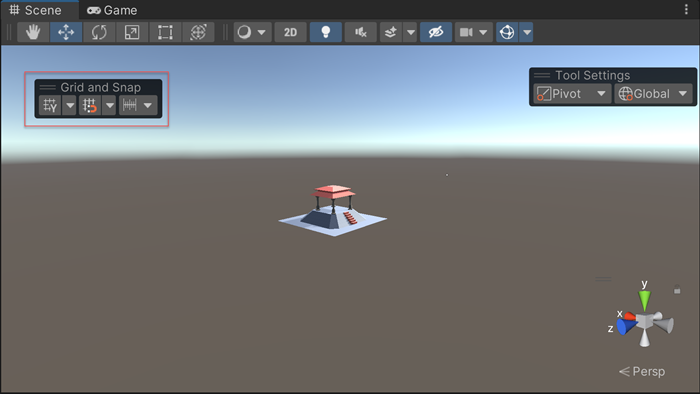
| Icon | Actions |
|---|---|
|
|
Toggle grid on or off Change grid axis Change grid opacity Move grid to gizmo handle or back to origin |
|
|
Toggle grid snapping on or off Change grid size Align a GameObject to an axis |
|
|
Change the default increment snap values |
Note: The settings on the Grid and Snap Overlay are global to all Scene views.
Align, snap, and incremental movements
This section provides information on how to perform these actions:
Align (push) to the grid
You can align a GameObject to either the closest grid point on a single axis, or on all axes at once.
To align a GameObject to the closest point on a grid for a specific axis:
In the Grid and Snap Overlays toolbarA row of buttons and basic controls at the top of the Unity Editor that allows you to interact with the Editor in various ways (e.g. scaling, translation). More info
See in Glossary, open the grid snapping drop-down menu ( ).
).-
In the Align Selected section, click the X, Y, or Z button that matches the axis you want to push to.
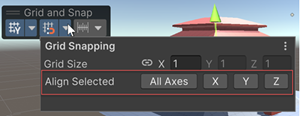
Align Selection to Grid section of the Grid and Snap window
To align a GameObject on all axes at once:
Select the GameObject(s) you want to align to the grid.
-
Use the Ctrl+\ (Windows) or Cmd+\ (macOS) shortcut to push the GameObject(s) onto the grids on all axes.
Alternatively, from the Grid and Snap Overlays toolbar, open the grid visibility drop-down menu (
 ) and in the Align Selected section, click All Axes.
Activate auto-snapping
To turn on automatic snapping to the grid:
- Activate the Move tool and make sure the handle orientation in the Tool Settings Overlay is set to Global (
 ).
). - Click the grid snapping icon (
 ) in the Grid and Snap toolbar Overlay. The icon is blue when activated.
When you enable automatic grid snapping, the Move, Rotate, and Scale transform tools snap the selected GameObject(s) to the grid along the active gizmoA graphic overlay associated with a GameObject in a Scene, and displayed in the Scene View. Built-in scene tools such as the move tool are Gizmos, and you can create custom Gizmos using textures or scripting. Some Gizmos are only drawn when the GameObject is selected, while other Gizmos are drawn by the Editor regardless of which GameObjects are selected. More info
See in Glossary axis. If you need the GameObject to move in smaller increments, you can also transform it incrementally.
Move, rotate, and scale in increments
To move, rotate, or scale by increment snap values:
- Hold down the Control key (Windows) or Command key (macOS) while using one of the transform gizmos.
To change the default increment snap values:
From the Grid and Snap Overlays toolbar, open the snap increment drop-down menu (
 ).
).-
The Increment Snap section contains several properties that let you set the same value for all axes or different values:

Increment Snap section of the Grid and Snap window Move: With the link icon selected, enter a uniform increment snap value for all axes, or unlink the axes and set different increment snap values in the X, Y, and Z axis properties.
Rotate: Enter a rotation increment value in degrees.
Scale: Enter a scale increment value as a scale factor. For example, if the Scale value is 2, the selected GameObject will scale at an increment of twice its original size.
Customize the grid
This section provides information on customizing the following:
- Show and hide grid lines
- Change the axis where the grid appears
- Resize the grid
- Change the default color of the grid lines
- Change the opacity of the grid
- Move the grid to the handle of a GameObject
- Reset values and settings to default
Show and hide grid lines
Toggle grid visibility by clicking the grid visibility icon (![]() ) on the Grid and Snap Overlay toolbar to display or hide the grid on any axis (X, Y, Z). If you are in orthographic mode (Iso), Unity chooses the view.
) on the Grid and Snap Overlay toolbar to display or hide the grid on any axis (X, Y, Z). If you are in orthographic mode (Iso), Unity chooses the view.
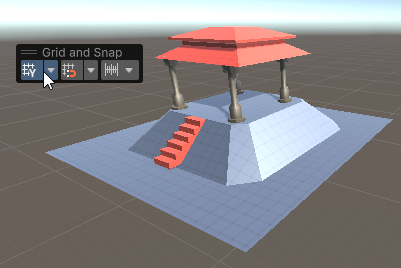
Change the axis where the grid appears
To change which axis the grid appears on:
From the Grid and Snap Overlays toolbar, open the grid visibility drop-down menu (
 ).
).-
From the Grid Plane section, select the axis you want to appear.
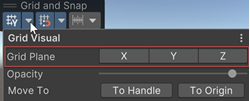
The Grid Axis section under the grid visibility drop-down menu
Resize the grid
You can set the size of the gridlines as they appear in the Scene view window. This affects the appearance of the grid and how your GameObjects automatically snap to the grid, but doesn’t affect how much your GameObject(s) move, rotate, or scale in increments.
If you set a size for all axes at once, a uniform (square-based) grid appears. However, you can also use different values on any of the three axes to see a non-uniform (rectangular-based) grid. By default, the grid is set to a uniform distance (1 on all axes).
To resize the grid:
From the Grid and Snap Overlays toolbar, open the snap increment drop-down menu (
 ).
).-
Use the Size property with the link icon selected to enter a uniform value for the visual grid (all grid lines the same length), or unlink the axes and specify a non-uniform distance between the grid lines for the X, Y, and Z.
For example, to create a rectangular grid on the x and y axes, unlink the axes and set X and Y to 1, and set Z to 2.
-
If you want to switch back to a uniform value between the grid lines:
- Select the link icon.
- The Size property now displays the value of all axes with the value entered in X.
Note: You can also use the keyboard shortcuts to increase and decrease the size of the grid:
- To increase the grid size, use Ctrl+] (Windows) or Command+] (macOS).
- To decrease the grid size, use Ctrl+[ (Windows) or Command+[ (macOS).
Change the default color of the grid lines
To change the color of the visible grid lines in the Scene view window:
Open the Unity Preferences page (go to Edit > Preferences on Windows or Unity > Preferences on macOS).
-
Click on the Colors category from the list to see the Colors page.
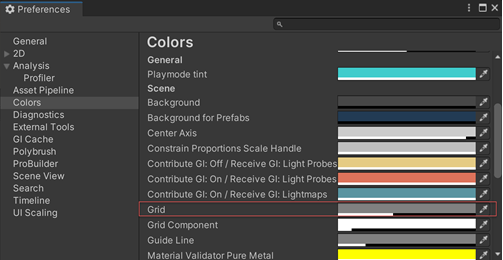
The grid preference properties on the Preferences page Select a new color using the Grid property’s color picker.
Change the opacity of the grid
If the grid lines are too light or too dark, you can adjust them:
From the Grid and Snap Overlays toolbar, open the grid visibility drop-down menu (
 ).
).-
Adjust the Opacity using the slider.
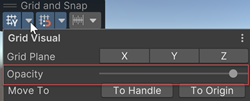
Adjust opacity in the grid visibility drop-down menu
Move the grid to the handle of a GameObject
From the grid visibility drop-down menu (![]() ) in the Grid and Snap Overlay toolbar, use the Move To section to move the grid to the handle of the selected GameObject (Handle) or back to the default position (Origin).
) in the Grid and Snap Overlay toolbar, use the Move To section to move the grid to the handle of the selected GameObject (Handle) or back to the default position (Origin).
Reset values and settings to default
To reset the grid axis and opacity settings to their defaults:
From the Grid and Snap Overlays toolbar, open the grid visibility drop-down menu (
 ).
).Click the More menu (⋮) and then click Reset.
To reset the size of the grid to the default:
From the Grid and Snap Overlays toolbar, open the grid snapping drop-down menu (
 ).
).Click the More menu (⋮) and then click Reset.
To reset the increment snap values to the default:
From the Grid and Snap Overlays toolbar, open the snap increment drop-down menu (
 ).
).-
Click the More menu (⋮) and then click Reset.
Only the values under the Increment Snap section return to their original default values.
Shortcut defaults
You can perform the following actions with these default Unity shortcuts:
| Action | Default shortcut |
|---|---|
| Increase Grid Size |
Ctrl+] (Windows) or Command+] (macOS) |
| Decrease Grid Size |
Ctrl+[ (Windows) or Command+[ (macOS) |
| Push to Grid (Align Selection to Grid) |
Ctrl+\ (Windows) or Command+\ (macOS) |
| Reset Grid | (no shortcut by default) |
To change these default keyboard shortcuts, use the Shortcuts Manager.