- Unity User Manual (5.6)
- 特定于平台的信息
- 独立平台
- 独立平台播放器设置 (Standalone Player Settings)
独立平台播放器设置 (Standalone Player Settings)
本页面将详细介绍独立平台(Mac OSX、Windows 和 Linux)特有的__播放器设置 (Player Settings)__。可在此处找到常规 Player Settings 的说明。
Resolution And Presentation
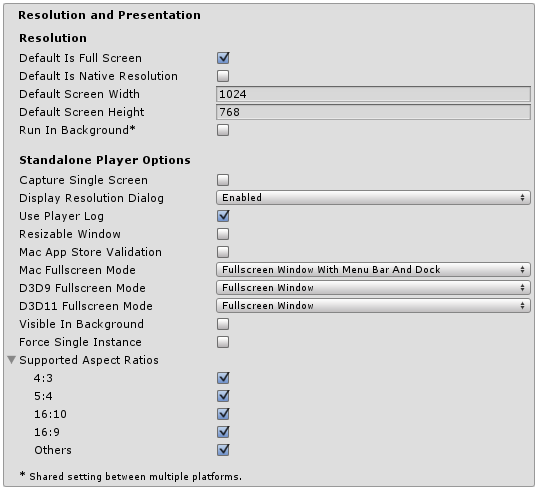
| 属性: | 功能: | |
|---|---|---|
| Resolution | ||
| Default is Full Screen | 选中此框可使游戏在默认情况下以全屏模式启动。 | |
| Default Is Native Resolution | 选中此框可使游戏使用目标机器上使用的默认分辨率。 | |
| Default Screen Width | 游戏画面的默认宽度(以像素为单位)。 | |
| Default Screen Height | 游戏画面的默认高度(以像素为单位)。 | |
| Run in background | 选中此框可在应用程序失去焦点时让游戏继续运行(而不是暂停)。 | |
| Standalone Player Options | ||
| Capture Single Screen | 选中此框可确保全屏模式下的独立平台游戏不会使多显示屏设置中的辅助显示屏变暗。Mac OS X 上不支持该功能。 | |
| Display Resolution Dialog | 选择游戏是否应先显示对话框让用户选择屏幕分辨率。提供的选项为 Disabled、Enabled 和 Hidden by Default__(即只有在启动时按下 Alt 键才会出现该选项)。 | |Use Player Log__ | 选中此框可向日志文件写入调试信息。如果计划将应用程序提交到 Mac App Store,请不要勾选此选项。默认情况下会勾选。 |
| Resizable Window | 选中此框可允许用户调整独立平台播放器窗口的大小。 | |
| Mac App Store Validation | 选中此框可启用 Mac App Store 的收据验证。 | |
| Mac Fullscreen Mode | 选择全屏模式在 MacOSX 上的运行方式。提供的选项为 Capture Display__(即 Unity 接管整个显示屏,用户无法切换应用程序,直到退出全屏模式)、Fullscreen Window__ 和 Fullscreen Window with Menu Bar and Dock。 | |
| D3D9 FullScreen Mode | Choose the fullscreen mode when using DirectX 9. | |
|         Exclusive Mode | 将默认全屏模式设置为包含整个屏幕,而不包含四周窗口。 | |
|     Fullscreen Window | 全屏时将游戏保持在窗口中。更好地让游戏在后台运行。 | |
|         Exclusive Mode | 将默认全屏模式设置为包含整个屏幕,而不包含四周窗口。 | |
|     Fullscreen Window | 全屏时将游戏保持在窗口中。更好地让游戏在后台运行。 | |
| Visible in Background | 如果使用全屏窗口模式(在 Windows 中),选中此框可在后台显示应用程序。 | |
| Force Single Instance | 选中此框可将独立平台播放器限制为单个并发运行实例。 | |
| Supported Aspect Ratios | 选择游戏启动时出现在分辨率对话框中的宽高比(只要用户的显示屏支持这些宽高比设置)。 | |
Icon
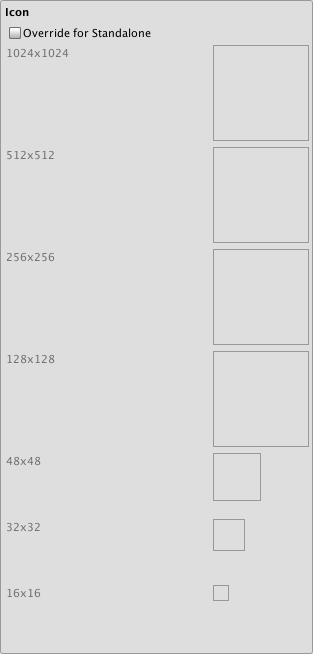
| 属性: | 功能: |
|---|---|
| Override for Standalone | 选中此框可指定用于独立平台游戏的自定义图标。应上传不同大小的图标来填充此复选框下方的每个方块。 |
Splash Image

| 属性: | 功能: |
|---|---|
| Config Dialog Banner | 添加要在 Display Resolution Dialog 中显示的自定义启动画面。 |
| Show Unity Splash Screen | 加载游戏时显示“Made with Unity”启动画面。 |
Other Settings
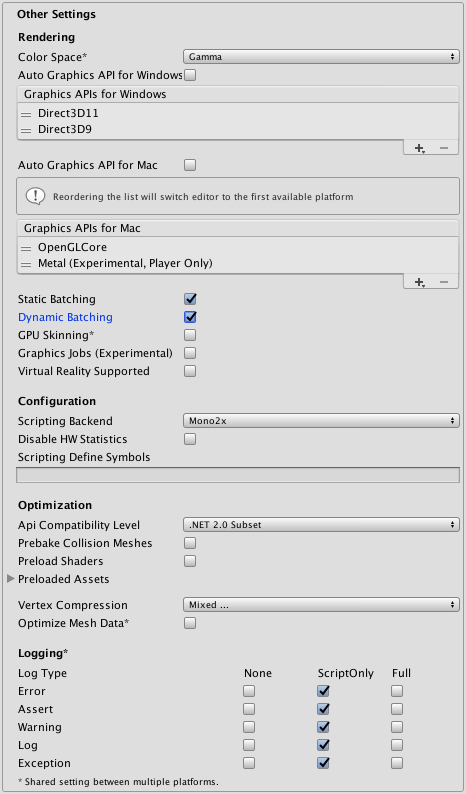
| 属性: | 功能: |
|---|---|
| 渲染 | |
| Color Space | 选择应该用于渲染的颜色空间。提供的选项为 Gamma 和 Linear。请参阅 Unity 手册的线性渲染页面以了解这两者之间的区别。 |
| Auto Graphics API for Windows | 选中此框可在运行游戏的 Windows 计算机上使用最佳图形 API。取消选中此框可添加和删除支持的图形 API。 |
| Auto Graphics API for Mac | 选中此框可在运行游戏的 Mac 上使用最佳图形 API。取消选中此框可添加和删除支持的图形 API。 |
| Auto Graphics API for Linux | 选中此框可在运行游戏的 Linux 计算机上使用最佳图形 API。取消选中此框可添加和删除支持的图形 API。 |
| Static Batching | 选中此框可使用静态批处理。 |
| Dynamic Batching | 选中此框可使用动态批处理(默认情况下激活此选项)。 |
| GPU Skinning | 选中此框可启用 DX11/ES3 GPU 蒙皮。 |
| Graphics Jobs (Experimental) | 选中此框可指示 Unity 将图形任务(渲染循环)卸载到在其他 CPU 核心上运行的工作线程。此功能旨在减少主线程上 Camera.Render 所花费的时间,该时间通常成为瓶颈。请注意,此功能是实验性的功能,可能无法为项目带来性能提升,并可能引入新的崩溃。 |
| Virtual Reality Supported | Check this box when building a Virtual Reality application. See VR Overview for more information. |
| Configuration | |
| Scripting Backend | Mono2x 是独立平台上唯一支持的脚本后端。 |
| Disable HW Statistics | 选中此框可指示应用程序不要将有关硬件的信息发送到 Unity(请参阅 Unity 硬件统计信息 (Unity Hardware Statistics) 页面以了解更多详细信息)。 |
| Scripting Define Symbols | 使用此属性可设置自定义的编译标志(请参阅平台相关的编译页面以了解更多详细信息)。 |
| Optimization | |
| API Compatibility Level | API 兼容性级别有两个选项:.Net 2.0 或 .Net 2.0 Subset。 |
|         .Net 2.0 | .Net 2.0 库。最高的 .net 兼容性,最大的文件大小。 |
|         .Net 2.0 Subset | 完整 .net 兼容性的子集,最小的文件大小。 |
| Prebake Collision Meshes | 选中此框可在构建时将碰撞数据添加到网格。 |
| Preload Shaders | 选中此框可在播放器启动时加载着色器。 |
| Preloaded Assets | 设置播放器启动时要加载的一组资源。 |
| Vertex Compression | 可为每个通道设置顶点压缩。例如,可选择为除位置和光照贴图 UV 之外的所有内容启用压缩。每个导入对象的整个网格压缩集将覆盖对象的顶点压缩(如果已设置),而其他所有内容将遵循此处设置的顶点压缩选项/通道。 |
| Optimize Mesh Data | 选中此框可从网格中删除应用于网格的材质不需要的所有数据(例如切线、法线、颜色、UV)。 |
API Compatibility Level
可为所有目标选择 mono API 兼容性级别。有时,第三方 .net dll 将使用您想要使用的 .net 兼容性级别之外的内容。为了解在这种情况下可能发生的问题以及如何以最佳方案修复问题,请安装适用于 Windows 的“Reflector”。
1.将相关 API 兼容性级别的 .net 程序集拖到 Reflector 中。这些程序集位于 Frameworks/Mono/lib/mono/YOURSUBSET/ 1.拖入第三方程序集。 1.右键单击第三方程序集并选择“Analyze”。 1.在分析报告中,检查“Depends on”部分。在此部分将以红色突出显示第三方程序集所依赖的但在您选择的 .net 兼容性级别中不可用的任何内容。
详细信息
自定义分辨率对话框
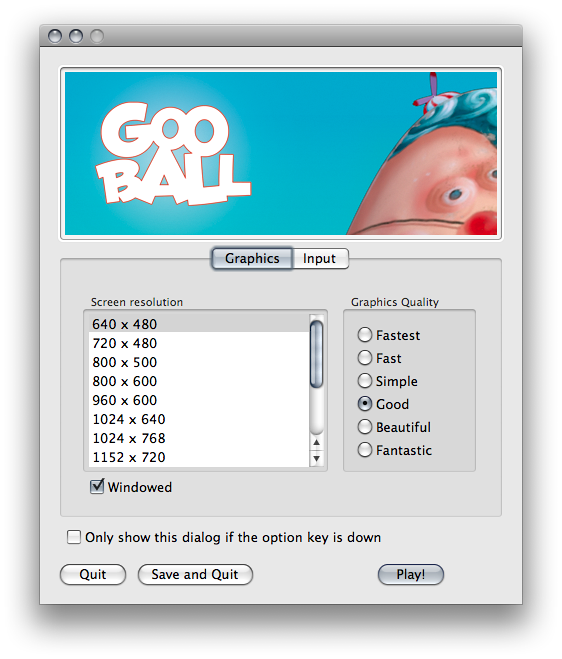
可选择将自定义横幅图像添加到独立平台播放器中的屏幕分辨率对话框中。最大图像大小为 432 x 163 像素。图像不会放大适应屏幕选择器,而是会自动居中并裁剪。
发布到 Mac App Store
Use Player Log 属性允许将调试信息写入日志文件。这对于调查游戏问题很有用。但是,在为 Apple 的 Mac App Store 发布游戏时,需要禁用此功能,因为如果启用此功能,Apple 可能会拒绝您提交。有关日志文件的更多信息,请参阅 Unity 手册日志文件页面。
Use Mac App Store Validation 属性可启用 Mac App Store 的收据验证。如果启用此属性,则只有当游戏包含来自 Mac App Store 的有效收据时才会运行。将游戏提交给 Apple 以便在 App Store 上发布时,应使用此功能。这样可以防止用户不在购买游戏的计算机上而在另一台计算机上运行游戏。请注意,此功能不实现任何强大的复制保护。特别需要说明的是,针对一个 Unity 游戏的任何潜在破解都将对所有其他 Unity 内容有效。因此,建议使用 Unity 的插件功能在此基础上实现您自己的收据验证代码。但是,由于 Apple 要求在显示屏幕设置对话框之前的最初阶段进行插件验证,因此您仍应启用此检查,否则 Apple 可能会拒绝您的提交。
Windows Store Apps
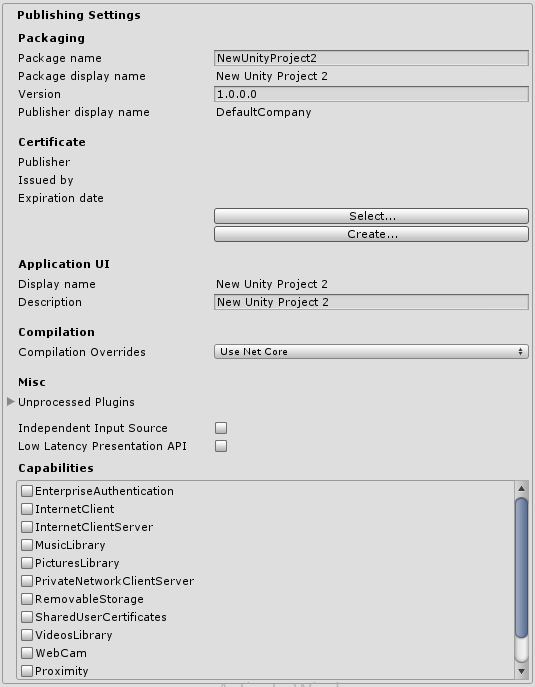
Most of these settings are transferred to Package.appxmanifest when creating Visual Studio solution for the first time.
Note: If you build your project on top of the existing one, Unity won’t overwrite Package.appxmanifest file if it’s already present, so check for this if you change something in Player Settings. If you want Package.appxmanifest to be regenerated, simply delete it and rebuild your project from Unity.
To read more about App package manifest, see the Windows Dev Center App package manifest page.
Any settings you choose in Packaging, Application UI, Tile, Splash Screen and Capabilities directly transfer to settings in the Package.appxmanifest file.
Certificate
Every Windows Store App needs a certificate which identifies a developer. Unity creates a default certificate if you don’t provide your own.
Compilation
Unity uses Mono when compiling script files, and you can use the API located in .NET 3.5. Compilation Overrides allows you to use .NET for Windows Store Apps (also known as .NET Core) in your C# files. The API is available from the Windows Dev Center.
There are three options to choose from in Compiler Overrides:
| 属性: | 功能: |
|---|---|
| None | C# files are compiled using Mono compiler. |
| Use .Net Core | C# files are compiled using Microsoft compiler and .NET Core. You can use Windows Runtime API, but classes implemented in C# files aren’t accessible from JS. |
| Use .Net Core Partially | C# files not located in Plugins, Standard Assets or Pro Standard Assets folders are compiled using Microsoft compiler and .NET Core. All other C# files are compiled using Mono compiler. The advantage here is that classes implemented in C# are accessible from JS. |
Note: You won’t be able to test .NET Core API in Unity Editor, because it doesn’t have access to .NET Core. You’ll only be able to test the API when running the Windows Store App.
Note: You cannot use .NET Core API in JS.
Here’s a simple example of how to use .NET Core API in scripts.
    string GetTemporaryFolder()
    {
    #if NETFX_CORE
        return Windows.Storage.ApplicationData.Current.TemporaryFolder.Path;
    #else
        return "LocalFolder";
    #endif
    }
Plugins
The property Unprocessed Plugins contains a list of plugins which are ignored by Unity’s preprocessing tools (like SerializationWeaver and AssemblyPreprocessor). Usually you don’t need to modify this list, unless you’re getting an error that Unity has failed to preprocess your plugin.
What happens if you add a plugin to this list?
Unity won’t inject additional IL code into your assembly used for serialization purposes. If your plugin isn’t referencing UnityEngine.dll, that’s fine, because Unity won’t serialize any data from your plugin.
Independent Input Source
The property Independent Input Source essentially gives you the ability to make your input more responsive. Learn more on the Windows Dev Center SwapChainPanel.CreateCoreIndependentInputSource class page.
Low Latency Presentation API
The property Low Latency Presentation API essentially creates a D3D11 swapchain with a DXGI\_SWAP\_CHAIN\_FLAG\_FRAME\_LATENCY\_WAITABLE_OBJECT flag, and can increase input responsiveness. Learn more on the Windows Dev Center DXGI_SWAP_CHAIN_FLAG enumeration page. This option is disabled by default because on hardware with older GPU drivers, this option makes game laggy, if you enable this option - be sure to profile your game if the performance is still acceptable.
Capabilities
These options are directly copied to Package.appxmanifest.
Note: If you’re building your game on top of a previous package, Package.appxmanifest won’t be overwritten, so check for this if you change something in Player Settings.