- Unity User Manual 2021.2
- プラットフォーム特有の情報
- Linux
- Linux Player 設定
Linux Player 設定
このページでは、Linux プラットフォームに特化した Player 設定について説明します。一般的な Player 設定の説明は、Player 設定を参照してください。

以下のセクションのプロパティが説明されています。
- Icon (アイコン)
- Resolution and Presentation (解像度と表示)
- Splash Image (スプラッシュ画像)
- Other Settings (その他の設定)
Icon
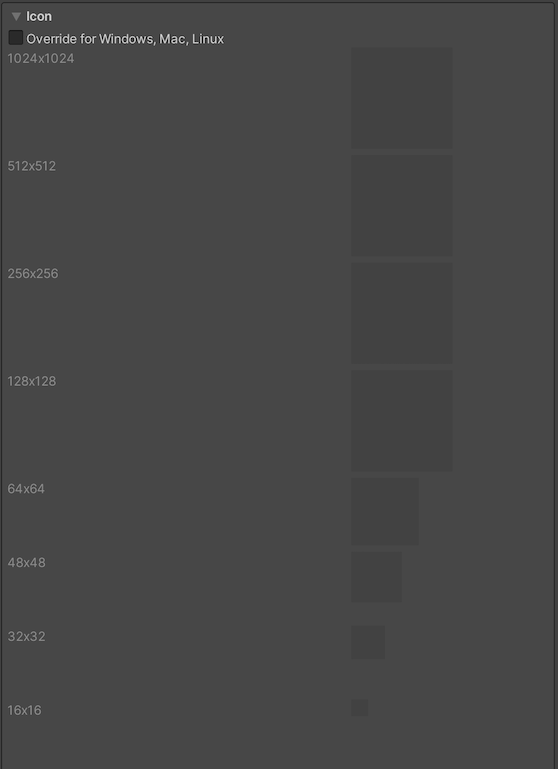
デスクトップゲームにカスタムアイコンを割り当てるには、Override for Windows, Mac, Linux 設定を有効にします。それぞれの四角に合ったさまざまなサイズのアイコンをアップロードできます。
Resolution and Presentation
Resolution and Presentation (解像度と表示) セクションの Resolution と Standalone Player Options を使用して、画面の表示をカスタマイズします。
Resolution
このセクションでは、スクリーンモードとデフォルトサイズをカスタマイズできます。

| プロパティ | 機能 | |
|---|---|---|
| Fullscreen Mode | 全画面のモードを選択します。起動時のデフォルトの画面モードを定義します。 | |
| Fullscreen Window | アプリケーション画面をディスプレイの全画面表示のネイティブの解像度に設定します。Unity は、スクリプトによって (または、ビルドされたアプリケーションを起動する時のユーザーの選択によって) 設定された解像度でアプリケーションコンテンツをレンダリングしますが、画面を満たすためにスケールします。スケールすると Player 設定で選択されたアスペクト比に一致させるために、黒い帯がレンダリングされた画像に加えられます。そのため、コンテンツは引き伸ばされません。この処理は レターボックス と呼ばれます。 | |
| Exclusive Fullscreen (Windows only) | アプリケーション画面を全画面表示で使用するように設定します。Fullscreen Window とは異なり、このモードは、アプリケーションが選択した解像度に合わせて、ディスプレイの OS 解像度を変更します。このオプションは Windows でのみサポートされます。他のプラットフォームでは、Fullscreen Window が代替として使用されます。 | |
| Maximized Window (Mac only) | オペレーティングシステムの “最大” の定義と同様の値にアプリケーション画面を設定します。つまり、macOS では、メニューバーとドックが自動的に非表示になる全画面表示を意味します。このオプションは macOS でのみサポートされています。他のプラットフォームでは、Fullscreen Window が代替として使用されます。 | |
| Windowed | アプリケーション画面を標準の、全画面表示ではない、移動可能な画面に設定します。画面サイズはアプリケーションの解像度に依存します。このモードでは、画面はデフォルトでサイズ変更可能です。これを無効にするには、Resizable Window 設定を無効にします。 | |
| Default Is Native Resolution | このオプションを有効にすると、ターゲットマシン上で使用されるデフォルトの解像度を使用します。Fullscreen Mode が Windowed に設定されている場合、このオプションは使用できません。 | |
| Default Screen Width | ゲーム画面のデフォルトの幅をピクセル単位で設定します。このオプションは、Full Screen Mode が Windowed に設定されている場合にのみ使用できます。 | |
| Default Screen Height | ゲーム画面のデフォルトの高さをピクセル単位で設定します。このオプションは、Full Screen Mode が Windowed に設定されている場合にのみ使用できます。 | |
| Mac Retina Support | このオプションを有効にすると、Mac で DPI (Retina) の高い画面をサポートします。これはデフォルトで有効です。これにより、Retina ディスプレイのプロジェクトが強化されますが、リソースの負荷が高くなる場合もあります。 | |
| Run In background | Enable this option to have the game running in the background instead of pausing if the app loses focus. | |
Standalone Player Options
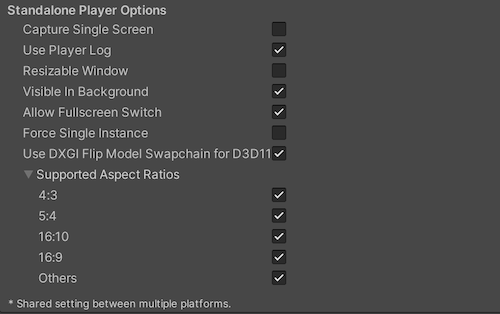
このセクションを使って、画面をカスタマイズできます。例えば、ユーザーが画面のサイズを変更できるかどうかや、同時に実行できるインスタンスの数などを決定できます。
| プロパティ | 機能 |
|---|---|
| Capture Single Screen | これを有効にすると、全画面モード のデスクトップゲームで、マルチモニター設定時に補助モニターが暗くならないようにします。Mac OS X ではサポートされていません。 |
| Use Player Log | これを有効にすると、デバッグ情報を含むログファイルを作成します。デフォルトは有効です。 注意 アプリケーションを Mac App Store に提出する場合は、このオプションを無効にします。詳細は、Mac App Store へ公開 を参照してください。 |
| Resizable Window | これを有効にすると、プレイヤーウィンドウサイズを変更できます。 注意 このオプションを無効にすると、アプリケーションは Fullscreen Mode の Windowed が使用できなくなります。 |
| Visible in Background | これを有効にすると、Windows で Fullscreen Mode の Windowed が使用されている場合に、アプリケーションを背景で表示します。 |
| Allow FullScreen Switch | これを有効にすると、デフォルトの全画面キーを押して全画面のモードと Windowed モードを切り替えることができます。 |
| Force Single Instance | これを有効にすると、デスクトッププレイヤーを 1 つの同時実行インスタンスに制限できます。 |
| Supported Aspect Ratios | 起動時に解像度ダイアログに表示したいアスペクト比を有効にします (ユーザーのモニターにサポートされている場合)。 |
Splash Image
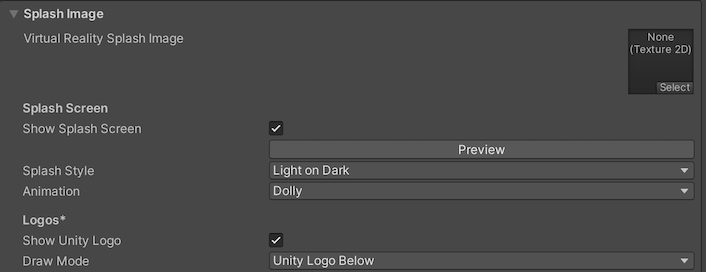
Virtual Reality Splash Image 設定を使用して、VR ディスプレイのカスタムスプラッシュ画像を指定します。一般的なスプラッシュスクリーン の設定については、スプラッシュスクリーン を参照してください。
Other Settings
Other Settings のセクションでは、以下のグループに分類されたさまざまなオプションをカスタマイズできます。
- Rendering (レンダリング)
- Vulkan Settings (Vulkan 設定)
- Mac App Store Options (Mac App Store オプション)
- Configuration (設定)
- Optimization (最適化)
- Logging (ログ)
- Legacy (古い機能)
Rendering
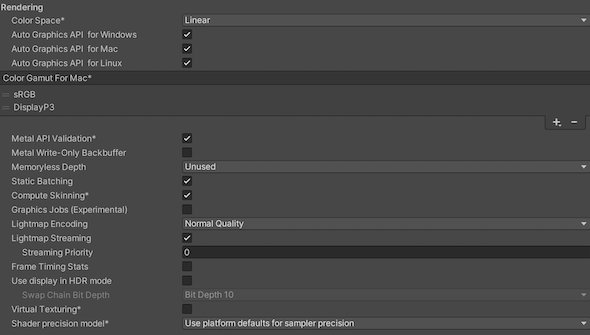
これらの設定を使用して、デスクトップ (Windows、Mac、Linux) プラットフォーム向けにゲームをレンダリングする方法をカスタマイズします。
| Property | Description | |
|---|---|---|
| Color Space | Choose which color space Unity uses for rendering: Gamma or Linear. See the Linear rendering overview for an explanation of the difference between the two. • Gamma: Gamma color space is typically used for calculating lighting on older hardware restricted to 8 bits per channel for the framebuffer format. Even though monitors today are digital, they might still take a gamma-encoded signal as input. • Linear: Linear color space rendering gives more precise results. When you select to work in linear color space, the Editor defaults to using sRGB sampling. If your Textures are in linear color space, you need to work in linear color space and disable sRGB sampling for each Texture. |
|
| Auto Graphics API for Windows | Enable this option to use the best Graphics API on the Windows machine the game is running on. Disable it to add and remove supported Graphics APIs. | |
| Auto Graphics API for Mac | Enable this option to use the best Graphics API on the Mac the game is running on. Disable it to add and remove supported Graphics APIs. | |
| Auto Graphics API for Linux | Enable this option to use the best Graphics API on the Linux machine it runs on. Disable it to add and remove supported Graphics APIs. | |
| Color Gamut for Mac | You can add or remove color gamuts for the Mac platform to use for rendering. Click the plus (+) icon to see a list of available gamuts. A color gamut defines a possible range of colors available for a given device (such as a monitor or screen). The sRGB gamut is the default (and required) gamut. | |
| Metal API Validation | Enable this option when you need to debug Shader issues. Note: Validation increases CPU usage, so use it only for debugging. |
|
| Metal Write-Only Backbuffer | Allow improved performance in non-default device orientation. This sets the frameBufferOnly flag on the back buffer, which prevents readback from the back buffer but enables some driver optimization. | |
| Memoryless Depth | Choose when to use memoryless render textures. Memoryless render textures are temporarily stored in the on-tile memory when rendered, not in CPU or GPU memory. This reduces memory usage of your app but you cannot read or write to these render textures. Note: Memoryless render textures are only supported on iOS, tvOS 10.0+ Metal and Vulkan. Render textures are read/write protected and stored in CPU or GPU memory on other platforms. |
|
| Unused | Never use memoryless framebuffer depth. | |
| Forced | Always use memoryless framebuffer depth. | |
| Automatic | Let Unity decide when to use memoryless framebuffer depth. | |
| Static Batching | Enable this option to use Static batching. | |
| Dynamic Batching | Enable this option to use Dynamic Batching on your build (enabled by default). Note: Dynamic batching has no effect when a Scriptable Render Pipeline is active, so this setting is only visible when nothing is set in the Scriptable Render Pipeline Asset Graphics setting. |
|
| Compute Skinning | Enable this option to enable DX11/ES3 GPU compute skinning, freeing up CPU resources. | |
| Graphics Jobs | Enable this option to instruct Unity to offload graphics tasks (render loops) to worker threads running on other CPU cores. This is intended to reduce the time spent in Camera.Render on the main thread, which is often a bottleneck. |
|
| Lightmap Encoding | Choose Normal Quality or High Quality to set the lightmap encoding. This setting affects the encoding scheme and compression format of the lightmaps. | |
| Lightmap Streaming | Enable this option to load only the lightmap mip maps as needed to render the current game Cameras. This value applies to the lightmap textures as they are generated. Note: To use this setting, you must enable the Texture Streaming Quality setting. |
|
| Streaming Priority | Set the lightmap mip map streaming priority to resolve resource conflicts. These values are applied to the light map textures as they are generated. Positive numbers give higher priority. Valid values range from –128 to 127. |
|
| Frame Timing Stats | Enable this property to gather CPU and GPU frame time statistics. Use this together with the Dynamic Resolution camera setting to determine if your application is CPU or GPU bound. | |
| Use Display In HDR Mode (Windows Only) | Enable this checkbox to make the game automatically switch to HDR mode output when it runs. This only works on displays that support this feature. If the display does not support HDR mode, the game runs in standard mode. | |
| Swap Chain Bit Depth | Select the number of bits in each color channel for swap chain buffers. Only available if HDR Mode is enabled. | |
| Bit Depth 10 | Unity will use the R10G10B10A2 buffer format and Rec2020 primaries with ST2084 PQ encoding. | |
| Bit Depth 16 | Unity will use the R16G16B16A16 buffer format and Rec709 primaries with linear color (no encoding). | |
| Virtual Texturing | Indicates whether to enable Virtual Texturing. Note: The Unity Editor requires a restart for this setting to take effect. |
|
| Shader precision model | Controls the default precision of samplers used in shaders. See Shader data types and precision for more details. | |
| 360 Stereo Capture | Indicates whether Unity can capture stereoscopic 360 images and videos. When enabled, Unity compiles additional shader variants to support 360 capture (currently only on Windows/OSX). When enabled, enable_360_capture keyword is added during the Stereo RenderCubemap call. Note that this keyword is not triggered outside the Stereo RenderCubemap function. For more information, see Stereo 360 Image and Video Capture. |
|
Vulkan Settings

| Property | Description |
|---|---|
| SRGB Write Mode | Enable this option to allow Graphics.SetSRGBWrite() renderer to toggle the sRGB write mode during runtime. That is, if you want to temporarily turn off Linear-to-sRGB write color conversion, you can use this property to achieve that. Enabling this has a negative impact on performance on mobile tile-based GPUs; therefore, do NOT enable this for mobile. |
| Number of swapchain buffers | Set this option to 2 for double-buffering, or 3 for triple-buffering to use with Vulkan renderer. This setting may help with latency on some platforms, but in most cases you should not change this from the default value of 3. Double-buffering might have a negative impact on performance. Do not use this setting on Android. |
| Acquire swapchain image late as possible | If enabled, Vulkan delays acquiring the backbuffer until after it renders the frame to an offscreen image. Vulkan uses a staging image to achieve this. Enabling this setting causes an extra blit when presenting the backbuffer. This setting, in combination with double-buffering, can improve performance. However, it also can cause performance issues because the additional blit takes up bandwidth. |
| Recycle command buffers | Indicates whether to recycle or free CommandBuffers after Unity executes them. |
Mac App Store Options

| プロパティ | 機能 | |
|---|---|---|
| Override Default Bundle Identifier | バンドルの識別子を手動で設定できるかどうかを示します。 | |
| Bundle Identifier | アプリケーションの Bundle ID を入力します。関連する info.plist ファイルに CFBundleIdentifier として表示されます。詳しくは、Apple 開発者ドキュメントの CFBundleIdentifier を参照してください。 |
|
| Build | アプリケーションのこのバージョンのビルド番号を入力します。関連する info.plist ファイルに CFBundleVersion として表示されます。詳しくは、Apple 開発者ドキュメントで CFBundleVersion を参照してください。 |
|
| Category | アプリケーションのタイプに関連する文字列を入力します。App Store はこの文字列を使用して、アプリケーションの適切なカテゴリを決定します。デフォルトでは、ゲームカテゴリ public.app-category.games に設定されています。使用可能なカテゴリのリストは、Apple の開発者のドキュメントのLSApplicationCategoryType を参照してください。 |
|
| Mac App Store Validation | これを有効にすると、Mac App Store からの有効な証明書がある場合にのみアプリケーションが実行されます。これにより、アプリケーションを購入したデバイスとは異なるデバイスで実行することができなくなります。独自の証明書の検証を実装している場合にのみ、この設定を無効にしてください。 | |
Mac App Store への公開
Use Player Log プロパティーを使用すると、デバッグ情報を持つログファイルを作成できます。これは、ゲームの問題を調査するのに便利です。ただし、Apple の Mac App Store 用にゲームを公開する場合は、Apple から提出を拒否されることを避けるためにこれを無効にする必要があります。ログファイルの詳細は、Unity マニュアルの ログファイル のページを参照してください。
Use Mac App Store Validation プロパティは、Mac App Store のレシート検証を有効にします。有効にすると、ゲームは、Mac App Store からの有効なレシートを持つ場合にのみ実行されます。ゲームを App Store に公開するために提出する場合は、このオプションを有効にします。すると、ゲームを購入したコンピューター以外のコンピューターでゲームを実行できなくなります。
この機能は強力なコピープロテクションを実装していないことに注意してください。特に、ある 1 つの Unity ゲームを不正利用できる能力は、他の Unity コンテンツに対しても不正利用を行うことが可能である恐れがあります。このため、Unity のプラグイン機能を使用して、独自のレシート検証コードを実装することが推奨されます。ただし、画面設定ダイアログを表示する前に、最初にプラグインの検証を行うことが Apple によって必須とされているため、このプロパティを有効にして、Apple によってゲームの提出が拒否されるのを避ける必要があります。
Configuration

| 設定 | 機能 | |
|---|---|---|
| Scripting Backend | 使用したいスクリプティングバックエンドを選択します。スクリプティングバックエンドは Unity のプロジェクトで C# コードをコンパイルし実行する方法を決定します。 | |
| Mono | C# コードを .NET Common Intermediate Language (CIL) にコンパイルし、それを Common Language Runtime を使用して実行します。詳細は、Mono プロジェクト に関するウェブサイトを参照してください。 | |
| IL2CPP | C# コードを CIL にコンパイルし、CIL を C++ に変換し、次に、その C++ をネイティブのマシンコードにコンパイルします。これは、ランタイムに直接実行されます。詳細は IL2CPP を参照してください。 | |
| API Compatibility Level | プロジェクトに使用する .NET API を選択します。この設定は、サードパーティ製ライブラリとの互換性に影響を与えます。 ヒント サードパーティ製アセンブリに問題がある場合は、後述の API Compatibility Level セクションを参照してください。 |
|
| .Net Standard | .NET Standard 2.0 と互換性があります。ビルドは小さく、完全なクロスプラットフォームをサポートします。 | |
| .Net Framework | .NET Framework 4 (.NET Standard 2.0 プロファイルのすべてと追加 API を含む) と互換性があります。.NET Standard 2.0 に含まれていない API にアクセスするライブラリを使用する場合は、このオプションを選択します。より大きいビルドが作成され、使用可能な追加の API がすべてのプラットフォームで必ずしもサポートされるわけではありません。詳細は、追加のクラスライブラリアセンブリの参照 を参照してください。 | |
| C++ Compiler Configuration | IL2CPP 生成コードをコンパイルするときに使用する C++ コンパイラーの設定を選択します。 ノート このプロパティは、Scripting Backend が IL2CPP に設定されない限り、無効です。 |
|
| Use incremental GC | Enable this to use the incremental garbage collector, which spreads garbage collection over several frames to reduce gc-related spikes in frame duration. | |
| Active Input Handling | ユーザーからの入力をどのように処理するかを選択します。 | |
| Input Manager (old) | Use the default Input window. | |
| Input System (Preview) | 新しい Input (入力) システムを使用します。入力システムはこのリリースのプレビューパッケージとして提供されています。Input System のプレビュー版を使用するには、InputSystem パッケージ をインストールしてください。 | |
| Both | 両方のシステムを同時に使用できます。 | |
API Compatibility Level
すべてのターゲットに対する Mono の API Compatibility Level (API 互換性レベル) を選択できます。時にはサードパーティ製の .NET ライブラリが、.NET 互換性レベル外の機能を使用することがあります。そのような場合に何が起きているか理解し、最良の修正処理を行うためには、以下を試みると良いでしょう。
- Windows の場合は Reflector をインストールします。
- API 互換性レベルに問題が疑われる .NET アセンブリを Reflector にドラッグします。これらは
Frameworks/Mono/lib/mono/YOURSUBSET/にあります。 - サードパーティ製のアセンブリをドラッグします。
- サードパーティ製のアセンブリを右クリックし、Analyze を選択します。
- 分析レポートの中で、Depends on セクションを調べます。サードパーティ製品依存でありながら、選択した .NET 互換性レベルで対応しないものはすべてここで赤字でハイライトされます。
Script Compilation
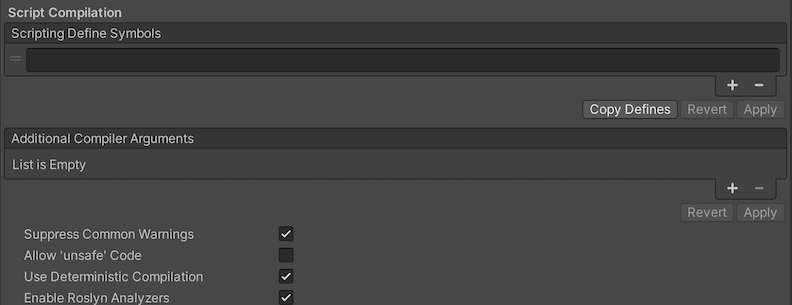
| 設定 | 機能 | |
|---|---|---|
| Scripting Define Symbols | Set custom compilation flags. For more details, see the documentation on Platform dependent compilation. | |
| Additional Compiler Arguments | Add entries to this list to pass additional arguments to the Roslyn compiler. Use one new entry for each additional argument. To create a new entry, press the ‘+’ button. To remove an entry, press the ‘-’ button. When you have added all desired arguments, click the Apply button to include your additional arguments in future compilations.The Revert button resets this list to the most recent applied state. |
|
| Suppress Common Warnings | Disable this setting to display the C# warnings CS0169 and CS0649. | |
| Allow ‘unsafe’ Code | Enable support for compiling ‘unsafe’ C# code in a pre-defined assembly (for example, Assembly-CSharp.dll). For Assembly Definition Files ( .asmdef), click on one of your .asmdef files and enable the option in the Inspector window that appears. |
|
| Use Deterministic Compilation | Disable this setting to prevent compilation with the -deterministic C# flag. With this setting enabled, compiled assemblies are byte-for-byte identical each time they are compiled. For more information, see Microsoft’s deterministic compiler option documentation. |
|
| Enable Roslyn Analyzers | Disable this setting to compile user-written scripts without Roslyn analyzer DLLs that might be present in your project. | |
Optimization

| Property | Description | |
|---|---|---|
| Prebake Collision Meshes | Enable this option to add collision data to Meshes at build time. | |
| Keep Loaded Shaders Alive | When enabled, you cannot unload a shader. See Shader Loading for more information. | |
| Preloaded Assets | Set an array of Assets for the player to load on startup. To add new Assets, increase the value of the Size property, then set a reference to the Asset to load in the new Element box that appears. |
|
| AOT compilation options | Additional options for Ahead of Time (AOT) compilation. This helps optimize the size of the built iOS player. | |
| Strip Engine Code | Enable this option if you want the Unity Linker tool to remove code for Unity Engine features that your Project doesn’t use. This setting is only available with the IL2CPP scripting backend. Most apps don’t use every available DLL. This option strips out DLLs that your app doesn’t use to reduce the size of the built Player. If your app is using one or more classes that would normally be stripped out under your current settings, Unity displays a debug message when you try to build the app. |
|
| Managed Stripping Level | Choose how Unity strips unused managed (C#) code.The options are Disabled Low, Medium, and High. When Unity builds your app, the Unity Linker process can strip unused code from the managed DLLs your Project uses. Stripping code can make the resulting executable significantly smaller, but can sometimes accidentally remove code that is in use. For more information about these options, see documentation on Managed code stripping. For information about bytecode stripping with IL2CPP, see documentation on Managed bytecode stripping with IL2CPP. |
|
| Vertex Compression | Choose the channel that you want to set for compressing meshes under the vertex compression method, which by default, is set to Mixed. This affects all the meshes in your project. Typically, Vertex Compression is used to reduce the size of mesh data in memory, reduce file size, and improve GPU performance. For information on how to configure vertex compression and limitations of this setting, see [compressing meshes]. | |
| Optimize Mesh Data | Selecting this option enables stripping of unused vertex attributes from the mesh used in a build. This reduces the amount of data in the mesh, which might help reduce build size, loading times, and runtime memory usage. However, you must remember to not change material or shader settings at runtime, if you have this setting enabled. See PlayerSettings.stripUnusedMeshComponents for more information. |
|
| Texture MipMap Stripping | Enable this option to enable mipmap stripping for all platforms, which strips unused mipmaps from Textures at build time. Unity determines unused mipmaps by comparing the value of the mipmap against the Quality Settings for the current platform. If a mipmap value is excluded from every Quality Setting for the current platform, then Unity strips those mipmaps from the build at build time. If QualitySettings.masterTextureLimit is set to a mipmap value that has been stripped, Unity will set the value to the closest mipmap value that has not been stripped. | |
Logging
特定のコンテキストで許可するログのタイプを選択します。
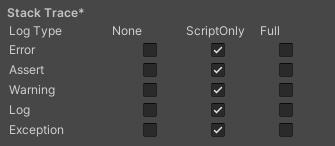
- Select your preferred logging method from the available options.
- Check a box that corresponds to each Log Type (Error, Assert, Warning, Log, and Exception) based on the type of logging you require. For example:
- ScriptOnly: Logs only when running scripts.
- Full: Logs all the time.
- None: No logs are ever recorded.
Legacy

| プロパティ | 機能 |
|---|---|
| Clamp BlendShapes (Deprecated) | これを有効にすると、SkinnedMeshRenderers でブレンドシェイプのウェイトの範囲を固定できます。 |
| Upload Cleared Texture Data | これは古い機能で現在は必要ありません。なぜなら、帯域幅を使用するからです。デフォルトでは、デバッグのために有効になっています。この設定を有効にすると、初期データがクリアされ、テクスチャがスクリプトからビデオメモリに自動的にアップロードされます。 |