Animation タブ
Animation Clips are the smallest building blocks of animation in Unity. They represent an isolated piece of motion, such as RunLeft, Jump, or Crawl, and can be manipulated and combined in various ways to produce lively end results (see Animation State Machines, Animator Controller, or Blend Trees). You can select Animation Clips from imported FBX data.
アニメーションクリップを含むモデルをクリックすると、以下のプロパティーが表示されます。
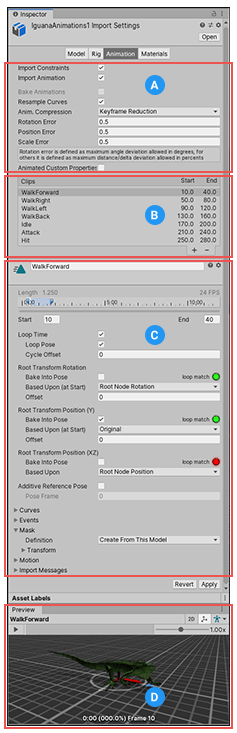
Inspector ウインドウの Animation タブは 4 つの部分に分けられています。
(A) Asset-specific properties. These settings define import options for the entire Asset.
(B) Clip selection list. You can select any item from this list to display its properties and preview its animation. You can also define new clips.
(C) Clip-specific properties. These settings define import options for the selected Animation Clip.
(D) Animation preview. You can playback the animation and select specific frames here.
アセット特有のプロパティー

これらのプロパティーは、このアセット内で定義されたすべてのアニメーションクリップと制約に適用されます。
| プロパティー | 機能 | |
|---|---|---|
| Import Constraints | このアセットから コンストレイント をインポートします。 | |
| Import Animation | このアセットからアニメーションをインポートします。 ノート: 無効にすると、このページの他のすべてのオプションは非表示になり、アニメーションはインポートされません。 |
|
| Bake Animations | キネマティックなキーフレームを転送するために、IK やリアルタイムな計算で作成されたアニメーションをベイクします。 Autodesk® Maya®、Autodesk® 3dsMax®、Cinema 4D ファイルのみに使用可能です。 |
|
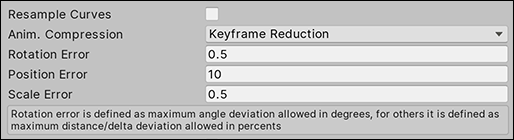
| Resample Curves | アニメーションカーブをクォータニオン値としてリサンプリングし、アニメーションのすべてのフレームに対して新しいクォータニオンのキーフレームを生成します。 このオプションはデフォルトで有効になっています。 元のアニメーションのキー間の補間に問題がある場合にのみ、アニメーションカーブをオリジナルに戻すをして、これを無効にします。 インポートしたファイルにオイラーカーブが含まれている場合のみ表示されます。 |
|
| Anim. Compression | アニメーションをインポートするときに使用する圧縮のタイプ。 | |
| Off | Disable animation compression. This means that Unity doesn’t reduce keyframe count on import. Disabling animation compression leads to the highest precision animations, but slower performance and bigger file and runtime memory size. It is generally not advisable to use this option - if you need higher precision animation, you should enable keyframe reduction and lower allowed Animation Compression Error values instead. | |
| Keyframe Reduction | Reduce redundant keyframes on import. If enabled, the Inspector displays Animation Compression Errors options. This affects both file size (runtime memory) and how curves are evaluated. Only for Generic Animation Type rigs. |
|
| Keyframe Reduction and Compression | Reduce keyframes on import and compress keyframes when storing animations in files. This affects only file size: the runtime memory size is the same as Keyframe Reduction. If enabled, the Inspector displays Animation Compression Errors options. Only for Legacy Animation Type rigs. |
|
| Optimal | Let Unity decide how to compress, either by keyframe reduction or by using dense format. If enabled, the Inspector displays Animation Compression Errors options. Only for Generic and Humanoid Animation Type rigs. |
|
| Animation Compression Errors | Keyframe Reduction または Optimal 圧縮が有効な場合のみ使用可能です。 | |
| Rotation Error | Set the error tolerance (as an angle in degrees) for rotation curve compression. Unity uses this to determine whether or not it can remove a key on a rotation curve. This represents the minimum angle between the original rotation value and the reduced value: Angle(value, reduced) < RotationError
|
|
| Position Error | Set the error tolerance (as a percentage) for position curve compression. Unity uses this to determine whether or not it can remove a key on a position curve. For more information, see Setting error tolerance for key reduction on position and scale curves. | |
| Scale Error | Set the error tolerance (as a percentage) for scale curve compression. Unity uses this to determine whether or not it can remove a key on a scale curve. For more information, see Setting error tolerance for key reduction on position and scale curves. | |
| Animated Custom Properties | カスタムのユーザープロパティーとして指定した FBX プロパティーをすべてインポートします。 Unity は、FBX ファイルをインポートするときに、小さなプロパティーのサブセットのみをサポートします (例えば、Translation、Rotation、Scale、Visibility)。ただし、extraUserProperties メンバーを使用してインポータースクリプトで名前を付けることで、ユーザープロパティーなどの標準的な FBX プロパティーを扱うことができます。インポートの間、Unity は「実際の」ユーザープロパティーと同様に、名前付きプロパティーを AssetPostprocessor に渡します。 |
|
Setting error tolerance for key reduction on position and scale curves
Set the error tolerance percentage to determine whether or not Unity can remove a key on a position or scale curve as a strategy for animation compression.
When you set the Anim. Compression property to “Keyframe Reduction” or “Optimal”, Unity compares the original curve to what the curve looks like after removing a specific keyframe and applies this test:
OriginalValue - ReducedValue > OriginalValue * percentageOfError
Unity removes a keyframe if the delta between the original value and the reduced value is less than the original value multiplied by the error tolerance percentage.
Note that the Unity compares the distances between the three curve components (that is, it compares distance(x,y,z) ), and also per component ( distance(x), distance(y), and then distance(z) ).
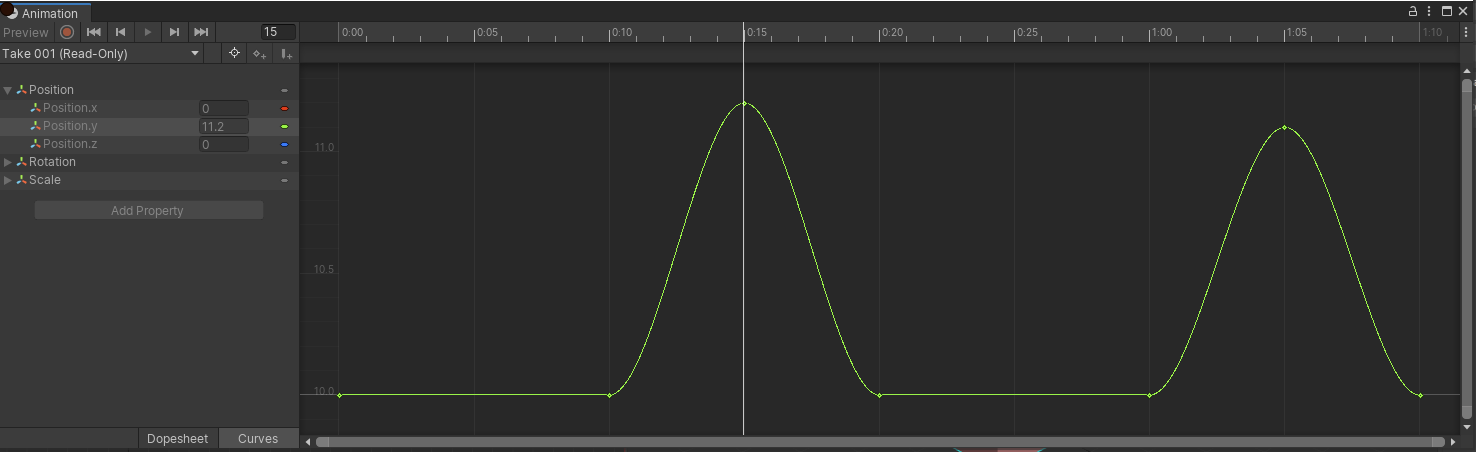
This example demonstrates how Unity evaluates a reduction on the y-axis using an error tolerance of 10%:
Keyframe A has a value of 11.2:
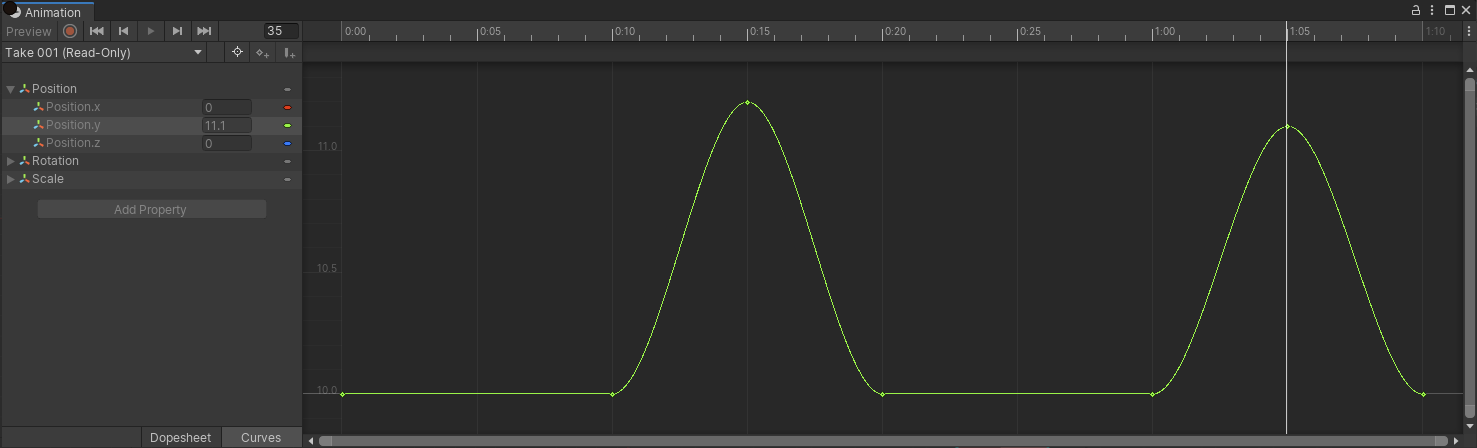
Keyframe B has a value of 11.1:
The resulting reduced curve looks like this:
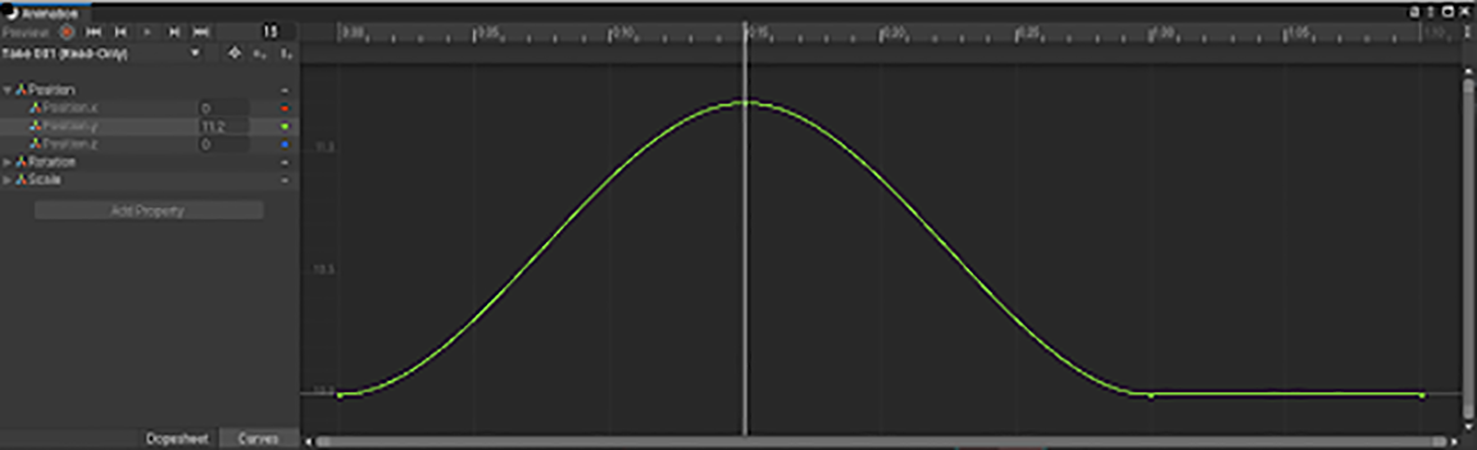
Keyframe A is not reduced because:
- The distance between the original and reduced value is
D = 11.2 - 10 = 1.2. - The error margin is
E = 10% * 11.2 = 1.12 - D > E
Keyframe B is reduced because 11.1 - 10 < 10% * 11.1:
- The distance between the original and reduced value is
D = 11.1 - 10 = 1.11 - The error margin is
E = 10% * 11.1 = 1.11 - D = E
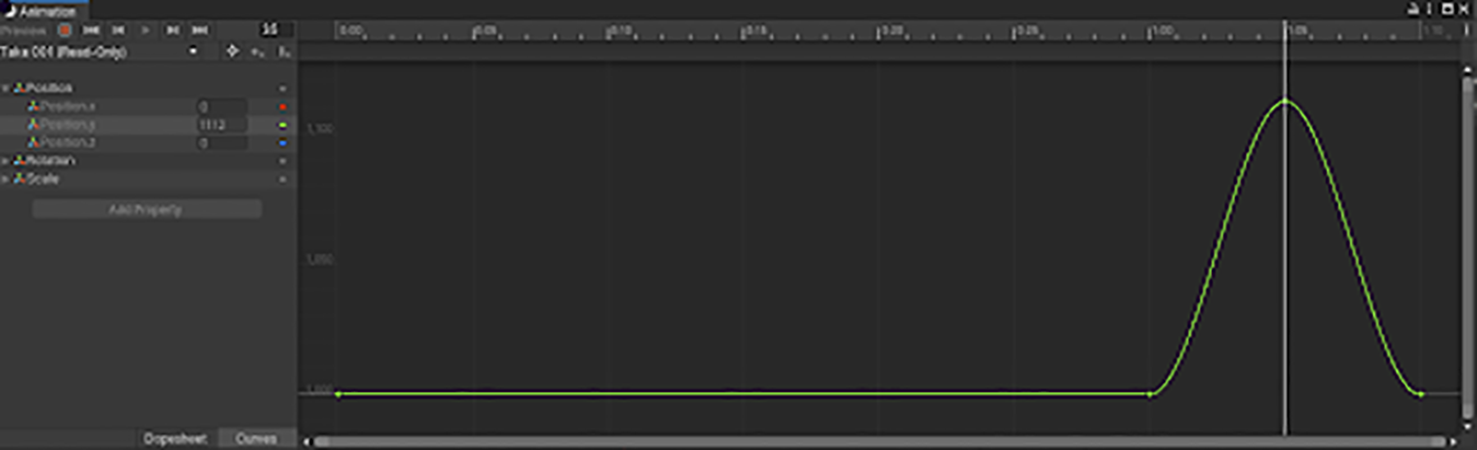
Note that this method has a limitation when using high values that vary only slightly. Moving the Scene 1000 units away results in essentially the same animation but located far from 0.

In this case, both keyframes are reduced.
Keyframe A is reduced because:
- The distance between the original and reduced value is
D = 1011.2 - 1010 = 1.2 - The error margin is
E = 10% * 1011.2 = 101.12
Keyframe B is reduced because 11.1 - 10 < 10% * 11.1:
- The distance between the original and reduced value is
D = 11.1 - 10 = 1.11 - The error margin is
E = 10% * 1011.1 = 101.11
Higher values require a much larger difference between the original and reduced values for keyframes to remain in the reduced curve. Keyframe A has a value of 1100 and is discarded; keyframe B has a value of 1112 and remains:
クリップ選択リスト
これらのタスクは Animation タブの各セクションで行ないます。
- リストからクリップを選択して クリップ固有のプロパティーを表示 します。
- 選択したクリップを クリッププレビューペイン で再生します。
- 追加 (
+) ボタンでこのファイルに 新規クリップの作成 を行ないます。 - 削除 (
-) ボタンで選択したクリップ定義を削除します。
クリップ固有のプロパティー

Animation タブのこのエリアには、以下の機能が表示されます。
(A) The (editable) name of the selected clip
(B) The animation clip timeline
(C) Clip properties to control looping and pose
(D) Expandable sections for: defining curves, events, masks, and motion roots; and viewing messages from the import process
アセット内で定義された各アニメーションクリップに対して、以下のプロパティーを個別に設定できます。
| プロパティー | 機能 | |
|---|---|---|
| エリア A (名前の編集) | ||
 |
このアニメーションクリップのソースとして使用するソースファイルのテイク。 これは、Motionbuilder、Autodesk® Maya®、その他の 3D パッケージで分離された一連のアニメーションを定義するものです。Unity はこれらのテイクを個々のクリップとしてインポートできます。ファイル全体から、またはフレームのサブセットからそれらを作成できます。 |
|
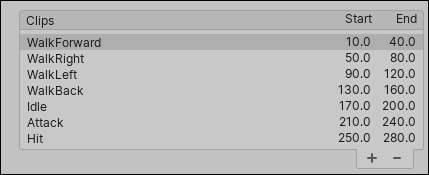
| エリア B (タイムライン機能) | ||
 |
タイムラインの開始と終了のインジケーターをドラッグして、各クリップのフレーム範囲を定義することができます。 | |
| Start | クリップの開始フレーム | |
| End | クリップの終了フレーム | |
| エリア C (ループとポーズの制御) | ||
| Loop Time | アニメーションクリップを最後まで再生し終わると、リスタートします。 | |
| Loop Pose | モーションをシームレスにループします。 | |
| Cycle Offset | 時間をずらしてアニメーションのループのサイクルを開始する場合、サイクルのオフセット。 | |
| Root Transform Rotation | ||
| Bake into Pose | ルートの回転をボーンの動きにベイクします。ルートモーションとして保存する場合は無効にします。 | |
| Based Upon | ルートの回転のベース | |
| Original | ソースファイルの元の回転を維持します。 | |
| Root Node Rotation | Use the rotation of the root node. Only available for the Generic Animation Type. |
|
| Body Orientation | 上体を前方に向けたままにします。 Animation Type が Humanoid のものにのみ使用可能です。 |
|
| Offset | ルートの回転のオフセット値 (角度単位) | |
| Root Transform Position (Y) | ||
| Bake into Pose | 垂直方向のルートモーションをボーンの動きにベイクします。ルートモーションとして保存する場合は無効にします。 | |
| Based Upon(at Start) | 垂直のルート位置のベース。 | |
| Original | ソースファイルからの垂直位置を維持します。 | |
| Root Node Position | 垂直のルート位置を使用します。 Animation Type が Generic のものにのみ使用可能です。 |
|
| Center of Mass | 重心をルートのトランスフォーム位置に揃えます。 Animation Type が Humanoid のものにのみ使用可能です。 |
|
| Feet | 足をルートの Transform 位置に揃えます。 Animation Type が Humanoid のものにのみ使用可能です。 |
|
| Offset | 垂直のルート位置のオフセット値。 | |
| Root Transform Position (XZ) | ||
| Bake into Pose | 水平方向のルートモーションをボーンの動きにベイクします。ルートモーションとして保存する場合は無効にします。 | |
| Based Upon | 水平のルート位置のベース。 | |
| Original | ソースファイルからの水平の位置を維持します。 | |
| Root Node Position | 水平のルートの Transform 位置を使用します。 Animation Type が Generic のものにのみ使用可能です。 |
|
| Center of Mass | ルートのトランスフォーム位置に揃えます。 Animation Type が Humanoid のものにのみ使用可能です。 |
|
| Offset | 水平のルート位置のオフセット値 | |
| Mirror | クリップの左右を反転します。 Animation Type が Humanoid に設定されている場合のみ表示されます。 |
|
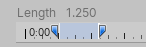
| Additive Reference Pose |
追加のアニメーションレイヤー のベースとして使用される参照ポーズのフレームを設定します。タイムラインエディターで青色のマーカーが表示されます。
|
|
| Pose Frame | 参照ポーズとして使用するフレーム番号を入力します。タイムラインで青のマーカーをドラッグして、この値を更新することもできます。 Additive Reference Pose が有効な場合のみ使用可能です。 |
|
| エリア D (拡張可能セクション) | ||
| Curves | このセクションを開き、インポートされたクリップのアニメーションカーブ を管理します。 | |
| Events | Expand this section to manage animation events on imported clips. | |
| Mask | このセクションを開き、インポートしたクリップのマスキング を管理します。 | |
| Motion | このセクションを開き、ルートモーションノードの選択 を管理します。 | |
| Import Messages | このセクションを開き、アニメーションのインポートに関する情報 とオプションの Retargeting Quality Report を表示します。 | |
クリップを作成することは基本的に、アニメーションのセグメントの開始点と終了点を定義することです。これらのクリップをループさせるには、任意のループ の最初と最後のフレームをできるだけ一致させるようにトリムします。
アニメーションのインポートに関する警告
アニメーションのインポート処理中に問題が発生した場合は、アニメーションのインポートインスペクター上部に警告が表示されます。
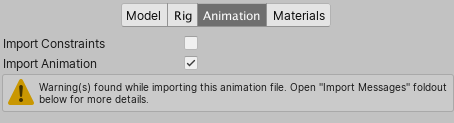
警告は、必ずしもアニメーションがインポートされていない、または、動作していないことを意味しているわけではありません。インポートされたアニメーションが、元のアニメーションと完全に同じでないことを意味している場合があります。
詳細情報を表示するには、Import Messages セクションを展開します。
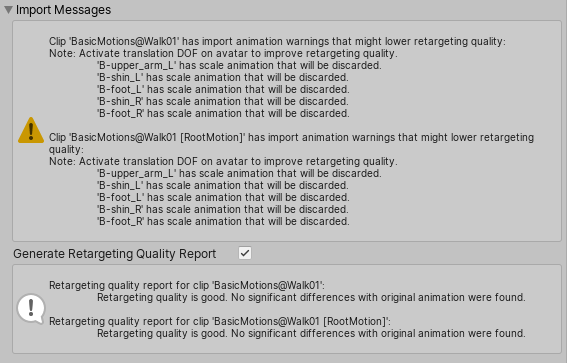
この場合では、Unity は Generate Retargeting Quality Report オプションを提供しています。これを有効にすると、リターゲティングの問題に関するより具体的な情報を確認できます。
他の警告の詳細は以下の通りです。
- Default bone length found in this file is different from the one found in the source avatar. (このファイルに含まれるデフォルトのボーンの長さが、ソースアバターのものと一致しません。)
- Inbetween bone default rotation found in this file is different from the one found in the source avatar. (このファイルに含まれるボーンとボーンの間の回転が、ソースアバターのものと異なります。)
- Source avatar hierarchy doesn’t match one found in this model. (ソースアバターの階層が、このモデルに含まれるものと一致しません。)
- This animation has Has translation animation that will be discarded. (このアニメーションに含まれる 平行移動のアニメーションは破棄されます。)
- Humanoid animation has inbetween transforms and rotation that will be discarded. (ヒューマノイドのアニメーションに含まれる中間にあるトランスフォームと回転は破棄されます。)
- Has scale animation that will be discarded. (スケールアニメーションは破棄されます。)
これらのメッセージは、アニメーションが Unity にインポートされ、Unity の内部形式に変換されるときに、元のファイルにあるデータの一部が失われたことを示しています。これらの警告は基本的に、リターゲティングされたアニメーションがソースアニメーションと正確に一致しないことを示しています。
注意 Unity は、constant 以外で事前、または事後の外挿 (pre-extrapolate と post-extrapolate) モード (pre-infinity と post-infinity モードとも呼ばれます) をサポートせず、インポート時に constant に変換します。
アニメーションプレビュー
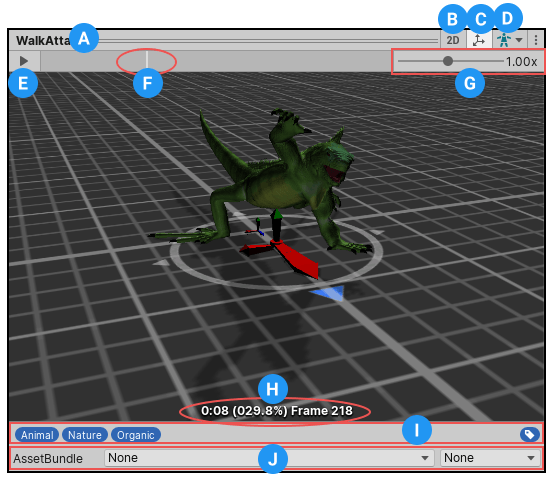
Animation タブのプレビューエリアには、以下の機能があります。
(A) The name of the selected clip
(B) The 2D preview mode button (switches between orthographic and perspective camera)
(C) The pivot and mass center display button (switches between displaying and hiding the gizmos)
(D) The Avatar selector (change which GameObject will preview the action)
(E) The play/pause button
(F) The playback head on the preview timeline (allows scrubbing back and forth)
(G) The animation preview speed slider (move left to slow down; right to speed up)
(H) The playback status indicator (displays the location of the playback in seconds, percentage, and frame number)
(I) The Tag bar, where you can define and apply Tags to your clip
(J) The AssetBundles bar, where you can define AssetBundles and Variants
- Materials タブは 2017.2 で追加NewIn20172
Copyright © 2023 Unity Technologies
优美缔软件(上海)有限公司 版权所有
"Unity"、Unity 徽标及其他 Unity 商标是 Unity Technologies 或其附属机构在美国及其他地区的商标或注册商标。其他名称或品牌是其各自所有者的商标。
公安部备案号:
31010902002961