- Unity User Manual (2019.2)
- Unity サービス
- Unity Integration
Unity Integration
Unity Integration を利用すると、開発ワークフロー内の以下の Unity Services を Unity 以外のサービスと接続できます
Integration を設定するには、プロジェクトのオーナーまたはマネージャーであることが必要です。ロールの割り当てに関する情報は、Organization の管理 の Members & Groups セクションを参照してください。
Unity Integration は以下の外部サービスをサポートします。
- Webhooks: Unity から外部サービスへ POST リクエストの送信を可能にするユーザー定義のコールバック。
- Discord: Discord によって定義された Webhook を通してチームの Discord チャンネルに通知を送信します。
- Slack: Slack によって定義された Webhook を通してチームの Slack チャンネルに通知を送信します。
- Email: メールでチームに通知を送信します。
- JIRA: JIRA 定義の Webhook を使用して JIRA チケットを作成または更新します。
- Trello: Create and comment on Trello cards.
Integration の制限
Unity Personal のユーザーはすべてのイベントに対して Integration を 1 つに制限されますが、複数の Unity サービスでこの 1 つの Integration を使用できます。Unity Teams、Plus、Pro のユーザーは最大 100 の Integration を利用できます。Unity Teams、Pro、Plus サブスクリプションの有効期限が切れた場合、現在のすべての Integration は維持されますが、自動的にそれらは使用不可になります。このような場合は、Unity Services Dashboard にサインインして Integration を 1 つ有効にすることができます。
Integration の追加
ワークフローに Integration を追加するには、以下を行います。
- Unity Services Dashboard にサインインします。
- Integration を加えるプロジェクトを選択します。
- 左側のナビゲーションバーで、Settings > Integrations を選択します。
- Integration ダッシュボードが表示されます。NEW INTEGRATION ボタンをクリックします。
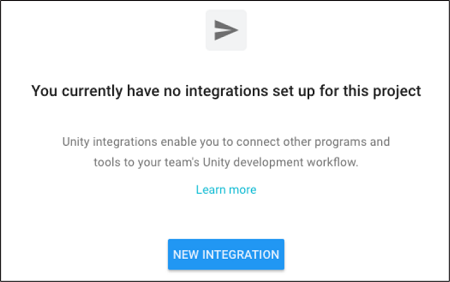
- 有効にしたい Integration を選択します。
- Integration をトリガーするイベントを選択し、NEXT ボタンをクリックします。
- Integration オプションを設定します。これらのオプションは、選択した Integration によって異なります。詳細は後述のセクションで説明します。

Webhook の Integration
Webhook Integration を設定するには、以下の情報を入力します。
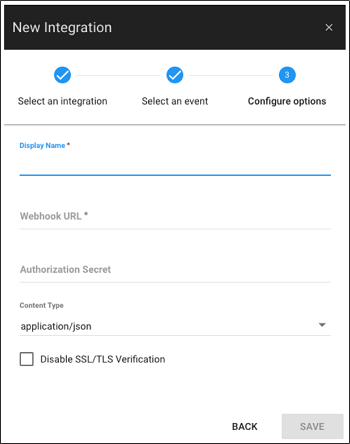
| パラメーター | 説明 |
|---|---|
| Display Name | Integration リストで Integration を識別するための名前。 |
| Webhook URL | Unity からの Webhook POST リクエストを受けとるサーバーエンドポイントの URL |
| Authentication Secret | 受信側アプリケーションのクライアントシークレット |
| Content Type | コンテンツの MIME タイプ。ドロップダウンからデータのコンテンツタイプを選択します。 |
| Disable SSL/TLS Verification | SSL/TLS セキュリティ証明書の検証を無効にするには、このチェックボックスにチェックを入れます。 SSL/TLS 証明書を検証すると、データを上記の Webhook URL に安全に送信できます。そのため、このオプションを有効にすることは推奨されません。それを完全に理解している場合にのみ、このオプションをチェックしてください。 |
Discord の Integration
Discord の Integration を設定するために、Unity は Discord API を使用するアプリケーションを呼び出して Webhook を Discord チャンネルに登録します。Discord サーバーがない場合は、Discord のドキュメント サーバーの作成の仕方 を参照してください。
重要 : 統合するアカウントで Webhook を使用可能にする必要があります。
以下の手順で設定します。
- 新しい Discord Integration を作成し、そのイベントを選択します。
- NEXT ボタンをクリックします。Discord ログイン画面でサインインします。
-
CONNECT TO DISCORD ダイアログ画面が表示されます。
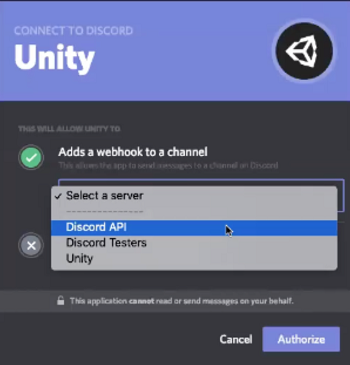
- Select a server ドロップダウンメニューから、Discord サーバーを選択します。
- Select a channel メニューから、通知をポストするチャンネルを選択します。
- Authorize ボタンをクリックします。
Slack の Integration
Slack の Integration を設定するために、Unity は Slack API を使用するアプリケーションを呼び出して Webhook を Slack チャンネルに登録します。
新しいSlack Integration を作成し、表示するイベントを設定した後に、Unity に Slack サーバーにアクセスするための承認を与える必要があります。
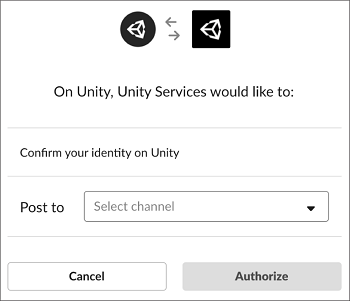
Slack サーバーがない場合は、Slack ワークスペースを作成する を参照してください。
以下の手順で設定します。
- Slack アカウントにサインインします。
- アプリケーションの右端で Slack Workspace を選択します。
- Post to ドロップダウンメニューから、通知を送信するSlackチャンネルを選択します。
- Authorize ボタンをクリックします。
Email の Integration
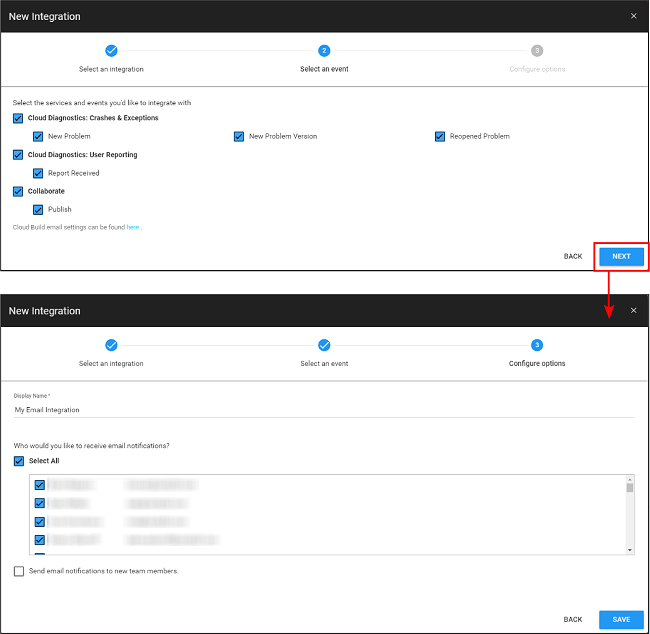
Email の Integration は、プロジェクトに指定されたイベントが発生したときにチームメンバーに通知します。
- ダッシュボードから Email Integration を作成し、イベントメニューを表示します。
- 電子メール通知を受け取りたいイベントを選択し、NEXT ボタンをクリックします。
ノート: Cloud Build は電子メール通知設定を個別に処理します。イベントメニューの下にある here のリンクをクリックして設定できます。 - 通知を送信するチームメンバーを選択します。
- チームメンバーが受信するメールを将来追加する新しいチームメンバーも自動的に受信できようにしたい場合は、Send email to new team members を選択します。
JIRA の Integration
Unity JIRA の Integration を使用すると、以下のように JIRA と相互作用できます。
- Cloud Diagnostics: レポートを受け取るときに新しい問題を作成します。Unity は unity-user-report、unity-crash-report、unity-exception-report のいずれかのラベルで問題を作成します。問題を作成し、これらのインテグレーションのラベル列を変更するには権限が必要です。
- Collaborate: Collaborate で変更を公開するときに、既存の問題にコメントを加えます。
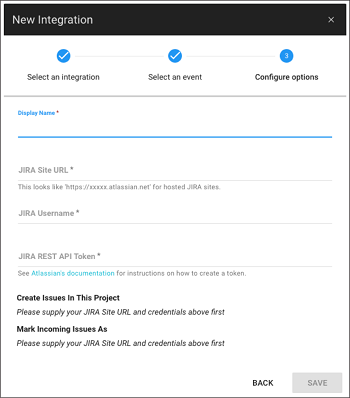
Collaborate または Cloud Diagnostics の JIRA Integration を設定するには、以下の情報を入力する必要があります。
| パラメーター | 説明 |
|---|---|
| Display Name | Integration リストで Integration を識別するための名前。 |
| JIRA Site URL | JIRA インスタンスの URL |
| JIRA Username | JIRA インスタンスに更新をポストするアカウントのユーザー ID |
| JIRA REST API Token | JIRA サーバーへの Integration リクエストを認証するための API トークン。 トークンの作成方法については、Atlassian のドキュメント を参照してください。 |
JIRA インスタンスの情報を入力したら、Cloud Diagnostics に以下の情報も入力する必要があります。
| パラメーター | 説明 |
|---|---|
| Create Issues In This Project | 問題を作成するプロジェクトを選択します。 |
| Mark Incoming Issues As | ログするレポートの問題のタイプを選択します。 |
Collaborate に変更を加える場合は、送信するメッセージの Issue キーを参照して JIRA に紐づいた問題を更新してください。例えば、“ISS–42 に起因するクラッシュを修正しました” は、問題 “ISS–42” の公開された詳細を加えます。
Trello Integrations
The Unity Trello Integration has the following features:
-
Collaborate: You can add a comment to an existing card. To do this, add the card’s URL in the publish message. To find the URL of a card, open the card in Trello and copy its URL in the address bar, or use the share button to get a shorter link. Example URL formats:
https://trello.com/c/lhLmnCRZhttps://trello.com/c/lhLmnCRZ/1-the-card-title
- Cloud Diagnostics: When you receive a user report, Unity automatically creates and adds a new card to your board.
To configure a Trello Integration for Collaborate or Cloud Diagnostics:
- Create a Trello Integration in your Unity Services Dashboard. To do this, select your Project from the dashboard then go to Settings > Integrations and choose Trello Integration from the window.
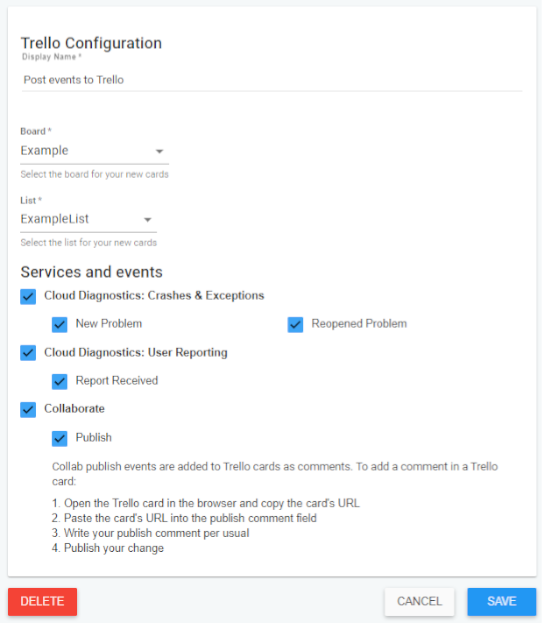
- Select the services and events you’d like to integrate your Project with, then select Next.
- Unity prompts you to sign into Trello, and it asks for permission to make changes to your Trello boards. This permission is needed so that Unity can create, update and comment on cards.
- Fill out the configuration page with a summary of the Integration, including what board and list Unity should post to, and save the settings.
既存の Integration の管理
既存の Integration を管理するには、以下を行います。
- Unity Services Dashboard にサインインします。
- 編集したい Integration を持つプロジェクトを選択します。
- 左側のナビゲーションバーで、Settings > Integrations を選択します。
既存の Integration を編集または削除するには、変更したい Integration の隣にある EDIT をクリックします。作成できる編集のタイプは Integration によって異なります。
- Slack と Discord の Integration では、表示名の更新や、Integration の削除を行えます。
- Webhook と JIRA の Integration では、作成時に指定した設定パラメーターを変更できます。
既存の Integration を有効または無効にするには、Status ボタンで Integration を有効または無効にします。
