シーンビューの操作
By default, you look through and control the Scene Camera when you navigate through the Scene view. To look through and control a GameObject that has a camera component attached to it, use the Cameras overlay.
You can use the following navigation controls to move the Scene Camera or a GameObject that has a camera component attached to it around the Scene view:
- シーンギズモ
- 移動、オービット、ズームツール
- センタリングツール
シーンギズモ
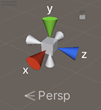
The Scene Gizmo appears in the Scene view. This displays the Scene Camera’s current orientation, and allows you to change the viewing angle and projection mode.

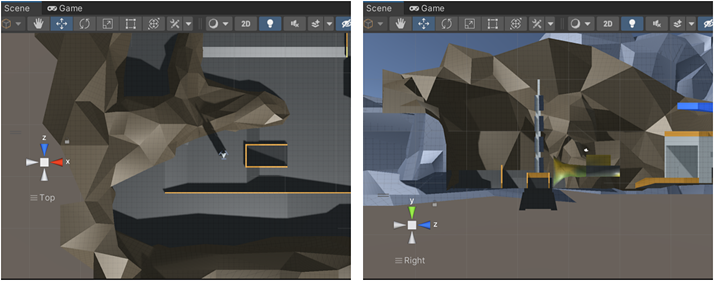
The Scene Gizmo has a conical arm on each side of the cube. The arms at the forefront are labelled X, Y, and Z. Click on any of the conical axis arms to snap the Scene Camera to the axis it represents (for example: top view, left view, and front view). You can also right-click the cube to see a menu with a list of viewing angles. To return to the default viewing angle, right-click the Scene Gizmo and select Free.
You can also toggle Perspective on and off. This changes the projection mode of the Scene view between Perspective and Orthographic (sometimes called “isometric”). To do this, click the cube in the center of the Scene Gizmo, or the text below it. The Orthographic view has no perspective, and is useful in combination with clicking one of the conical axis arms to get a front, top or side elevation.


If your Scene view is in an awkward viewpoint (upside-down or just an angle you find confusing), Shift-click the cube at the center of the Scene Gizmo to get back to a Perspective view with an angle that looks at the Scene from the side and slightly from above.
Click on the padlock on the top right of the Scene Gizmo to enable or disable rotation of the Scene. Once Scene rotation is disabled, right-click to pan the view instead of rotating it. This is the same as the View tool.
Note that in 2D Mode, the Scene Gizmo doesn’t appear. The only view option in 2d Mode is to look perpendicularly at the XY plane.
Mac トラックパッドのジェスチャ
トラックパッドを搭載した Mac では、2 本の指でドラッグするとビューをズームできます。
You can also use three fingers to simulate the effect of clicking the arms of the Scene Gizmo: drag up, left, right or down to snap the Scene Camera to the corresponding direction. You must enable three-finger swiping in the MacOS trackpad gesture settings to use this feature.
Move, orbit and zoom in the Scene view
Moving, orbiting, and zooming are key operations in Scene view navigation. Unity provides several ways to perform them for maximum accessibility:
- Use the arrow keys
- Use the View tool
- Use flythrough mode
- Change the move speed of the camera
- Use movement shortcuts
Use the arrow keys
You can use the Arrow Keys to move around the Scene as though “walking” through it. The Up and Down arrow keys move the Camera forward and backward in the direction it faces. The Left and Right arrow keys pan the view sideways. Hold down the Shift and an arrow key to move faster.
Use the View tool
When the View tool is selected (shortcut: Q), the following mouse controls are available:
| コントロール | 説明 |
|---|---|
| Pan |
 Click and drag to pan the Camera around. |
| 周回 |
 Hold Alt (Windows) or Option (macOS), and left-click and drag to orbit the Camera around the current pivot point. This option isn’t available in 2D mode, because the view is orthographic. |
| ズーム |
 Alt (Windows) または Option (macOS) を押したまま、右クリックしてドラッグし、シーンビューをズームします。 macOS では、Control を押したまま左クリックしてドラッグすることもできます。 |
さらに Shift を押したままで行うと移動やズームが速くなります。
Use flythrough mode
Use the Flythrough mode to fly around the Scene view in first-person, similar to how you would navigate in many games.
Flythrough mode is designed for Perspective Mode. In Orthographic Mode, if you click and hold the right mouse button and move your mouse, your view orbits the Camera instead.
Flythrough mode isn’t available in 2D mode. In 2D mode, if you click and hold the right mouse button and move your mouse, your view pans around the Scene view.
To enter Flythrough mode and navigate through the Scene view in Flythrough mode:
- Click and hold the right mouse button.
- Do the following to navigate through the Scene view:
- Use your mouse to move the view.
- To move forward or backward, press W or S.
- To move left or right, press A or D.
- To move up or down, press Q or E.
- To move faster, press and hold Shift.
Change the move speed of the camera
The Scene Camera displays the Scene view in the Editor. By default, the Scene Camera is what you control and look through when you navigate through the Scene view. To learn how to control a GameObject that has a camera component attached, refer to Control a camera in first person.
To change the speed that a Camera moves at in the Scene view, select the Camera icon in the View Options overlay then adjust the value of the Camera Speed property to the speed you want.
Note: To find the View Options overlay, press ` to open the Overlays menu. In the Overlays menu, hover over View Options to highlight the View Options overlay in the Scene view.
In Flythrough mode, use the scroll wheel on your mouse or drag two fingers on a trackpad to change the speed that the Scene Camera moves at through the Scene.
動きのショートカット
For extra efficiency, these controls can also be used regardless of which transform tool is selected. The most convenient controls depend on which mouse or track-pad you are using.
| アクション | 3 ボタンマウス | 2 ボタンマウスまたはトラックパッド | 1 ボタンマウスまたはトラックパッド |
|---|---|---|---|
| Pan | Hold the middle-mouse button then drag | Alt + Control + 左クリックしながら、ドラッグ | Hold Option+Command+left-click, then drag |
| 回転 (2D モードでは使用不可) | Alt + 左クリックしながらドラッグ | Alt + 左クリックしながらドラッグ | Hold Option+left-click, then drag |
| ズーム | スクロールホイールを使用するか、Alt + 右クリックしながらドラッグします。 | Alt + 右クリックして、ドラッグ | Use the two-finger swipe method to scroll in and out, or hold Option+Control+left-click, then drag |
| 速度の変更 (フライスルーモードでのみ使用可能) | 移動中にスクロールホイールを使用します。 | Drag with two fingers while moving | Drag with two fingers while moving |
Center the view on a GameObject
ゲームオブジェクトをシーンビューの中央に置くには、Hierarchy でゲームオブジェクトを選択し、シーンビューの上にマウスを移動させて F を押します。ゲームオブジェクトがすでに選択されている場合は、 F を押すと、ピボットポイントにズームインします。この機能は、メニューバーの Edit > Frame Selected にもあります。
To lock the view to the GameObject even when the GameObject is moving, press Shift+F. This feature is also in the menu bar under Edit > Lock View to Selected.