Code sign and notarize your macOS application
This page details the process of code signing and notarization for macOS applications.
Code signing is the process of creating a code signature for an application. This signature guarantees the integrity of applications and safeguards from any tampering. Apple devices use an application’s code signature to detect changes made after the code signature was created. If an application doesn’t have a code signature, the device warns the end user before they open it. Unity automatically code signs any application it builds for macOS.
Notarization is when Apple verifies your application to ensure it has a Developer ID code signature and doesn’t contain malicious content. For more information about notarization, refer to Apple’s documentation on macOS Code Signing in Depth and Notarizing macOS Software Before Distribution.
If you develop on an Apple device, you can use Xcode, Xcode command-line tools, or Unity Cloud Build to notarize your application. If you don’t have an Apple device, use Unity Cloud Build.
This page has information on the following notarization methods:
Note: Notarization isn’t required to distribute your application through the Mac App Store. The Mac App Store’s upload process includes similar content validation to notarization. Refer to Delivering to the Mac App Store for more information.
Use Xcode to notarize your application
Unity can create an Xcode project that represents your Unity project during the build process. You can use this Xcode project to notarize your application. Follow the macOS application build steps to create an Xcode project from your Unity project. For information on notarizing the Xcode project, see Apple’s documentation on Notarizing macOS Software Before Distribution.
Use Xcode command-line tools to notarize your application
If you can’t notarize your application in the Xcode environment or want to control notarization manually, you can use Xcode’s command-line tools. To do this, you need the following:
- Apple ID.
- macOS 10.15 Catalina 이상을 실행하는 Apple 기기
- Xcode 11 이상. 이 버전은 필수 커맨드 라인 툴을 설치합니다.
- Apple 개발자 프로그램 멤버십. Apple 개발자 멤버십이 없는 경우 Apple 개발자에 가입합니다.
Code sign your application
To notarize your application with the Xcode command-line tools, you must first code sign the application. This section explains how to code sign your application using Xcode’s command-line tools.
ID 서명
Unity adds a code signature to every macOS build it produces. This simple code signature doesn’t identify you as the developer. To notarize an application, Apple requires the code signature to include a cryptographic signature that identifies the developer. This is called a signing identity. Usually, you use a Developer ID certificate.
새로운 개발자 ID 인증서를 만들려면 새로운 인증서 생성으로 이동하여 다음을 수행합니다.
- 프롬프트를 따라 프라이빗 키를 생성하고 Certificate Signing Request를 업로드합니다.
- 개발자 ID 인증서를 다운로드합니다. 이 인증서의 파일 포맷은
.cer입니다. - 인증서를 클릭하여 키체인에 추가합니다. 키체인 내에 Developer ID Application : XXX (YYY)라고 포맷한 이름으로 나타납니다.
애플리케이션 식별자
애플리케이션을 공증하려면 Apple은 해당 애플리케이션을 식별해야 합니다. 애플리케이션 식별자를 가져오려면 Unity에서 가져오는 방법과 빌드된 애플리케이션의 정보 프로퍼티 리스트 파일에서 가져오는 방법이 있습니다.
- Unity에서 가져오는 방법:
- Edit > Project Settings > Player로 이동합니다.
- Other Settings 섹션을 확장하여 Mac App Store Options로 이동합니다.
- Bundle Identifier 값을 확인합니다.
- 정보 프로퍼티 리스트 파일에서 가져오는 방법:
- Finder에서 빌드된 애플리케이션으로 이동합니다.
- 애플리케이션에서 마우스 오른쪽 버튼을 클릭한 후 Show Package Contents를 선택합니다.
- Contents로 이동하여Info.plist를 엽니다.
- 애플리케이션 식별자를 나타내는 키는 CFBundleIdentifier입니다.
애플리케이션 식별자가 있으면 Apple에 등록할 수 있습니다. 등록하려면 다음을 수행하십시오.
- Apple Developer으로 이동하여 로그인합니다.
- Certificates, IDs & Profiles를 선택합니다.
- Select Identifiers
- Add your bundle ID.
자격
Entitlements are permissions or restrictions your code signature includes that allow or prevent your application from taking specific actions.
애플리케이션에 대한 자격을 설정하려면 다음을 수행하십시오.
- 빌드된 애플리케이션과 동일한 디렉토리에서
.entitlements파일 확장자로 애플리케이션과 동일한 이름을 가진 파일을 생성합니다. 예를 들어 애플리케이션 이름이 Sample인 경우Sample.entitlements라는 이름의 파일을 생성합니다. - 텍스트 에디터를 사용하여 파일을 열고 다음의 콘텐츠를 복사합니다.
<?xml version="1.0" encoding="UTF-8"?>
<!DOCTYPE plist PUBLIC "-//Apple//DTD PLIST 1.0//EN" "http://www.apple.com/DTDs/PropertyList-1.0.dtd">
<plist version="1.0">
    <dict>
       <key>com.apple.security.cs.disable-library-validation</key>
       <true/>
       <key>com.apple.security.cs.disable-executable-page-protection</key>
       <true/>
    </dict>
</plist>
이러한 자격은 Hardened Runtime을 갖기 위해 macOS 애플리케이션에서 필요한 최소한의 자격입니다. 애플리케이션에 더 많은 자격이 필요한 경우 이 리스트에 추가합니다.
Code sign an application
코드 서명 프로세스는 커맨드 라인을 사용합니다. 시작하려면 터미널을 열고 애플리케이션이 있는 디렉토리로 이동합니다. 코드 서명을 처리하는 데 필수 읽기 권한이 있는지 확인하려면 "application_name.app"가 애플리케이션의 이름으로 있는 다음의 커맨드를 실행합니다.
chmod -R a+xr "application_name.app"
A code signature uses a particular signing identity. Usually, this is your Developer ID Application signing identity. However, some digital distribution services, such as the Mac App Store require a different signing identity.
애플리케이션을 코드 서명하려면 다음의 위치에 있는 커맨드를 실행합니다.
-
"application_name.app"은 빌드된 애플리케이션입니다. - `“application_name.entitlements”는 자격 파일의 이름입니다.
-
"Developer ID Application : XXX (YYY)"는 서명 ID입니다.
codesign --deep --force --verify --verbose --timestamp --options runtime --entitlements "application_name.entitlements" --sign "Developer ID Application : XXX (YYY)" "application_name.app"
이 커맨드는 애플리케이션 번들 폴더를 통해 재귀적으로 이동하며 모든 파일을 서명하고 안전한 타임스탬프를 추가하며 해당 서명에 설정한 자격을 포함합니다.
Warning: Using the --deep option might cause issues with your code signature. This is because:
서명한 모든 코드에 동일한 코드 서명 옵션과 자격을 적용합니다.
발견한 코드 파일만 서명합니다. 시스템이 데이터를 찾으리라 예상되는 위치에 코드 파일이 있는 경우
--deep을 사용하면 이러한 코드 파일을 서명하지 않습니다.
For more information about the --deep option and how to resolve issues with it, refer to Sign your code.
Upload an application for notarization
After you code sign your application, you must upload it to Apple for notarization. To fulfill the upload requirements, the following items are necessary:
Compress the application
Apple에서는 공증하기 위해 애플리케이션을 업로드하기 전에 압축해야 합니다. 압축하려면 다음을 수행하십시오.
터미널을 열고 애플리케이션이 있는 디렉토리로 이동합니다.
- 다음의 위치에 있는 커맨드를 실행합니다.
-
"application_name.app"은 빌드된 애플리케이션입니다. -
"application_name.zip"은 생성할 압축 파일 이름입니다.
-
ditto -c -k --sequesterRsrc --keepParent "application_name.app" "application_name.zip"
이는 애플리케이션을 압축하고 압축한 파일을 애플리케이션과 동일한 디렉토리로 출력합니다.
Generate an application password
애플리케이션을 공증하려면 Apple에는 특정 포맷으로 된 고유한 비밀번호가 필요합니다. 애플리케이션 비밀번호를 생성하려면 Apple ID가 있어야 합니다. Apple ID가 없는 경우 Apple Id 관리로 이동하여 ID를 만듭니다.
For information on how to generate an application password, refer to How to generate an app-specific password. The password you generate uses the following format: xxxx-xxxx-xxxx-xxxx.
Retrieve your provider short name
공급자 약칭은 개인이나 회사를 식별하는 단일 단어 레이블입니다. Apple은 Apple ID가 둘 이상의 조직과 연관될 때 공증할 조직을 결정하는 데 공급자 약칭을 사용합니다. 공급자 약칭을 가져오려면 다음을 수행하십시오.
- 터미널을 엽니다.
- 다음 위치에 있는 Xcode 커맨드를 실행합니다.
-
apple_id는 Apple ID입니다. -
xxxx-xxxx-xxxx-xxxx는 애플리케이션 비밀번호입니다.
-
xcrun iTMSTransporter -m provider -u apple_id -p xxxx-xxxx-xxxx-xxxx
Start the upload process
Apple에서 애플리케이션을 공증할 경우 공증 서버에 업로드해야 합니다. 업로드하려면 다음을 수행하십시오.
- 터미널을 열고 압축 애플리케이션이 있는 디렉토리로 이동합니다.
- 다음의 위치에 있는 커맨드를 실행합니다.
-
apple_id는 Apple ID입니다. -
xxxx-xxxx-xxxx-xxxx는 애플리케이션 비밀번호입니다. -
provider_short_name은 공급자 약칭입니다. -
application_bundle_id는 애플리케이션의 애플리케이션 식별자입니다. -
application_name.zip은 압축 애플리케이션입니다.
-
xcrun altool --notarize-app --username apple_id --password xxxx-xxxx-xxxx-xxxx --asc-provider provider_short_name --primary-bundle-id application_bundle_id --file application_name.zip
업로드를 성공한 경우 Apple은 요청 ID가 포함된 터미널에 리스폰스를 표시합니다. 이 요청 ID를 사용하여 요청 상태를 확인할 수 있습니다. 이는 서비스의 트래픽에 따라 공증 프로세스에 몇 시간씩 걸릴 수도 있기 때문에 유용합니다. 요청 상태를 확인하려면 다음을 수행하십시오.
- 터미널을 열고 압축 애플리케이션이 있는 디렉토리로 이동합니다.
- 다음의 위치에 있는 커맨드를 실행합니다.
-
request_id는 Apple이 이전 커맨드에서 반환한 요청 ID입니다. -
apple_id는 Apple ID입니다. -
xxxx-xxxx-xxxx-xxxx는 애플리케이션 비밀번호입니다. -
provider_short_name은 공급자 약칭입니다.
-
xcrun altool --notarization-info request_id --username apple_id --password xxxx-xxxx-xxxx-xxxx --asc-provider provider_short_name
공증 프로세스가 완료되면 Apple은 Apple ID와 연결된 이메일 주소로 확인 메일을 보냅니다. 그러면 공증이 성공했는지 확인할 수 있습니다. 확인하려면 다음을 수행하십시오.
- 터미널을 열고 애플리케이션이 있는 디렉토리로 이동합니다.
- 다음의 위치에 있는 커맨드를 실행합니다.
-
application_name.app는 애플리케이션 이름입니다.
-
spctl -a -v application_name.app
공증을 성공한 경우 Apple이 애플리케이션을 수락하였으며 개발자 ID를 포함하고 있다는 점을 표시하는 메시지가 반환됩니다.
Staple the application
After notarizing your application, any device that runs it can verify that it has a code signature and contains no malicious content. However, the device can only perform this verification online. To verify your application on a device without an internet connection, you must staple the application. For information about stapling, refer to Staple the Ticket to Your Distribution.
To staple your application,
- 터미널을 열고 애플리케이션이 있는 디렉토리로 이동합니다.
- Run the following command where
"ApplicationName.app"is the name of your application:xcrun stapler staple "ApplicationName.app".
Unity 클라우드 빌드를 사용한 공증
Unity Cloud Build can notarize and staple your macOS application during the build process. To do this, Unity requires the following:
- Apple ID.
- 애플리케이션별 비밀번호
- Apple 개발자 프로그램 멤버십.
- 자격 파일
- PKCS #12 Personal Information Exchange (.p12) 파일 포맷으로 익스포트한 개발자 ID 인증서
-
.p12파일을 생성하는 데 사용한 비밀번호 - 공급자 약칭.
Depending on the platform you are developing on, the process for some of these requirements differs. If you develop on an Apple device, you can use Xcode command-line tools to get the information and create the relevant files. If you develop on Windows or Linux, you won’t have access to Apple-specific Xcode command-line tools.
사용 중인 플랫폼에 상관 없이 Apple ID, 비밀번호, 자격 파일을 가져오는 프로세스는 다음과 같이 플랫폼 애그노스틱입니다.
- Apple ID가 없는 경우 Apple ID 관리로 이동하여 ID를 만듭니다.
- Create an application password. For information on how to do this, refer to Generating an application Password.
- Apple 개발자 멤버십이 없는 경우 Apple 개발자에서 가입합니다.
- Create an entitlements file for your application. For information on how to do this, refer to Entitlements.
이 단계를 완료한 후 다음을 수행합니다.
- macOS에서 개발 중인 경우 Apple 기기용 Unity 클라우드 빌드 공증을 참조하십시오.
- Windows 또는 Linux에서 개발 중인 경우 Windows 및 Linux 기기용 Unity 클라우드 빌드 공증을 참조하십시오.
Apple 기기용 Unity 클라우드 빌드 공증
Apple 기기에서 개발하는 경우 Xcode 커맨드 라인 툴을 사용하여 Unity 클라우드 빌드를 사용한 공증에 나열된 요구 사항을 충족할 수 있습니다. 그런 다음 Unity 클라우드 빌드를 설정하여 빌드 프로세스의 일환으로 애플리케이션을 공증하고 스테이플할 수 있습니다. 요구 사항을 충족하려면 다음을 단계를 수행하십시오
- Unity 클라우드 빌드를 사용한 공증의 플랫폼 애그노스틱 단계를 따릅니다.
- Create a Developer ID certificate and add it to your Keychain. For information on how to do this, refer to Signing identity.
- Export the Developer ID certificate from the Keychain as a file in Personal Information Exchange (
.p12) format. For information on how to do this, refer to Import and export keychain items using Keychain Access on Mac. - Get your provider short name. For information on how to do this, refer to Getting your provider short name.
요구 사항을 충족하고 나면 Unity 클라우드 빌드 공증 양식을 채워 제출합니다.
Windows 및 Linux 기기용 Unity 클라우드 빌드 공증
If you develop on Windows or Linux and want to build, notarize, and staple your application for macOS, you can’t use Xcode command-line tools. To meet the requirements listed in Notarization using Unity Cloud Build to set up Unity Cloud Build to notarize and staple your application as part of the build process:
- Unity 클라우드 빌드를 사용한 공증의 플랫폼 애그노스틱 단계를 따릅니다.
- Create a Developer ID certificate and download it. For information on how to do this, refer to Signing identity. Note: The last step in Signing identity is only relevant for macOS users.
- Convert the Developer ID certificate to the PKCS #12 Personal Information Exchange (.p12) file format. For information on how to do this, refer to Converting a Developer ID certificate to a .p12 file on Windows and Linux.
- Apple 개발자 계정을 통해 공급자 약칭을 가져옵니다. 공급자 약칭을 가져오려면 Membership Details로 이동하여 Team ID를 찾습니다. Team ID를 공급자 약칭으로 사용할 수 있습니다.
요구 사항을 충족하고 나면 Unity 클라우드 빌드 공증 양식을 채워 제출합니다.
Convert a Developer ID certificate to a .p12 file on Windows and Linux
.p12 파일은 개발자 ID 인증서와 프라이빗 키를 번들로 묶습니다. 개발자 ID 인증서에서 만드는 방법은 다음과 같습니다.
Open a command-line interface and go to the directory that contains your Developer ID certificate file. If you didn’t download your Developer ID certificate, refer to Signing identity.
- 개발자 ID 인증서는
.cer파일 포맷을 사용합니다. 이 파일을.pem파일 포맷으로 전환합니다. 전환하려면 다음의 위치에 있는 커맨드를 실행합니다.-
developer_identity.cer은 전환할 개발자 ID 인증서입니다. -
developer_identity.pem은 출력할 파일 이름이자 파일 타입입니다.
openssl x509 -in developer_identity.cer -inform DER -out developer_identity.pem -outform PEM -
- 새로운 프라이빗 키를 생성합니다. 프라이빗 키를 생성하려면 다음 위치에 있는 커맨드를 실행합니다.
-
mykey.keyis the file name of the private key to output.
openssl genrsa -out mykey.key 2048 -
-
.p12파일을 생성합니다. 이 파일을 생성하려면 다음의 위치에 있는 커맨드를 실행합니다.-
mykey.key는 3단계에서 생성한 프라이빗 키 파일입니다. -
developer_identity.pem은 2단계에서 생성한.pem파일입니다.
openssl pkcs12 -export -inkey mykey.key -in developer_identity.pem -out iphone_dev.p12 -
Submit the Unity Cloud Build notarization form
Unity 클라우드 빌드를 사용한 공증에서 설명한 요구 사항을 충족하고 나면 다음의 단계를 따라 Unity 클라우드 빌드 공증을 설정합니다.
- Set up your project to use Unity Cloud Build. For information on how to do this, refer to Unity Cloud Build.
- 클라우드 빌드에 새로운 Mac Desktop 빌드 타겟을 생성합니다.
-
Config 페이지로 돌아갑니다. 이제 이 페이지에는 Notarization 섹션이 포함되어 있습니다. 이 섹션을 열어 EDIT NOTARIZATION을 클릭합니다.
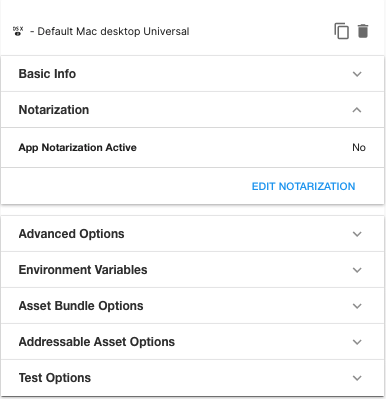
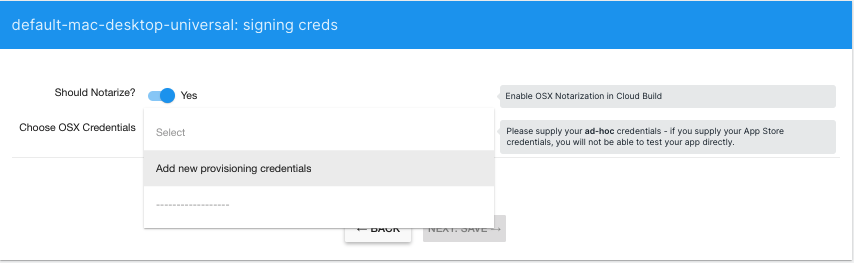
- Enable the Notarization flag. If you have previously supplied a set of notarization credentials to Unity Cloud Build for the same Organization, you can select those from Credentials. Otherwise, select Add new provisioning credentials.
- 다음 사항을 제공합니다.
- Name: 자격 증명 세트에 대한 이름입니다. 이러한 자격 증명은 동일한 조직에서 설정한 모든 추가 프로젝트에 사용할 수 있습니다.
-
p12 File: 플랫폼에 따라 Apple 기기용 Unity 클라우드 빌드 공증 또는 Windows 및 Linux 기기용 Unity 클라우드 빌드 공증에서 생성한
.p12파일입니다. - Entitlements File (optional): The entitlements file you created in Notarization using Unity Cloud Build. If you do not provide an entitlements file, Unity Cloud Build uses the minimum entitlements a macOS application requires to have a Hardened Runtime. For information on what these minimum entitlements are, refer to Entitlements.
-
p12 Password:
.p12파일을 생성할 때 제공한 비밀번호입니다. - Provider Short Name (선택 사항): 플랫폼에 따라 Apple 기기용 Unity 클라우드 빌드 공증 또는 Windows 및 Linux 기기용 Unity 클라우드 빌드 공증에서 취득한 공급자 약칭입니다. Apple ID가 둘 이상의 조직과 연관되어 있고 이를 제공하지 않는 경우 공증은 실패합니다.
- Apple ID Username: Apple ID 사용자 이름입니다.
- Apple ID Password: Unity 클라우드 빌드를 사용한 공증에서 생성한 애플리케이션 비밀번호입니다. Unity 클라우드 빌드는 빌드를 공증할 때까지 Apple 자격 증명을 확인하지 않으므로 사용자 이름과 비밀번호를 정확히 입력했는지 확인해야 합니다.
-
Confirm your Apple ID Password: Apple ID Password를 한 번 더 입력합니다.
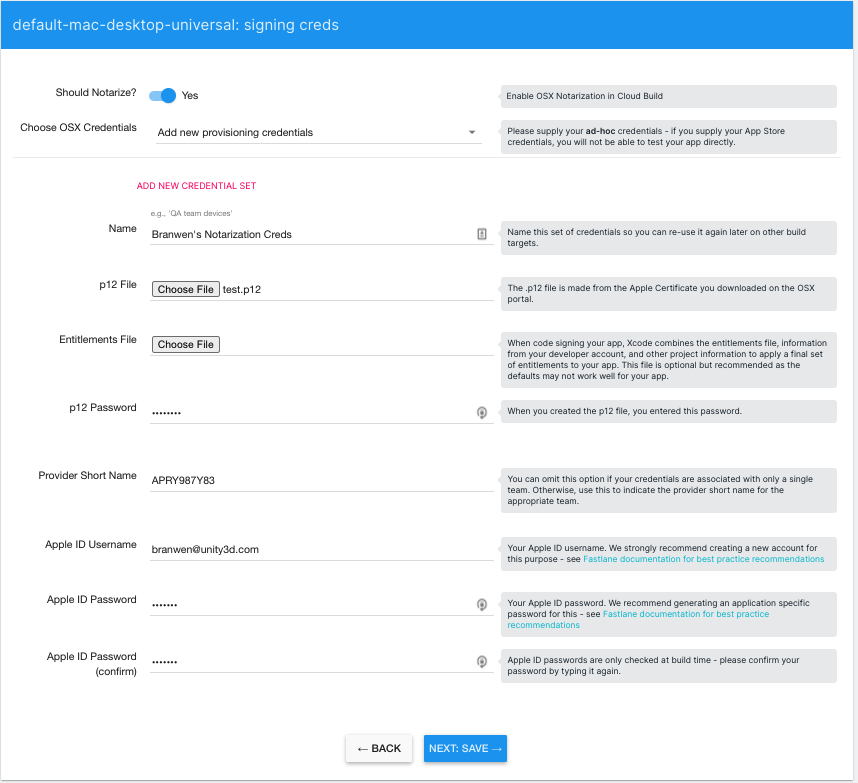
- 자격 증명을 저장합니다.
- Build History 페이지로 돌아가서 Mac 타겟에 대해 빌드를 시작합니다.
- 빌드를 성공하면 Unity 클라우드 빌드는 해당 결과를 공증하고 스테이플합니다.
- 클라우드 빌드는
--deep --force --verify --verbose --timestamp --options runtime플래그를 사용하여codesign커맨드를 실행합니다. 현재는 커스텀 플래그를 지정할 수 없습니다. - Additional log outputs from notarization are available using the environment variable
FASTLANE_NOTARIZE_VERBOSE=truein your build target Environment Variables.
- 클라우드 빌드는
- Unity 클라우드 빌드가 프로젝트를 빌드, 공증, 스테이플하고 나면 빌드가 포함된 압축 파일을 다운로드할 수 있습니다.
Copyright © 2023 Unity Technologies
优美缔软件(上海)有限公司 版权所有
"Unity"、Unity 徽标及其他 Unity 商标是 Unity Technologies 或其附属机构在美国及其他地区的商标或注册商标。其他名称或品牌是其各自所有者的商标。
公安部备案号:
31010902002961