Create a lens flare
Create a flare and apply it to a lens flare component, then configure it to be visible by cameras.
Note: This workflow is compatible only with the Built-in Render PipelineA series of operations that take the contents of a Scene, and displays them on a screen. Unity lets you choose from pre-built render pipelines, or write your own. More info
See in Glossary. For similar functionality in other render pipelines, see Lens flares and halos.
Apply a Flare asset
- Assign the Flare asset to a Light component or a Lens flare component.
- If you assign it to the Flare property of a Light component, Unity automatically tracks the position and direction of the Light and uses those values to configure the appearance of the lens flare.
- If you assign it to the Flare property of a Lens flare component, you can use the Lens Flare component to configure additional values for more precise control.
- If you want a CameraA component which creates an image of a particular viewpoint in your scene. The output is either drawn to the screen or captured as a texture. More info
See in Glossary to see lens flares, attach a Flare Layer component to the Camera’s GameObject. - To see the lens flare effect in the Scene ViewAn interactive view into the world you are creating. You use the Scene View to select and position scenery, characters, cameras, lights, and all other types of Game Object. More info
See in Glossary, enable the Effect toggle in the SceneA Scene contains the environments and menus of your game. Think of each unique Scene file as a unique level. In each Scene, you place your environments, obstacles, and decorations, essentially designing and building your game in pieces. More info
See in Glossary View toolbarA row of buttons and basic controls at the top of the Unity Editor that allows you to interact with the Editor in various ways (e.g. scaling, translation). More info
See in Glossary and, in the drop-down, enable Flares.
Examples
There are some sample Flare assets in Unity’s Standard Assets.
Note: This workflow is compatible only with the Built-in Render Pipeline. For similar functionality in other render pipelines, see Lens flares and halos.
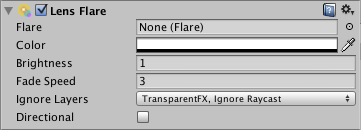
Create a lens flare with the Lens Flare component
- Create a new GameObjectThe fundamental object in Unity scenes, which can represent characters, props, scenery, cameras, waypoints, and more. A GameObject’s functionality is defined by the Components attached to it. More info
See in Glossary (menu bar: GameObject > Create Empty). - In the Inspector, click Add Component > Effects > Lens Flare.
- Assign a Flare Asset to the Flare property.
- If you want a Camera to see lens flares, attach a Flare Layer component to the Camera’s GameObject.
- To see the lens flare effect in the Scene View, enable the Effect toggle in the Scene View toolbar and, in the drop-down, enable Flares.

Make a lens flare visible to a camera
In the Built-in Render Pipeline, if you want a Camera to see lens flaresA component that simulates the effect of lights refracting inside a camera lens. Use a Lens Flare to represent very bright lights or add atmosphere to your scene. More info
See in Glossary, you must attach a Flare Layer component to the Camera’s GameObject.
Copyright © 2023 Unity Technologies
优美缔软件(上海)有限公司 版权所有
"Unity"、Unity 徽标及其他 Unity 商标是 Unity Technologies 或其附属机构在美国及其他地区的商标或注册商标。其他名称或品牌是其各自所有者的商标。
公安部备案号:
31010902002961