UI Toolkit について
UI Toolkit で初めての UI を作る場合は、この基本 UI Toolkit ワークフロー例を参考にしてください。
ノート: デモンストレーションの目的で、このページではエディター UI の UI コントロールを追加する方法を説明します。ただし、UI ドキュメントに UI コントロールを追加する手順は、ランタイム UI にも適用されます。詳しくは、ランタイム UI について を参照してください。
特定の作業を頻繁に行う場合、UI Toolkit を使ってその作業専用の UI を作成することができます。例えば、カスタムのエディターウィンドウを作成できます。 この例では、カスタムエディターウィンドウを作成し、UI ビルダー、UXML、C# スクリプトを使用してカスタムエディターウィンドウに UI コントロールを追加する方法を示します。
この例で作成するすべてのファイルは、GitHub リポジトリ にあります。
カスタムエディターウィンドウの作成
- Unity エディターで任意のテンプレートを使ってプロジェクトを作成します。
- Project ウィンドウで右クリックし、
Assetsフォルダー内で右クリックし、Create > UI Toolkit > Editor Window を選択します。 -
UI Toolkit Editor Window Creator に
MyCustomEditorと入力します。 - USS チェックボックスを解除します。
- Continue をクリックします。
これにより、2 つのラベルを持つカスタムのエディターウィンドウが作成されます。エディターウィンドウはメニューから開くことができます (Window > UI Toolkit > MyCustomEditor)。ソースファイルは Assets/Editor フォルダーにあります。
UI コントロールをウィンドウに加える
以下の方法で UI コントロールをウィンドウに加えることができます。
- UI Builder を使用して UI コントロールを視覚的に加える
- XML に似たテキストファイル (UXML) を使って UI コントロールを追加える
- C# スクリプトを使用して UI コントロールを加える
これらの方法は、個別でも、組み合わでも使用することもできます。以下の例では、これらのメソッドを組み合わせて、3 組のラベル、ボタン、トグルを作成します。
UI Builder を使用して UI コントロールを加える
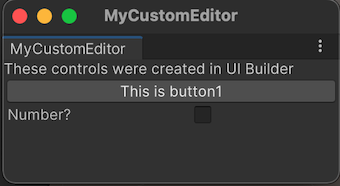
UI コントロールをウィンドウに視覚的に加えるには、UI Builder を使用します。以下のステップは、デフォルトのラベルに加えて、ボタンとトグルをカスタムエディターウィンドウに加えます。
-
Editorフォルダーで、MyCustomEditor.uxmlをダブルクリックして、UI Builder を開きます。 - UI Builder で、Button と Toggle を Library > Controls から Hierarchy または **Viewport のウィンドウプレビューにドラッグしてください。
- Hierarchy ウィンドウで、Label を選択します。
- Inspector ウィンドウの Text フィールドで、デフォルトのテキストを
These controls were created in UI Builderに変更します。 - Hierarchy ウィンドウで、Button を選択します。
- Inspector ウィンドウで、Text フィールドに
This is button1と入力します。 -
Name フィールドに
button1と入力します。 - Hierarchy ウィンドウで、Toggle を選択します。
- Inspector ウィンドウの Label フィールドに
Number?を入力します。 -
Name フィールドに
toggle1と入力します。 - 保存 して、UI Builder ウィンドウを閉じます。
- カスタムエディターウィンドウを閉じていない場合は閉じてください。
- Window > UI Toolkit > MyCustomEditor を選択し、カスタムエディターウィンドウを再度開いて、追加したボタンとトグルを確認します。
UXML を使用して UI コントロールを加える
テキストファイルで UI を定義したい場合は、UXML を編集して UI コントロールを追加できます。以下のステップでは、もう一揃いのラベル、ボタン、トグルをウィンドウに追加します。
Editorフォルダーで、Assets > Create > UI Toolkit > UI Document をクリックして、MyCustomEditor_UXML.uxmlという UXML ファイルを作成します。Project ウィンドウの
MyCustomEditor_UXML.uxmlの矢印をクリックします。inlineStyleをダブルクリックして、テキストエディターでMyCustomEditor_UXML.uxmlを開きます。-
MyCustomEditor_UXML.uxmlのコンテンツを以下のように置き換えます。<?xml version="1.0" encoding="utf-8"?> <engine:UXML xmlns:xsi="http://www.w3.org/2001/XMLSchema-instance" xmlns:engine="UnityEngine.UIElements" xmlns:editor="UnityEditor.UIElements" xsi:noNamespaceSchemaLocation="../../UIElementsSchema/UIElements.xsd" > <engine:Label text="These controls were created with UXML." /> <engine:Button text="This is button2" name="button2"/> <engine:Toggle label="Number?" name="toggle2"/> </engine:UXML> MyCustomEditor.csを開きます。-
MyCustomEditorクラスにm_UXMLTreeという名の private のVisualTreeAssetフィールドを追加します。その上に[SerializeField]という属性を付けます。[SerializeField] private VisualTreeAsset m_UXMLTree; -
CreateGUI()の末尾に以下のコードを追加します。root.Add(m_UXMLTree.Instantiate()); Project ウィンドウで
MyCustomEditor.csを選択します。MyCustomEditor_UXML.uxmlを Project ウィンドウから Inspector の UXML Tree フィールドにドラッグします。これで、UXML がビジュアルツリーに割り当てられます。Window > UI Toolkit > MyCustomEditor を選択します。これにより、3 つのラベル、2 つのボタン、2 つのトグルを持つカスタムエディターウィンドウが開きます。

C# スクリプトを使用して UI コントロールを加える
コーディングを使いたい場合は、C# スクリプトでウィンドウに UI コントロールを加えられます。このステップでは、もう一揃いのラベル、ボタン、トグルをウィンドウに追加します。
MyCustomEditor.csを開きます。-
Unity では、ラベル、ボタン、トグルなどの基本的な UI コントロールに
UnityEngine.UIElementsを使用します。UI コントロールを使用するには、(まだ存在しない場合は) 以下の宣言を加える必要があります。using UnityEngine.UIElements; 既存のラベルのテキストを
"Hello World!From C#"から"These controls were created using C# code."に変えます。-
EditorWindow クラスには
rootVisualElementと呼ばれるプロパティがあります。UI コントロールをウィンドウに追加するには、まず、いくつかの属性を持つ要素クラスをインスタンス化し、rootVisualElementのAddメソッドを使用します。完成した
CreateGUI()メソッドは、以下のようになります。public void CreateGUI() { // Each editor window contains a root VisualElement object VisualElement root = rootVisualElement; // VisualElements objects can contain other VisualElements following a tree hierarchy. Label label = new Label("These controls were created using C# code."); root.Add(label); Button button = new Button(); button.name = "button3"; button.text = "This is button3."; root.Add(button); Toggle toggle = new Toggle(); toggle.name = "toggle3"; toggle.label = "Number?"; root.Add(toggle); // Import UXML var visualTree = AssetDatabase.LoadAssetAtPath<VisualTreeAsset>("Assets/Editor/MyCustomEditor.uxml"); VisualElement labelFromUXML = visualTree.Instantiate(); root.Add(labelFromUXML); } カスタムエディターウィンドウを閉じていない場合は閉じてください。
Window > UI Toolkit > MyCustomEditor を選択し、カスタムエディターウィンドウを再度開いて、追加した 3 つのラベル、3 つのボタン、3 つのトグルを確認します。

UI コントロールの動作を定義する
UI コントロールにイベントハンドラーを設定すると、ボタンをクリックしたときや、トグルを選択/クリアしたときに、UI コントロールが何らかのタスクを実行します。
この例では、以下のようなイベントハンドラーを設定します。
- ボタンをクリックすると、エディターコンソールにメッセージが表示されます。
- トグルを選択すると、ボタンが何回クリックされたかがコンソールに表示されます。
完成した MyCustomEditor.cs ファイルは、以下のようになります。
using UnityEditor;
using UnityEngine;
using UnityEngine.UIElements;
public class MyCustomEditor : EditorWindow
{
[MenuItem("Window/UI Toolkit/MyCustomEditor")]
public static void ShowExample()
{
MyCustomEditor wnd = GetWindow<MyCustomEditor>();
wnd.titleContent = new GUIContent("MyCustomEditor");
}
[SerializeField]
private VisualTreeAsset m_UXMLTree;
private int m_ClickCount = 0;
private const string m_ButtonPrefix = "button";
public void CreateGUI()
{
// Each editor window contains a root VisualElement object
VisualElement root = rootVisualElement;
// VisualElements objects can contain other VisualElement following a tree hierarchy.
Label label = new Label("These controls were created using C# code.");
root.Add(label);
Button button = new Button();
button.name = "button3";
button.text = "This is button3.";
root.Add(button);
Toggle toggle = new Toggle();
toggle.name = "toggle3";
toggle.label = "Number?";
root.Add(toggle);
// Import UXML
var visualTree = AssetDatabase.LoadAssetAtPath<VisualTreeAsset>("Assets/Editor/MyCustomEditor.uxml");
VisualElement labelFromUXML = visualTree.Instantiate();
root.Add(labelFromUXML);
root.Add(m_UXMLTree.Instantiate());
//Call the event handler
SetupButtonHandler();
}
//Functions as the event handlers for your button click and number counts
private void SetupButtonHandler()
{
VisualElement root = rootVisualElement;
var buttons = root.Query<Button>();
buttons.ForEach(RegisterHandler);
}
private void RegisterHandler(Button button)
{
button.RegisterCallback<ClickEvent>(PrintClickMessage);
}
private void PrintClickMessage(ClickEvent evt)
{
VisualElement root = rootVisualElement;
++m_ClickCount;
//Because of the names we gave the buttons and toggles, we can use the
//button name to find the toggle name.
Button button = evt.currentTarget as Button;
string buttonNumber = button.name.Substring(m_ButtonPrefix.Length);
string toggleName = "toggle" + buttonNumber;
Toggle toggle = root.Q<Toggle>(toggleName);
Debug.Log("Button was clicked!" +
(toggle.value ? " Count: " + m_ClickCount : ""));
}
}
- 例を試すには、Window > UI Toolkit > MyCustomEditor を選択します。
その他の参考資料
Copyright © 2023 Unity Technologies
优美缔软件(上海)有限公司 版权所有
"Unity"、Unity 徽标及其他 Unity 商标是 Unity Technologies 或其附属机构在美国及其他地区的商标或注册商标。其他名称或品牌是其各自所有者的商标。
公安部备案号:
31010902002961